Uploading images is a common requirement in PHP applications such as profile systems, product catalogs, and content management tools.
Sometimes we store images in a folder.
Sometimes we store them directly in the database.
In this tutorial, we store the image in a MySQL table as BLOB data and display it from the database.
The example shows:
- how to upload an image using a PHP form
- how to store the image in MySQL
- how to display the stored image
The code uses plain PHP and MySQLi. It is simple and easy to follow.
Quick Answer
You can upload an image to a MySQL database in PHP by reading the uploaded file and storing its binary data in a BLOB column.
To upload an image to MySQL using PHP:
- Create a table with a BLOB column.
- Upload the image using an HTML form.
- Validate the uploaded file in PHP.
- Store the image binary data using MySQLi prepared statements.
- Read the stored BLOB data and display it using a data URI.
This tutorial shows a simple working example using PHP and MySQLi.
Requirements
This example uses:
- PHP 8 or later
- MySQL or MariaDB
- MySQLi extension enabled
Example Output
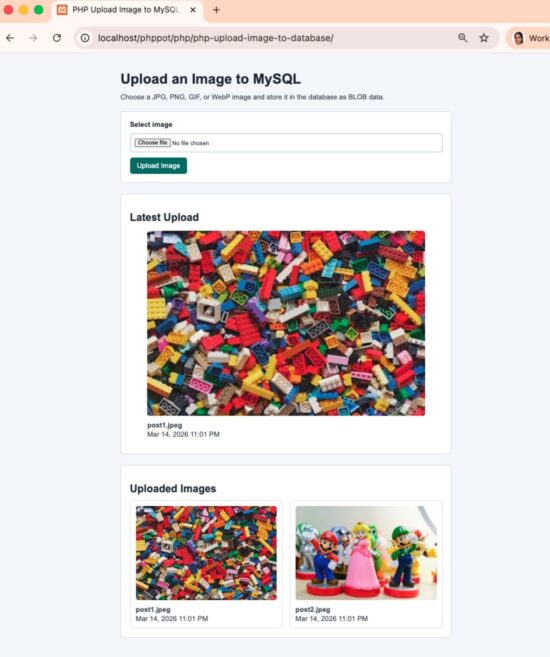
Upload image form and the stored image displayed from MySQL database
The page shows a simple image upload form. After uploading, the stored image is displayed from the MySQL database.
Project Structure
The example project is kept simple and modular.
project/
│
├─ index.php # Upload form, upload handling, image display
├─ db.php # MySQL database connection
├─ functions.php # Validation and helper functions
├─ schema.sql # Database table
└─ style.css # Minimal styling
index.php contains the main logic and UI.
MySQL Table for Image Storage
Upload the following SQL. This creates a table to store the image data. The image will be stored as BLOB data.
We store:
- file name
- MIME type
- image binary data
- upload time
schema.sql
CREATE DATABASE IF NOT EXISTS phppot_image_upload;
USE phppot_image_upload;

CREATE TABLE IF NOT EXISTS images (
    id INT UNSIGNED AUTO_INCREMENT PRIMARY KEY,
    image_name VARCHAR(255) NOT NULL,
    image_type VARCHAR(100) NOT NULL,
    image_data MEDIUMBLOB NOT NULL,
    uploaded_at TIMESTAMP DEFAULT CURRENT_TIMESTAMP
);
This example stores the image directly in MySQL using BLOB data. Some applications store images in folders instead and save only the file path in the database.
MEDIUMBLOB can store images up to 16MB, which is enough for this example.
Database Connection
Create a database connection file. This example uses the MySQLi extension for database queries.
db.php
<?php

declare(strict_types=1);

mysqli_report(MYSQLI_REPORT_ERROR | MYSQLI_REPORT_STRICT);

$dbHost = 'localhost';
$dbUser = 'root';
$dbPassword = '';
$dbName = 'phppot_image_upload';

try {
    $mysqli = new mysqli($dbHost, $dbUser, $dbPassword, $dbName);
    $mysqli->set_charset('utf8mb4');
} catch (mysqli_sql_exception $exception) {
    http_response_code(500);
    echo '<p>Database connection is not available. Check your settings in <code>db.php</code>.</p>';
    echo "\n<!-- " . htmlspecialchars($exception->getMessage(), ENT_QUOTES, 'UTF-8') . " -->\n";
    exit;
}
This connection file will be included where needed.
Image Upload Form
Create a simple form to upload the image.
index.php (form HTML)
<form method="post" enctype="multipart/form-data" class="upload-form">
   <label for="image">Select image</label>
   <input type="file" name="image" id="image" accept=".jpg,.jpeg,.png,.gif,.webp,image/jpeg,image/png,image/gif,image/webp">
   <button type="submit">Upload Image</button>
</form>
The form uses multipart/form-data to send the file to PHP.
Upload Image to MySQL Database Using PHP
Now we show the important part of index.php.
index.php (form submit action)
if ($_SERVER['REQUEST_METHOD'] === 'POST') {
    [$messageType, $message, $latestImage] = handleImageUpload($mysqli, $_FILES['image'] ?? null);
}
When the form is submitted, the image is validated and saved to MySQL.
The upload logic is handled inside functions.php.
This keeps index.php clean.
The function validates the file and stores it in MySQL.
functions.php
function handleImageUpload(mysqli $mysqli, ?array $file): array
{
    if ($file === null) {
        return ['error', 'Please choose an image file.', null];
    }

    if (($file['error'] ?? UPLOAD_ERR_NO_FILE) === UPLOAD_ERR_NO_FILE) {
        return ['error', 'Please choose an image file.', null];
    }

    $uploadError = getUploadErrorMessage((int) $file['error']);
    if ($uploadError !== null) {
        return ['error', $uploadError, null];
    }

    if (($file['size'] ?? 0) > MAX_IMAGE_SIZE) {
        return ['error', 'Image size must be 5 MB or less.', null];
    }

    $tmpName = $file['tmp_name'] ?? '';
    if ($tmpName === '' || !is_uploaded_file($tmpName)) {
        return ['error', 'The uploaded file is not valid.', null];
    }

    $imageInfo = @getimagesize($tmpName);
    if ($imageInfo === false || empty($imageInfo['mime'])) {
        return ['error', 'Please upload a valid image file.', null];
    }

    $allowedMimeTypes = [
        'image/jpeg',
        'image/png',
        'image/gif',
        'image/webp',
    ];

    $mimeType = $imageInfo['mime'];
    if (!in_array($mimeType, $allowedMimeTypes, true)) {
        return ['error', 'Only JPG, PNG, GIF, and WebP files are allowed.', null];
    }

    $imageData = file_get_contents($tmpName);
    if ($imageData === false) {
        return ['error', 'Unable to read the uploaded file.', null];
    }

    $imageName = trim((string) ($file['name'] ?? ''));
    if ($imageName === '') {
        $imageName = 'image';
    }

    try {
        $statement = $mysqli->prepare(
            'INSERT INTO images (image_name, image_type, image_data) VALUES (?, ?, ?)'
        );
        $statement->bind_param('sss', $imageName, $mimeType, $imageData);
        $statement->execute();

        $imageId = $statement->insert_id;
        $statement->close();

        $uploadedImage = fetchImageById($mysqli, $imageId);

        return ['success', 'Image uploaded successfully.', $uploadedImage];
    } catch (mysqli_sql_exception $exception) {
        return ['error', 'Image upload failed. Please try again.', null];
    }
}
The image is stored as binary BLOB data.
PHP provides built-in support for file uploads. You can read more in the official PHP documentation.
Display Image from MySQL
The stored images are fetched and displayed.
index.php (gallery)
<?php foreach ($images as $image): ?>
   <article class="gallery-card">
      <img
         src="<?= imageDataUri($image['image_type'], $image['image_data']); ?>"
         alt="<?= escape($image['image_name']); ?>">
      <div class="gallery-meta">
         <strong><?= escape($image['image_name']); ?></strong>
         <span><?= escape(formatUploadedAt($image['uploaded_at'])); ?></span>
      </div>
   </article>
<?php endforeach; ?>
The image is rendered using a data URI created from the stored BLOB data.
Security Notes
Always validate uploaded files on the server.
Important checks used in this example:
- Verify the file is an image using
getimagesize() - Allow only specific MIME types
- Limit the file size
- Use prepared statements for database queries
- Escape output before displaying file names
Do not rely only on the HTML accept attribute. Server-side validation is required.
In real applications, images are often resized before saving or displaying.
Common Errors and Fixes
Image not uploading
Check the PHP upload limits in php.ini.
upload_max_filesize
post_max_size
If the image is larger than the allowed limit, the upload will fail.
Image not displaying
Make sure the image MIME type is stored correctly in the database.
The image is displayed using a data URI created from the stored BLOB data.
Upload failed message
This can happen if the database connection fails or the query execution fails. Check the database credentials in db.php
Store Image in Database vs Folder in PHP
In PHP applications, images can be stored either directly in the database as BLOB data or as files in a server folder.
Images can be stored in two ways.
Store in database (BLOB)
The image binary data is saved in a MySQL table. This approach keeps the file and its metadata together in the database.
Store in folder
The image file is saved on the server. Only the file path is stored in the database.
For small applications, storing images as BLOB works well. Large applications usually store images in folders or object storage and save only the file path in the database.
If you prefer saving images to a folder, see this guide on PHP file upload.
Developer FAQ
Is storing images in MySQL recommended?
For small applications it works fine. Large applications usually store images in a folder and save only the file path in the database.
What BLOB type should I use for images?
MEDIUMBLOB is enough for most images. It supports files up to 16MB.
Can I upload multiple images with this example?
Yes. Each upload creates a new row in the database table.
Why store the image MIME type?
The MIME type is used when rendering the image using a data URI. This ensures the browser displays the image correctly.
Why is my uploaded image showing as broken?
This usually happens when the MIME type is incorrect or the image data is not encoded properly. Make sure the stored MIME type is used when creating the data URI.
Download Source Code
Download the complete example project below.
The project includes:
- Image upload form
- Image validation
- MySQL storage using BLOB
- Image gallery display
Download the source code and run it locally to test the example.
The project structure is simple, so you can easily integrate it into your own PHP application.


Thanks for the knowledge
Welcome!
having difficult in displaying file from my database
Hi Monfung,
I have updated the article and made it simple. You can download the project and it has complete source code. Follow the instructions. If you got stuck, let me know and I will help you out.
how would i make a gallery of all the pictures uploaded to the datbase?
Hi Kevin,
I have published a tutorial to display an image gallery https://phppot.com/php/php-responsive-image-gallery-using-css-media-queries/
You may have to combine these two to get what you need.
Thanks a lor these tips! It’s so helpful!
Welcome Isaac
thank you very much dear, Allah bless you and your family. very very useful
Thank you Amin.
How to display multiple images like a directory with name of the person and other details from database after resizing the image to small rectangle
Regards
You can store the person’s name and image in the database and then fetch all records to display them in a directory-style layout. Loop through the results and render each image with the person’s details.
For resizing, you can create a smaller thumbnail before saving the image or resize it using PHP image functions like imagecopyresampled().
For large directories, it is better to store a small thumbnail and display that instead of the full image.