If you want to upload a file using AJAX and also need to show a progress bar during the upload, you have landed on the right page.
This article has an example code for JavaScript AJAX file upload with a progress bar.
An AJAX-based file upload is a repeatedly needed requirement for a web application.
It is for providing an inline editing feature with the uploaded file content. For example, the following tasks can be achieved using the AJAX file upload method.
- Photo or banner update on the profile page.
- Import CSV or Excel files to load content to the data tables.
HTML upload form
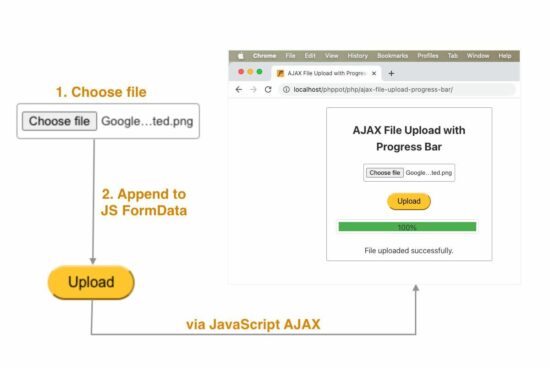
This HTML shows the input to choose a file. This form has a button that maps its click event with an AJAX handler.
In a previous tutorial, we have seen a jQuery example for uploading form data with a chosen file binary.
But in this example, the HTML doesn’t have any form container. Instead, the form data is created by JavaScript before processing the AJAX.
This HTML has a container to show the progress bar. Once the progress is 100% complete, a success message is added to the UI without page refresh.
<div class="phppot-container tile-container text-center">
    <h2>AJAX File Upload with Progress Bar using JavaScript</h2>
    <input type="file" id="fileUpload" />
    <br>
    <br>
    <button onclick="uploadFile()">Upload</button>
    <div class="progress">
        <div class="progress-bar" id="progressBar"></div>
    </div>
    <br>
    <div id="uploadStatus"></div>
</div>
AJAX file upload request with progress bar
This section is the core of this example code. This example’s HTML and PHP files are prevalent, as seen in other file upload examples.
The script below follows the steps to achieve the AJAX file upload.
- It reads the file binary chosen in the file input field.
- It instantiates JavaScript FormData and appends the file binary into it.
- It creates an
XMLHttpRequesthandle. - This handle uses the ‘upload’ property to get
XMLHttpRequestUploadobject. - This
XMLHttpRequestUploadobject tracks the upload progress in percentage. - It creates event listeners to update the progressing percentage and the upload status.
- Then finally, it posts the file to the PHP endpoint like usual AJAX programming.
function uploadFile() {
    var fileInput = document.getElementById('fileUpload');
    var file = fileInput.files[0];

    if (file) {
        var formData = new FormData();
        formData.append('file', file);

        var xhr = new XMLHttpRequest();

        xhr.upload.addEventListener('progress', function (event) {
            if (event.lengthComputable) {
                var percent = Math.round((event.loaded / event.total) * 100);
                var progressBar = document.getElementById('progressBar');
                progressBar.style.width = percent + '%';
                progressBar.innerHTML = percent + '%';
            }
        });

        xhr.addEventListener('load', function (event) {
            var uploadStatus = document.getElementById('uploadStatus');
            uploadStatus.innerHTML = event.target.responseText;
        });

        xhr.open('POST', 'upload.php', true);
        xhr.send(formData);
    }
}
PHP endpoint to move the uploaded file into a directory
This PHP has a standard code to store the uploaded file in a folder using the PHP move_uploaded_file(). The link has the code if you want to store the uploaded file and save the path to the database.
This endpoint creates a unique name for the filename before upload. It is a good programming practice, but the code will work without it, also.
It is for stopping file overwriting in case of uploading different files in the same name.
Note: Create a folder named “uploads” in the project root. Give sufficient write permissions.
<?php

if ($_SERVER['REQUEST_METHOD'] === 'POST' && isset($_FILES['file'])) {
    $file = $_FILES['file'];

    // file will be uploaded to the following folder
    // you should give sufficient file permissions
    $uploadDir = 'uploads/';

    // unique file name generated
    $fileName = uniqid() . '_' . $file['name'];

    // moving the uploaded file from temp location to our target location
    if (move_uploaded_file($file['tmp_name'], $uploadDir . $fileName)) {
        echo 'File uploaded successfully.';
    } else {
        echo 'Failed to upload file.';
    }
}