An image upload field has a remarkable ability to attract 8 MB phone photos, even when the page displays them at 600 pixels wide. Sending those originals to every visitor is a little like delivering a sofa when the customer ordered a cushion.
This example compresses uploaded images with PHP’s GD extension. It accepts JPEG, PNG, and WebP files, resizes oversized images proportionally, preserves transparency, and reports the actual size before and after processing.
No database or framework is required. The compressed file is saved with a random server-generated name inside the upload directory.
Quick answer
PHP can compress an image by loading it into GD and encoding it again with an appropriate output function:
imagejpeg()saves JPEG images with a quality value from 0 to 100.imagewebp()saves WebP images with a quality value from 0 to 100.imagepng()saves PNG images with a lossless compression level from 0 to 9.
For JPEG and WebP, a lower quality value usually produces a smaller file with more visible information loss. PNG’s setting works differently. It controls lossless compression effort, not visual quality.
The example uses a default quality of 82 for JPEG and WebP and compression level 7 for PNG. Images larger than 1920 × 1920 pixels are scaled down before encoding. Smaller images keep their original dimensions.
Compression and resizing are different operations
Image compression changes how pixel data is encoded. Resizing changes the number of pixels. Both can reduce file size, but resizing a large photo often makes the bigger difference.
For example, saving a 6000 × 4000 JPEG at a lower quality still leaves the browser decoding 24 million pixels. Reducing it to 1920 × 1280 before encoding lowers both its dimensions and its storage cost.
The project combines the two operations:
- Validate the uploaded file and detect its real image type.
- Decode it with the matching GD function.
- Correct common JPEG orientation values.
- Resize it only when it exceeds the configured boundary.
- Encode it as JPEG, PNG, or WebP.
- Compare the resulting byte count with the original upload.
Re-encoding does not guarantee a smaller file. An image that was already optimized may stay roughly the same size or even become larger. The demo reports that result honestly instead of announcing a fictional saving because a function returned true.
What the example supports
- JPEG, PNG, and static WebP uploads
- Optional conversion to WebP
- Adjustable JPEG and WebP quality
- Lossless PNG compression
- Aspect-ratio-preserving resize
- PNG and WebP alpha transparency
- JPEG EXIF orientation correction when EXIF is available
- Upload size and source pixel limits
- Before-and-after file-size reporting
Requirements
Use PHP 8.2 or later with the GD extension. GD must include support for every format the application accepts. Fileinfo is required for server-side MIME detection, while EXIF is optional.
If a required image function is unavailable, use phpinfo() to check the active PHP configuration and confirm that GD supports the intended image format.
Check the loaded extensions and GD format support from the command line:
php -m | grep -E "gd|fileinfo|exif"
php -r "print_r(gd_info());"
Look for JPEG, PNG, and WebP support in the gd_info() output. Having GD enabled does not automatically mean that every format was included when PHP was built.
Validate the upload before decoding it
An image compressor works on untrusted binary data, so upload validation belongs before the expensive GD operations. The project checks the PHP upload status, file size, temporary-file origin, MIME type, dimensions, and total pixel count.
Start with the upload error reported by PHP:
<?php
private function validateUpload(array $file): void
{
    if ($file['error'] !== UPLOAD_ERR_OK) {
        $message = match ($file['error']) {
            UPLOAD_ERR_INI_SIZE,
            UPLOAD_ERR_FORM_SIZE => 'The uploaded file is too large.',
            UPLOAD_ERR_NO_FILE => 'Choose an image to upload.',
            UPLOAD_ERR_PARTIAL =>
                'The upload was interrupted. Please try again.',
            default => 'The image upload failed.',
        };

        throw new RuntimeException($message);
    }

    if ($file['size'] < 1 || $file['size'] > self::MAX_FILE_SIZE) {
        throw new RuntimeException(
            'The image must be no larger than 10 MB.'
        );
    }

    if (!is_uploaded_file($file['tmp_name'])) {
        throw new RuntimeException('The upload could not be verified.');
    }
}
is_uploaded_file() confirms that the temporary path came through PHP’s HTTP upload mechanism. It prevents another local file path from being passed to the compressor as if it were an upload.
The 10 MB application limit is separate from upload_max_filesize and post_max_size. PHP may reject the request earlier when either configuration value is lower.
Detect the image type from its contents
Do not choose a decoder from the original filename or $_FILES['type']. Both values come from the client and can be changed before the request reaches the server.
The project uses both getimagesize() and Fileinfo. The first reads image dimensions and format information. The second independently detects the MIME type from the file data.
<?php
$imageInfo = @getimagesize($file['tmp_name']);

if ($imageInfo === false) {
    throw new RuntimeException(
        'The uploaded file is not a readable image.'
    );
}

[$sourceWidth, $sourceHeight] = $imageInfo;
$imageMime = $imageInfo['mime'] ?? '';

$finfo = new finfo(FILEINFO_MIME_TYPE);
$detectedMime = $finfo->file($file['tmp_name']);

if (!is_string($detectedMime) || $detectedMime !== $imageMime) {
    throw new RuntimeException(
        'The image type could not be verified.'
    );
}
The detected type must appear in a small allowlist:
<?php
if (
    !in_array(
        $imageMime,
        ['image/jpeg', 'image/png', 'image/webp'],
        true
    )
) {
    throw new RuntimeException(
        'Only JPEG, PNG, and WebP images are supported.'
    );
}
The application does not accept GIF because GD does not preserve an animated GIF’s frames during this workflow. Quietly replacing an animation with its first frame is technically an output, but rarely the output the user expected.
Limit pixels as well as file size
A compressed file’s byte count does not reveal how much memory it will need after decoding. A highly compressed 30-megapixel JPEG may be only a few megabytes on disk while consuming much more memory inside GD.
The project rejects invalid dimensions and images above 30 million source pixels:
<?php
if ($sourceWidth < 1 || $sourceHeight < 1) {
    throw new RuntimeException(
        'The image dimensions are invalid.'
    );
}

if ($sourceWidth * $sourceHeight > self::MAX_SOURCE_PIXELS) {
    throw new RuntimeException(
        'The image has too many pixels to process safely.'
    );
}
A pixel limit is useful even when the upload limit looks conservative. File size protects bandwidth and storage. Pixel count protects the image-decoding step from unexpectedly large memory use.
Load the image with the matching GD decoder
After validation, select the decoder from the verified MIME type. This avoids trusting an extension such as .jpg when the file contains another format.
<?php
private function createSourceImage(
    string $path,
    string $mime
): GdImage {
    $image = match ($mime) {
        'image/jpeg' => @imagecreatefromjpeg($path),
        'image/png' => @imagecreatefrompng($path),
        'image/webp' => @imagecreatefromwebp($path),
    };

    if (!$image instanceof GdImage) {
        throw new RuntimeException(
            'GD could not decode the image.'
        );
    }

    return $image;
}
In PHP 8, a successful GD decoder returns a GdImage object. A valid-looking header is not enough to guarantee that the remaining image data can be decoded, so the return value still needs to be checked.
Correct JPEG orientation before resizing
Many phones store the camera orientation in EXIF metadata rather than rotating the actual pixels. If the image is re-encoded without applying that value, an upright photo may suddenly appear sideways.
The project handles the common 90-degree, 180-degree, and 270-degree orientation values before it calculates the output dimensions:
<?php
private function applyExifOrientation(
    GdImage $image,
    string $path,
    string $mime
): GdImage {
    if (
        $mime !== 'image/jpeg'
        || !function_exists('exif_read_data')
    ) {
        return $image;
    }

    $exif = @exif_read_data($path);
    $orientation = is_array($exif)
        ? (int) ($exif['Orientation'] ?? 1)
        : 1;

    $angle = match ($orientation) {
        3 => 180,
        6 => -90,
        8 => 90,
        default => 0,
    };

    if ($angle === 0) {
        return $image;
    }

    $rotated = imagerotate($image, $angle, 0);

    if (!$rotated instanceof GdImage) {
        return $image;
    }

    imagedestroy($image);
    return $rotated;
}
The EXIF extension is optional. When it is unavailable, compression continues without orientation correction.
GD creates a new encoded image rather than copying the original file. As a result, the output normally does not retain the original EXIF metadata. This can remove camera and location details, but any orientation that affects the pixels must be applied first.
Resize oversized images proportionally
The compressor fits the image inside a 1920 × 1920 pixel boundary. It uses the smaller width or height ratio, with 1 as the maximum scale so that small images are not enlarged.
<?php
$sourceWidth = imagesx($source);
$sourceHeight = imagesy($source);

$scale = min(
    $maxWidth / $sourceWidth,
    $maxHeight / $sourceHeight,
    1
);

$targetWidth = max(
    1,
    (int) round($sourceWidth * $scale)
);

$targetHeight = max(
    1,
    (int) round($sourceHeight * $scale)
);
A 4000 × 3000 upload becomes 1920 × 1440. A 1200 × 800 upload remains 1200 × 800. Both results keep the original aspect ratio.
The project creates a second GD image only when the dimensions need to change:
<?php
$target = $source;

if (
    $targetWidth !== $sourceWidth
    || $targetHeight !== $sourceHeight
) {
    $target = $this->resizeImage(
        $source,
        $targetWidth,
        $targetHeight,
        $imageMime
    );
}
Preserve PNG and WebP transparency
A new true-color canvas is opaque by default. Without alpha setup, transparent areas can become black after resizing.
<?php
private function resizeImage(
    GdImage $source,
    int $width,
    int $height,
    string $mime
): GdImage {
    $target = imagecreatetruecolor($width, $height);

    if (!$target instanceof GdImage) {
        throw new RuntimeException(
            'GD could not create the resized image.'
        );
    }

    if ($mime === 'image/png' || $mime === 'image/webp') {
        imagealphablending($target, false);
        imagesavealpha($target, true);

        $transparent = imagecolorallocatealpha(
            $target,
            0,
            0,
            0,
            127
        );

        imagefill($target, 0, 0, $transparent);
    }

    $copied = imagecopyresampled(
        $target,
        $source,
        0,
        0,
        0,
        0,
        $width,
        $height,
        imagesx($source),
        imagesy($source)
    );

    if (!$copied) {
        imagedestroy($target);
        throw new RuntimeException(
            'GD could not resize the image.'
        );
    }

    return $target;
}
GD alpha values run from 0 for fully opaque to 127 for fully transparent. That direction is easy to reverse accidentally, especially if you have just been working with CSS opacity.
Choose the output format
By default, the project keeps the source format. A JPEG remains JPEG, a PNG remains PNG, and a WebP remains WebP. When the WebP option is selected, any supported input is encoded as WebP instead.
<?php
$outputMime = $convertToWebp
    ? 'image/webp'
    : $imageMime;

$extension = match ($outputMime) {
    'image/jpeg' => 'jpg',
    'image/png' => 'png',
    'image/webp' => 'webp',
};
Keeping the original format is the least surprising default. WebP conversion is useful when a smaller web-delivery format is wanted, but changing formats should be an explicit decision rather than a side effect hidden inside a function called compressImage().
Save JPEG, PNG, and WebP correctly
Each format has different encoding controls. The project routes the GD image to the matching output function:
<?php
private function saveImage(
    GdImage $image,
    string $destination,
    string $mime,
    int $quality
): bool {
    return match ($mime) {
        'image/jpeg' => $this->saveJpeg(
            $image,
            $destination,
            $quality
        ),
        'image/png' => imagepng(
            $image,
            $destination,
            7
        ),
        'image/webp' => imagewebp(
            $image,
            $destination,
            $quality
        ),
    };
}
JPEG quality
imagejpeg() accepts a quality value from 0 to 100. Lower values normally produce smaller files with more visible compression artifacts. Higher values retain more detail but create larger files.
A value around 75 to 85 is a practical starting range for typical web photographs. It is not a percentage of the original quality, and a value of 100 does not recreate information already lost in an earlier JPEG encoding.
The project also enables progressive JPEG output:
<?php
private function saveJpeg(
    GdImage $image,
    string $destination,
    int $quality
): bool {
    imageinterlace($image, true);

    return imagejpeg(
        $image,
        $destination,
        $quality
    );
}
A progressive JPEG can display a coarse version of the complete image while more data arrives. This changes how the file appears during loading, not whether the image is lossless.
PNG compression
imagepng() uses a compression level from 0 to 9. Level 0 applies no compression, while level 9 applies the strongest compression effort. The decoded pixels remain lossless at every level.
This setting is not interchangeable with JPEG quality. Passing the user’s value of 82 to imagepng() would be invalid. The project uses PNG level 7 as a reasonable balance between encoding work and output size.
GD does not perform advanced PNG palette optimization. A dedicated tool such as pngquant or oxipng may produce a smaller PNG, depending on whether lossy palette reduction is acceptable.
WebP quality
imagewebp() accepts a quality value from 0 to 100 for normal lossy output. The same default of 82 used for JPEG is a practical starting point, although equivalent numbers do not guarantee equivalent visual quality or file size across formats.
The best value depends on the image. A photograph, a screenshot, and a transparent illustration can react very differently to the same setting.
Generate the output path on the server
Never build the destination path from the uploaded filename. Generate a random name and select the extension from the verified output MIME type.
<?php
if (
    !is_dir($destinationDirectory)
    && !mkdir($destinationDirectory, 0755, true)
    && !is_dir($destinationDirectory)
) {
    $this->destroyImages($source, $target);

    throw new RuntimeException(
        'The output directory could not be created.'
    );
}

$destination = rtrim(
    $destinationDirectory,
    DIRECTORY_SEPARATOR
) . DIRECTORY_SEPARATOR
    . bin2hex(random_bytes(16))
    . '.'
    . $extension;
The original name is useful for display or application metadata, but it should not control the server path. A generated name avoids collisions, path manipulation, and awkward characters.
Verify that GD created a real file
A successful return value is not the final check. The PHP manual warns that imagewebp() may return true even when the underlying GD library fails to produce output.
After encoding, the project clears PHP’s file-status cache and confirms that a non-empty file exists:
<?php
$saved = $this->saveImage(
    $target,
    $destination,
    $outputMime,
    $quality
);

$this->destroyImages($source, $target);

clearstatcache(true, $destination);

if (
    !$saved
    || !is_file($destination)
    || filesize($destination) < 1
) {
    throw new RuntimeException(
        'The compressed image could not be saved.'
    );
}
This small verification step is more reliable than treating a truthy encoder return value as proof that the expected file is ready to serve.
Process the compression request
The page controller reads the selected quality, checks whether WebP conversion was requested, and passes the upload to ImageCompressor.
<?php
if ($_SERVER['REQUEST_METHOD'] === 'POST') {
    try {
        if (
            !isset($_FILES['image'])
            || !is_array($_FILES['image'])
        ) {
            throw new RuntimeException(
                'Choose an image to upload.'
            );
        }

        $quality = filter_input(
            INPUT_POST,
            'quality',
            FILTER_VALIDATE_INT,
            [
                'options' => [
                    'default' => 82,
                    'min_range' => 40,
                    'max_range' => 95,
                ],
            ]
        );

        $convertToWebp = isset(
            $_POST['convert_webp']
        );

        $compressor = new ImageCompressor();

        $result = $compressor->compressUpload(
            $_FILES['image'],
            __DIR__ . '/uploads',
            $quality,
            1920,
            1920,
            $convertToWebp
        );

        $message = 'Image compressed successfully.';
        $messageType = 'success';
    } catch (RuntimeException $exception) {
        $message = $exception->getMessage();
        $messageType = 'error';
    }
}
The quality input is restricted to values from 40 to 95. This keeps accidental or deliberately extreme values away from the encoder while still leaving a useful testing range.
The maximum dimensions are passed to the compressor instead of being hidden inside the class. Change both 1920 values when the application needs a different image boundary.
Create the compression form
The form sends the file, output quality, and WebP preference in one multipart POST request.
<form method="post" enctype="multipart/form-data">
    <label for="image">Image file</label>

    <input
        type="file"
        id="image"
        name="image"
        accept="image/jpeg,image/png,image/webp"
        required
    >

    <p class="help">Maximum file size: 10 MB</p>

    <label for="quality">JPEG/WebP quality</label>

    <input
        type="number"
        id="quality"
        name="quality"
        min="40"
        max="95"
        value="<?= (int) $quality ?>"
    >

    <p class="help">
        Try 75 to 85 for general web images.
        PNG uses lossless compression.
    </p>

    <label class="checkbox">
        <input
            type="checkbox"
            name="convert_webp"
            value="1"
            <?= $convertToWebp ? 'checked' : '' ?>
        >
        Convert the result to WebP
    </label>

    <button type="submit">
        Upload and compress
    </button>
</form>
The accept attribute improves the browser’s file picker, but it is not validation. A request can bypass the form, which is why the PHP code still performs all server-side checks.
Compare the original and compressed sizes
The compressor returns the original byte count, output byte count, MIME type, dimensions, and saved path. The page calculates the difference from those actual values.
<?php
$difference = $result['originalBytes']
    - $result['outputBytes'];

$percent = $result['originalBytes'] > 0
    ? abs($difference)
        / $result['originalBytes']
        * 100
    : 0;
?>
A positive difference means the output is smaller. A negative difference means re-encoding produced a larger file. Showing both cases is useful when comparing formats or quality settings.
<dl class="stats">
    <div>
        <dt>Original</dt>
        <dd>
            <?=
            htmlspecialchars(
                formatBytes($result['originalBytes']),
                ENT_QUOTES,
                'UTF-8'
            )
            ?>
        </dd>
    </div>

    <div>
        <dt>Output</dt>
        <dd>
            <?=
            htmlspecialchars(
                formatBytes($result['outputBytes']),
                ENT_QUOTES,
                'UTF-8'
            )
            ?>
        </dd>
    </div>

    <div>
        <dt>Difference</dt>
        <dd>
            <?= number_format($percent, 1) ?>%
            <?=
            $difference >= 0
                ? 'smaller'
                : 'larger'
            ?>
        </dd>
    </div>
</dl>
The preview URL uses only the generated basename. Dynamic values are escaped before being inserted into HTML.
<?php
$imageUrl = 'uploads/'
    . rawurlencode(
        basename($result['path'])
    );
?>

<img
    src="<?=
        htmlspecialchars(
            $imageUrl,
            ENT_QUOTES,
            'UTF-8'
        )
    ?>"
    alt="Compressed uploaded image"
>

<p class="caption">
    <?= (int) $result['width'] ?>
    ×
    <?= (int) $result['height'] ?>
    pixels,
    <?=
    htmlspecialchars(
        $result['outputMime'],
        ENT_QUOTES,
        'UTF-8'
    )
    ?>
</p>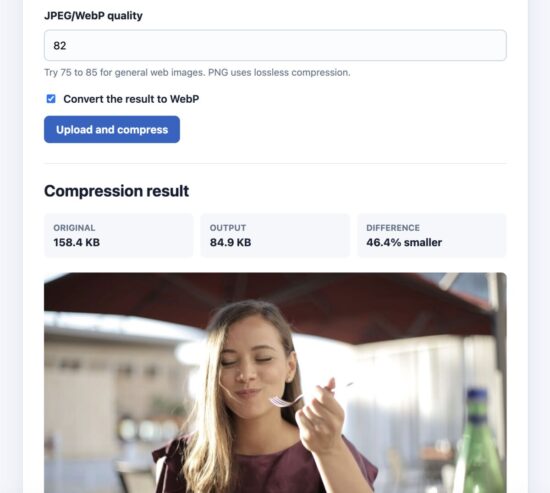
PHP image compression result with before-and-after file sizes
Common errors and fixes
Call to undefined function imagewebp()
GD is enabled, but the installed build does not include WebP support. Check gd_info() and look for WebP Support.
If WebP cannot be enabled on that server, keep the original format and remove the WebP conversion option. Do not call imagewebp() merely because the PHP version supports the function in principle.
The compressed image is larger than the original
This is possible and does not necessarily indicate a bug. The source may already be efficiently optimized, while GD re-encodes it with different settings or metadata.
PNG is particularly unpredictable because GD applies lossless compression but does not perform advanced palette optimization. Compare the actual output size before replacing an existing asset.
The PNG or WebP background becomes black
The destination canvas was probably created without alpha preservation. Call imagealphablending($target, false) and imagesavealpha($target, true) before resampling the image.
JPEG photos appear sideways
The source photo probably stores its orientation in EXIF metadata. Read and apply the orientation before resizing or re-encoding the pixels.
Allowed memory size is exhausted
GD works with decoded pixels, not just the compressed upload. Reduce the permitted source pixel count or maximum output dimensions before increasing memory_limit.
Processing several large images in one request can multiply memory use. For bulk jobs, process files individually through a queue rather than loading the entire batch at once.
The upload is missing from $_FILES
Check upload_max_filesize and post_max_size. When the complete request exceeds post_max_size, PHP may leave both $_POST and $_FILES empty.
Protect the output directory
Successful image decoding and re-encoding reduce the risk of storing arbitrary uploaded content, but the output directory should still be treated as untrusted storage.
The downloadable Apache example disables directory listing and script execution inside uploads/:
Options -Indexes -ExecCGI

<FilesMatch "\.(php|phtml|phar|cgi|pl|py|sh)$">
    Require all denied
</FilesMatch>
Nginx requires an equivalent server rule. For stronger isolation, store generated files outside the document root or serve them from a separate static host.
Generated images also need a retention policy. Delete abandoned or temporary outputs on a schedule instead of allowing every test upload to remain on disk forever.
Developer FAQ
Can PHP compress an image without losing quality?
PNG compression is lossless, so it can reduce encoding overhead without changing decoded pixels. Normal JPEG and WebP quality compression is lossy. It reduces file size by discarding information that the encoder considers less noticeable.
“Without losing quality” often means “without an obvious visual difference,” not mathematically lossless output.
What JPEG or WebP quality should I use?
Start around 75 to 85 and inspect representative images from the application. The best value depends on the image content, display size, and acceptable file weight.
Do not judge the setting from one photograph. Fine text, gradients, faces, and noisy backgrounds reveal compression artifacts differently.
Is WebP always smaller than JPEG or PNG?
No. WebP often performs well for web delivery, but the result depends on the source, dimensions, transparency, encoder, and quality setting. Measure the generated file instead of assuming a saving from the extension.
Does PHP compress the image before upload?
Not before the network transfer. The browser first uploads the file to PHP’s temporary directory. The server then validates, compresses, and saves the result before permanent storage.
Reducing the transfer itself requires client-side compression in the browser. That is a different workflow and should not replace server-side validation.
Can the compressor produce an exact target file size?
Not with one fixed quality value. The final size depends on the image content. Reaching a byte target requires encoding repeatedly at different quality values until an acceptable result is found.
That extra work increases CPU usage and still may not reach the target without resizing. A quality range plus maximum dimensions is simpler and more predictable for ordinary uploads.
Why are animated GIF and animated WebP excluded?
This GD workflow does not preserve animation frames. Handling animated images requires an animation-aware processing library and separate limits for frame count, duration, and dimensions.
Is a database required?
No. Compression only needs a source file and an output path. Store the generated path in a database only when the surrounding application needs persistent image records.
Download the PHP image compression example
The project includes the reusable ImageCompressor class, upload form, WebP option, before-and-after size report, responsive CSS, upload-directory protection, and setup instructions.
Download the PHP image compression project
It requires PHP 8.2 or later with GD and Fileinfo. No database, Composer package, or framework is required.



Hello there, Vincy.
Thanks for tutorial. Howbeit the code makes a double insertion in the table. How do I resolve this, please.
Hi Brian,
Is it due to double click fo the submit button?
Thank you vincy, I see this error when i try to upload image.
“Uncaught Error: Call to undefined function imagecreatefromjpeg()”
You’re welcome! This error normally means that the PHP GD extension is not enabled, or your GD installation does not include JPEG support.
Enable GD in your active `php.ini` file, then restart Apache or PHP-FPM. You can confirm the installation with:
“`php
Your code is simple to use and easy to integrate always, thanks.
Welcome Jeff
Hi thank you for spending your valuable time and writing this for us!
Welcome Bablu