Do you have heavy image files in your application? And do you want to optimize them before pushing them into application directory? This PHP compress image code will help you to optimize images before upload.
The compressed images are scaled down from the original by quality and size. This process makes your media library lightweight and optimized.
This article uses PHP GD functions to implement image compression. It uses the functions imagecreatefromjpeg(), imagejpeg() to resize the images.
We are going to see a quick example and a featured example in PHP to achieve this.
Quick Example
It is a two-step process that this example code performs PHP compress image.
- Step 1: imagecreatefromjpeg() gets a resource reference of the source image.
- Step 2: imagejpeg() creates the compressed image and outputs it to the browser.
<?php
$sourceFile = 'image.jpg';
$outputFile = 'compressed-image.jpg';
$outputQuality = 60;
$imageLayer = imagecreatefromjpeg($sourceFile);
imagejpeg($imageLayer, $outputFile, $outputQuality);
?>
In the second step, it accepts the source image identifier and the target quality. It also accepts the name of the output file in which the compressed version will be.
It has the least possible number of lines shown below.
It optimizes the source and outputs resized images with the specified quality.
There are alternative functions under different PHP extensions to implement image compress. The following PHP ImageMagick functions are used to do this.
- Imagick::setImageCompression
- Imagick::setImageCompressionQuality
Example 2: PHP compress image and upload to the database
If you are looking for PHP AJAX image upload, refer the linked earlier written article. This example gives more features on PHP compress image compared to the above code. Some of those features are,
- Image upload option via HTML form.
- Handling JPEG, GIF and PNG image sources to optimize.
- Image file validation and proper error reporting.
This will be useful for embedding to an application with these additional handlings. Refer this earlier article if you are looking for PHP AJAX image upload.
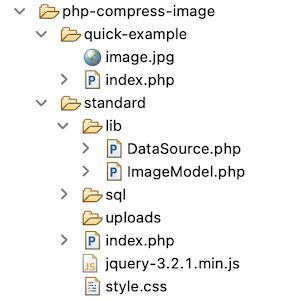
File structure
This screenshot shows the file structure of a simple PHP compress image example. It contains structured files and is easy to understand.
This section describes the steps to set up this example in a development environment.
Step 1: Import database script
Import this SQL script into your database table. It creates a tbl_image table to run this example. It will have the image name and its path on upload.
It also adds the index for primary key settings and auto_increament flag settings.
sql/structure.sql
--
-- Database: `image_upload`
--

--
-- Table structure for table `tbl_image`
--

CREATE TABLE `tbl_image` (
  `id` int(11) NOT NULL,
  `name` varchar(255) NOT NULL,
  `image` varchar(255) NOT NULL
) ENGINE=InnoDB DEFAULT CHARSET=utf8mb4;

--
-- Indexes for dumped tables
--

--
-- Indexes for table `tbl_image`
--
ALTER TABLE `tbl_image`
  ADD PRIMARY KEY (`id`);

--
-- AUTO_INCREMENT for dumped tables
--

--
-- AUTO_INCREMENT for table `tbl_image`
--
ALTER TABLE `tbl_image`
  MODIFY `id` int(11) NOT NULL AUTO_INCREMENT;
Step 2: Design image upload form
This code displays the HTML form with the option to upload the image. The HTML accept attribute limits the file type to allow only images to choose from.
The form-submit action calls the JavaScript validation. It ensures that the file input is not empty.
It targets the endpoint to optimize images by the compressing process. After a successful PHP compress image process, it shows a preview of the image.
index.php (Image upload Form HTML)
<html>
<head>
<link href="style.css" rel="stylesheet" type="text/css" />
</head>
<body>
    <div class="container">
        <h1>PHP Image Compress</h1>
        <div class="form-container">
            <form class="form-horizontal" action="" method="post"
                id="image" enctype="multipart/form-data" name="form"
                onsubmit="return validateImage()">
                <label>Choose image to compress</label>
                <div Class="input-row">
                    <input type="file" name="image" id="file"
                        class="file" value=""
                        accept=".jpg, .jpeg, .png, .gif">
                </div>
        		<?php
        if (! empty($result[0]["image"])) {
            ?>
            <!-- PHP image compress preview  -->
                <img src="<?php echo $result[0]["image"] ;?>"
                    class="img-preview" alt="photo">
    		<?php } ?>
                <div class="input-row">
                    <input type="submit" name="send" value="Upload"
                        class="btn">
                    <div id="response"
                        class="<?php if(!empty($response["type"])) { echo $response["type"] ; } ?>">
                    <?php if(!empty($response["message"])) { echo $response["message"]; } ?>
                    </div>
                </div>
            </form>
        </div>
    </div>

    <script src="jquery-3.2.1.min.js"></script>
    <script>
    function validateImage() {
        var InputFile = document.forms["form"]["image"].value;
        if (InputFile == "") {
          error = "No source found";
          $("#response").html(error).addClass("error");;
          return false;
        }
        return true;
      }
    </script>
</body>
</html>
Process PHP compress image action
This PHP code is at the beginning of the landing page named index.php. It requests the PHP compress image action once the user submits the form.
First, it calls the compressImage() function to resize. Thereby, it optimizes and stores the image into a folder. Once the image is successfully stored in the folder, then the path will be stored in the database.
index.php (PHP compress image action)
<?php
namespace Phppot;

require_once __DIR__ . '/lib/ImageModel.php';

$imageModel = new ImageModel();

if (isset($_POST['send'])) {
    $source = $_FILES["image"]["tmp_name"];
    $destination = "uploads/" . $_FILES["image"]["name"];
    $response = $imageModel->compressImage($source, $destination, 90);
    if (!empty($response)) {
        $id = $imageModel->insertImage($destination);
        if (!empty($response)) {
            $response["type"] = "success";
            $response["message"] = "Upload Successfully";
            $result = $imageModel->getImageById($id);
        }
    } else {
        $response["type"] = "error";
        $response["message"] = "Unable to Upload:$response";
    }
}
?>
PHP model class to compress image
This PHP model class has functions to perform the following.
- Read all images or a particular image by id.
- Insert uploaded image to the database.
- Compress the submitted image files to a given quality.
The PHP image insertion function sets a target to place the uploaded image path.
The compressImage() function is used to compress the uploaded file. The main focus of this process is to optimize the image quality.
lib/ImageModel.php
<?php
namespace Phppot;

use Phppot\DataSource;

class ImageModel
{

    private $conn;

    function __construct()
    {
        require_once 'DataSource.php';

        $this->conn = new DataSource();
    }

    function getAll()
    {
        $query = "SELECT * FROM tbl_image";
        $result = $this->conn->select($query);
        return $result;
    }

    function getImageById($id)
    {
        $query = "SELECT * FROM tbl_image WHERE id=?";
        $paramType = 'i';
        $paramValue = array(
            $id
        );
        $result = $this->conn->select($query, $paramType, $paramValue);
        return $result;
    }

    function insertImage($destination)
    {
        $insertId = 0;
        if (! empty($destination)) {
            $query = "INSERT INTO tbl_image(name,image) VALUES(?,?)";
            $paramType = 'ss';

            $paramValue = array(
                $_FILES["image"]["name"],
                $destination
            );
            $insertId = $this->conn->insert($query, $paramType, $paramValue);
        }
        return $insertId;
    }

    function compressImage($sourceFile, $outputFile, $outputQuality)
    {
        $imageInfo = getimagesize($sourceFile);
        if ($imageInfo['mime'] == 'image/gif')
        {
            $imageLayer = imagecreatefromgif($sourceFile);
        }
        else if ($imageInfo['mime'] == 'image/jpeg')
        {
            $imageLayer = imagecreatefromjpeg($sourceFile);
        }
        else if ($imageInfo['mime'] == 'image/png')
        {
            $imageLayer = imagecreatefrompng($sourceFile);
        }
        $response = imagejpeg($imageLayer, $outputFile, $outputQuality);
        return $response;
    }
}
?>
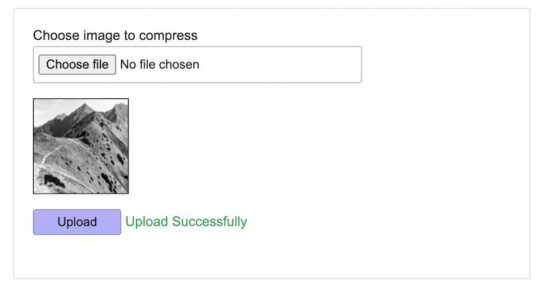
Output: PHP image compress
The below screenshot shows the output of this PHP compress image example. It displays a choose file option to upload an image via an HTML form.
It shows a preview of the uploaded image after form submission.
Use case scenarios that require ‘PHP compress image’
There are some scenarios that need to have media files in optimal quality. In such cases, this PHP compress image utility will be useful to have lightweight images.
- Online photo gallery application.
- Applications that create and maintain multiple thumbnails for each image.
- When the user uploads heavy images that exceed the allowed limit.
Conclusion
I hope, it is useful for you to learn the PHP compress image process. We have seen the purpose and the necessity of this job in a PHP application.
The use case scenarios discussed above justify the importance of having compressed images.
The examples we have seen may help to know the steps to implement. It will make you create your own image file util to do PHP compress image action.
Download


Hello there, Vincy.
Thanks for tutorial. Howbeit the code makes a double insertion in the table. How do I resolve this, please.
Hi Brian,
Is it due to double click fo the submit button?