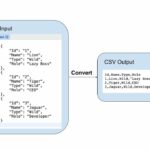
Are you searching for data-migration code from a CSV to MySQL database? Here you go!
There are many ways to implement CSV import. We have seen one or two examples of it previously. Even, this article gives two examples on CSV to MySQL import.
About two examples:
- A quick example to simply importing data from an existing CSV file.
- An interactive featured code to choose CSV via form and process CSV import.
This simple code imports CSV to MySQL database using PHP. All it needs is a source CSV file and a target database. See the prerequisites to experiment with this example in your environment.
Quick Example
CSV to MySQL PHP import
<?php
$mysqli = new mysqli("localhost", "root", "", "csv-to-mysql");

$csvFilePath = "import-template.csv";
$file = fopen($csvFilePath, "r");
while (($row = fgetcsv($file)) !== FALSE) {
    $stmt = $mysqli->prepare("INSERT INTO tbl_users (userName, firstName, lastName) VALUES (?, ?, ?)");
    $stmt->bind_param("sss", $row[1], $row[2], $row[3]);
    $stmt->execute();
}
?>
Prerequisites:
The below blocks contain the prerequisites of running the CSV to MySQL quick example.
It displays source data in CSV format and a database structure to have the tbl_users table.
(1) Source CSV file
1,kevin_tom,Kevin,Thomas
2,vincy,Vincy,Jone
3,tim_lee,Tim,Lee
4,jane,Jane,Ferro
(2) Target MySQL database
CREATE TABLE `tbl_users` (
  `id` int(11) NOT NULL,
  `userName` varchar(255) NOT NULL,
  `firstName` varchar(255) NOT NULL,
  `lastName` varchar(255) NOT NULL,
  `create_at` timestamp NOT NULL DEFAULT current_timestamp() ON UPDATE current_timestamp()
);
ALTER TABLE `tbl_users`
  ADD PRIMARY KEY (`id`);

ALTER TABLE `tbl_users`
  MODIFY `id` int(11) NOT NULL AUTO_INCREMENT;
Steps to implement importing CSV to MySQL
- Create a target database to store CSV records.
- Design import form and handle validation.
- Develop PHP file reading endpoint to import CSV to MySQL database.
Example 2: Full-fledge and featured CSV to MySQL import
Let us see this elaborate example by following the above three steps. It shows the code created to achieve each step to implement the CSV to MySQL import.
This example uses the same database as its target to import the CSV data.
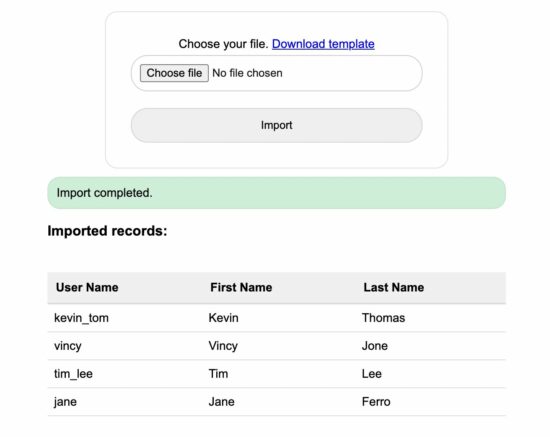
HTML form to choose CSV source
This HTML form allows users to choose the CSV source file. It accepts CSV and Excel files to read data to import.
index.php (Import Form)
<form action="" method="post" name="frmCSVImport" id="frmCSVImport"
	enctype="multipart/form-data" onsubmit="return validateFile()">
	<div Class="input-row">
		<label>Choose your file. <a href="./import-template.csv" download>Download
				template</a></label> <input type="file" name="file" id="file"
			class="file" accept=".csv,.xls,.xlsx">
		<div class="import">
			<button type="submit" id="submit" name="import" class="btn-submit">Import
				CSV and Save Data</button>
		</div>
	</div>
</form>
CSS and JavaScript validation script
The above form calls the validation script on submit. The validation script is in JavaScript to check if the file input is not empty. It is in the head section of the same index.php page.
index.php (Validation)
<head>
<link href="style.css" rel="stylesheet" type="text/css" />
<script type="text/javascript">
function validateFile() {
    var csvInputFile = document.forms["frmCSVImport"]["file"].value;
    if (csvInputFile == "") {
      error = "No source found to import. Please choose a CSV file. ";
      $("#response").html(error).addClass("error");;
      return false;
    }
    return true;
  }
</script>
</head>
and the styles are,
style.css
body {
	font-family: Arial;
	width: 550px;
	font-size: 0.9em;
	margin: 60px auto;
}

.heading {
	text-align: center;
}

.form-container {
	border: #e0dfdf 1px solid;
	padding: 30px 30px 10px 30px;
	border-radius: 15px;
	margin: 10px auto;
	width: 350px;
	text-align: center;
}

.input-row {
	margin-top: 0px;
	margin-bottom: 20px;
}

.btn-submit {
	background: #efefef;
	border: #d3d3d3 1px solid;
	width: 100%;
	border-radius: 20px;
	cursor: pointer;
	padding: 12px;
}

.btn-submit:hover {
	background: #d9d8d8;
	border: #c3c1c1 1px solid;
}

.outer-container table {
	border-collapse: collapse;
	width: 100%;
}

.outer-container th {
	border-top: 2px solid #dddddd;
	background: #f9f9f9;
	padding: 8px;
	text-align: left;
	font-weight: normal;
}

.outer-container td {
	border-top: 1px solid #dddddd;
	padding: 8px;
	text-align: left;
}

.outer-container label {
	margin-bottom: 5px;
	display: inline-block;
}

#response {
	padding: 10px;
	border-radius: 15px;
}

.success {
	background: #c7efd9;
	border: #bbe2cd 1px solid;
}

.error {
	background: #fbcfcf;
	border: #f3c6c7 1px solid;
}

.file {
	border: 1px solid #cfcdcd;
	padding: 10px;
	border-radius: 20px;
	color: #171919;
	width: 100%;
	margin-bottom: 20px;
}
CSV to MySQL import in PHP
On submitting the form, the PHP code triggers the CSV read handler. The readUserRecords() function of the UserModel class is doing this CSV parsing.
index.php (Triggering CSV read in PHP)
<?php
namespace Phppot;

use Phppot\DataSource;
require_once __DIR__ . '/lib/UserModel.php';
$userModel = new UserModel();
if (isset($_POST["import"])) {
    $response = $userModel->readUserRecords();
}
?>
and the UserModel class contains the functions to do the following.
- Read CSV data using PHP fgetcsv()
- Verify CSV to ignore empty rows.
- Read all imported data from the MySQL database.
This model class connects the database in its constructor and set the connection object.
UserModel.php
<?php
namespace Phppot;

use Phppot\DataSource;

class UserModel
{

    private $conn;

    function __construct()
    {
        require_once 'DataSource.php';
        $this->conn = new DataSource();
    }

    function getAllUser()
    {
        $sqlSelect = "SELECT * FROM users";
        $result = $this->conn->select($sqlSelect);
        return $result;
    }

    function readUserRecords()
    {
        $fileName = $_FILES["file"]["tmp_name"];
        if ($_FILES["file"]["size"] > 0) {
            $file = fopen($fileName, "r");
            $importCount = 0;
            while (($column = fgetcsv($file, 10000, ",")) !== FALSE) {
                if (! empty($column) && is_array($column)) {
                    if ($this->hasEmptyRow($column)) {
                        continue;
                    }
                    if (isset($column[1], $column[3], $column[4])) {
                        $userName = $column[1];
                        $password = $column[2];
                        $firstName = $column[3];
                        $lastName = $column[4];
                        $insertId = $this->insertUser($userName, $password, $firstName, $lastName);
                        if (! empty($insertId)) {
                            $output["type"] = "success";
                            $output["message"] = "Import completed.";
                            $importCount ++;
                        }
                    }
                } else {
                    $output["type"] = "error";
                    $output["message"] = "Problem in importing data.";
                }
            }
            if ($importCount == 0) {
                $output["type"] = "error";
                $output["message"] = "Duplicate data found.";
            }
            return $output;
        }
    }

    function hasEmptyRow(array $column)
    {
        $columnCount = count($column);
        $isEmpty = true;
        for ($i = 0; $i < $columnCount; $i ++) {
            if (! empty($column[$i]) || $column[$i] !== '') {
                $isEmpty = false;
            }
        }
        return $isEmpty;
    }

    function insertUser($userName, $password, $firstName, $lastName)
    {
        $sql = "SELECT userName FROM users WHERE userName = ?";
        $paramType = "s";
        $paramArray = array(
            $userName
        );
        $result = $this->conn->select($sql, $paramType, $paramArray);
        $insertId = 0;
        if (empty($result)) {
            $hashedPassword = password_hash($password, PASSWORD_DEFAULT);
            $sql = "INSERT into users (userName,password,firstName,lastName)
                       values (?,?,?,?)";
            $paramType = "ssss";
            $paramArray = array(
                $userName,
                $hashedPassword,
                $firstName,
                $lastName
            );
            $insertId = $this->conn->insert($sql, $paramType, $paramArray);
        }
        return $insertId;
    }
}
?>
List imported data from the database
This is for closing the CSV to MySQL import process loop. With this step, the user experiences that the import is completed successfully.
It shows the imported data on the screen. Instead of showing a static message like ‘Imported successfully’, this will give a good user experience.
list.php
<?php
namespace Phppot;

$result = $userModel->getAllUser();
if (! empty($result)) {
    ?>
<h3>Imported records:</h3>
<table id='userTable'>
	<thead>
		<tr>
			<th>User Name</th>
			<th>First Name</th>
			<th>Last Name</th>
		</tr>
	</thead>
<?php
    foreach ($result as $row) {
        ?>
    <tbody>
		<tr>
			<td><?php  echo $row['userName']; ?></td>
			<td><?php  echo $row['firstName']; ?></td>
			<td><?php  echo $row['lastName']; ?></td>
		</tr>
                    <?php
    }
    ?>
    </tbody>
</table>
<?php
}
?>

Thank you for the clear and simple tutorial.
Welcome Hyder. Keep reading and sharing.
thanks
Thank you very much for your contribution, it works perfect, it is a great help
Welcome Etor.
Thank you
Welcome Mustafa.
Excellent. Thanks for doing this.
Welcome Andy. Keep reading and sharing.
really helpful
Thank you Kawsikan.
Working Fine
Thank you Sumanta.
Thank you so much.
You saved a lot of time to me.
It’s so nice coding.
Welcome Prabha.
Hi Vincy Excellent job you have done. But i am facing an issue. My csv file has 85k rows in it and when i import it does not work. Your kind help is needed.
Hi Maria,
Thank you. What is the error you are getting. This code should work seamlessly for 85K records.
Thank you for this.
Really appreciate it much.
Helped me in my lessons to teach PHP.
More power!
So happy to hear that Angel. I am glad you are teaching PHP.
thank you very much for this simple tutorial
Thank you Hicham.
Thank you vincy… Your tutorial simple and easy to learn,
I often visit your web this.
Welcome Yaqin. Keep visiting :-)
Is there a way to skip the first row if the csv has headings?
Yes Chris. Just use a counter variable and use it to skip the first row.
Vincy,
Thanks. It works great.
In the internet it is difficult to get such hassle free guide.
regards
Wow! Thank you Yakub for the appreciation.
You are the best. There are so many scripts out there, none of that worked for me. saved me a lot of time. Thank you soo much
Thank you Pradeep.
Thank you :)
Welcome Fouad.
Thanks!
Welcome Feri.
I am just learning the ropes – the article was great
Thank you Raja.
Excellent! I had not tried yet, but am going to try this. by the reviews, I can understand your best performances…. Thanks Vincy “the great Programmer” I liked your best part of replies
Thank you Dhirendra for your nice words.
Thank you very much for your contribution, it works perfect, it is a great help
Welcome Deep.
Thank you very much
Welcome Sadik.
Hi great tutorial and working very well for me. My csv contains titles in row 1. How do I set to ignore this row?
Hi Rce,
Just declare a counter variable outside the while loop and increment it inside the loop. When it is ‘1’, just skip the processing.
Thank you so much.
Welcome.
thankyou
Welcome Luluk.
Thank you! Worked like a charm.
Welcome Laurie.
Thank you very much for sharing this.
Bless you man.
Welcome Cedric.
Good Job!
Welcome Odeyale.
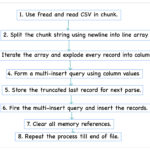
Is this method sufficiant for larger amount of data like 1 Million Data ?
Hi Jay,
Check this for importing huge volume like 1 million records.
https://phppot.com/php/how-to-batch-import-huge-csv-fast-using-php-million-records-in-seconds/
Thanks a lot, works perfectly !
Welcome