In this tutorial, we are going to see how to integrate PayPal Checkout in a PHP based eCommerce website. PayPal Checkout method has several advantages compared to the PayPal Standard payment gateway method. If you want to see the PayPal Standard method of integrating payment gateway in PHP the linked article is an excellent guide.
Note: Previously PayPal Checkout was known as Express Checkout and the Express Checkout method is deprecated. Though the existing integrations are still supported, PayPal recommends following the new integration guide to be facilitated by the upcoming features and enhancements. This PayPal checkout can be used in a simple PHP shopping cart eCommerce website.
PayPal provides API access for authenticating the payment request and process payment with the valid token. The payment request is authenticated with the REST API application credentials. Then the requested payment will be processed with the reference of a token.
The payment request will be sent via the JavaScript by using checkout.js. In the SagePay payment gateway integration example using PHP, we have sent the payment request via JavaScript. Ass of now, we have seen numerous payment integration examples like stripe payment gateway and Authorize.Net payment gateway in PHP.
PayPal Standard Vs PayPal Checkout
In Paypal Standard payment gateway integration method we pass payment data via a standard payment form. With this form, we usually set the application endpoint to get the IPN and to callback after payment process. Sometimes, the process of receiving IPN from PayPal contains lack of reliability.
PayPal Checkout is the simple and secure method that supports to manage payment states with your application server instead of redirecting to PayPal. As of this reason, it will greatly increase the reliability of states during the payment process.
Ways to Integrate PayPal Checkout
PayPal Checkout integration can be done in three ways.
- Client Integration
- Server Integration
- Braintree Integration
In this tutorial, we are implementing the client integration. This is the easiest and fastest way of integration among the available options. Also, it is one of the best for mobile and web applications which require payment gateway.
Note: If you want to acquire more payment options instant capture, authorize caption, issue refund and more, you can go with the server integration. We can also upgrade our existing client integration to a server integration by carrying the payment call through the client -> application server -> PayPal server.
PayPal Checkout Client Integration Steps
These are the steps for integrating PayPal Checkout into your eCommerce website.
- Create a PayPal developer account and log into it.
- Creating Rest API application and get the client id and the secret key.
- Add PayPal Checkout Button into eCommerce application.
Step 1: Create a PayPal developer account and log into it
Go to PayPal developers page and create a developer account to Login to Dashboard. By logging into the developer zone, PayPal allows creating the API credentials based on the type of integration method. The API keys are created with respect to the PayPal facilitator account id.
Step 2: Creating a REST API app and get the keys
After login, go to My Apps & Credentials section by using PayPal developer website navigation menu. In this page, you can see Create App option under the Rest API apps section. In this step, we have to enter the app name and select the PayPal facilitator account for creating the app keys.
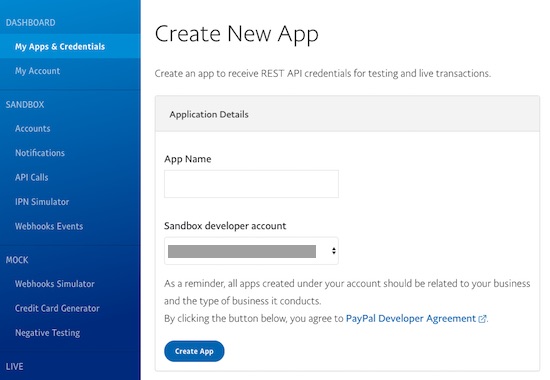
By creating the app, the corresponding client_id and secret key will be created. The process of getting the API keys are very similar to that of many APIs’ procedures. In a previous tutorial, we have seen how to get the keys for accessing Google reCaptcha API service.
Step 3: Add PayPal Checkout Button into eCommerce application
The following code is used to render the PayPal Checkout button on your eCommerce website by using client integration method. Below code snippet contains various sections to configure data to process payment.
- Configure the client ID based on the environment (sandbox/production).
- Setup payment by sending the transaction details.
- Execute the payment onAuthorize event callback.
<html>
<head>
<title>How to Integrate PayPal Checkout in eCommerce Website</title>
</head>
<style>
#response {
    display:none;
    color: #255625;
    padding: 10 20px;
    background: #c0efc0;
    border: #aadeab 1px solid;
    border-radius: 3px;
    margin-bottom: 20px;
}
</style>
<body>
<div id="response"></div>
<div id="paypal-button"></div>
<script src="https://www.paypalobjects.com/api/checkout.js"></script>
<script>
	paypal.Button.render({
    // Configure environment
    env: 'sandbox',
    client: {
      sandbox: 'client_id'
    },
    // Set up a payment
    payment: function(data, actions) {
      return actions.payment.create({
        transactions: [{
          amount: {
            total: '0.01',
            currency: 'USD'
          }
        }]
      });
    },
    // Execute the payment
    onAuthorize: function(data, actions) {
      return actions.payment.execute().then(function() {
    	  document.getElementById("response").style.display = 'inline-block';
        document.getElementById("response").innerHTML = 'Thank you for making the payment!';
      });
    }
  }, '#paypal-button');

</script>
</body>
</html>
Configuring the client ID based on the (sandbox/production) environment
The env: and the client: options are used to specify the environment and the REST API app client_key created in the corresponding environment.
In this code, the sandbox environment is used for testing. Once you have done with the test transaction and want to go live, then this is the section where you need to replace sandbox with production to make live transactions.
Setup payment by sending the transaction details
While setting payment options by specifying the amount, currency and other transaction details, the payment is set with the PayPal and the payment id is created and returned as the result. This Payment id is the acknowledgment of the payment confirmation process. It could be used in the subsequent API requests.
In the above code, it has only a few basic payment options. PayPal allows sending more options like item details, custom information, shipping information and more. The following code shows the possible params with example data that could be passed while setting up the payment.
// Set up a payment
payment: function(data, actions) {
  return actions.payment.create({
    transactions: [{
      amount: {
        total: '40.04',
        currency: 'USD',
        details: {
          subtotal: '40.00',
          tax: '0.01',
          shipping: '0.01',
          handling_fee: '0.01',
          shipping_discount: '-1.00',
          insurance: '0.01'
        }
      },
      description: 'Transaction Description',
      custom: '90048630024435',
      invoice_number: '(unique invoice number)',
      payment_options: {
        allowed_payment_method: 'INSTANT_FUNDING_SOURCE'
      },
      soft_descriptor: 'ECHI5786786',
      item_list: {
        items: [
        {
          name: 'ToyCar',
          description: 'MetalCar',
          quantity: '1',
          price: '3',
          tax: '0.01',
          sku: '1',
          currency: 'USD'
        },
        {
          name: 'FidgetSpinner',
          description: 'Metal',
          quantity: '1',
          price: '15',
          tax: '0.02',
          sku: '2',
          currency: 'USD'
        }],
        shipping_address: {
          recipient_name: 'Martha Jelinson',
          line1: '5th Floor',
          line2: '#6',
          city: 'San Jose',
          country_code: 'US',
          postal_code: '32323',
          phone: '0123456789',
          state: 'CA'
        }
      }
    }],
    note_to_payer: 'Feel free to Contact admin to know your order status.'
  });
},
Execute the payment on authorize event callback
On clicking the PayPal checkout button, the buyer login modal will be shown. When the buyer is authorized by logging in then the payment will be confirmed. After confirmation, the payment will be executed by invoking the onauthorize function. In this section on successful payment execution, the buyer will be acknowledged by showing the success message or by sending email notification via AJAX.
Go Live from PayPal Sandbox
If everything is Okay with the PayPal Checkout integration, then you can move it to the production mode to do live transactions. The following steps are required to go live.
- Create a PayPal Business account.
- Create REST API app Credentials by using a live account login.
- Change the environment from sandbox to production and change the client id that is created with respect to the live PayPal account.
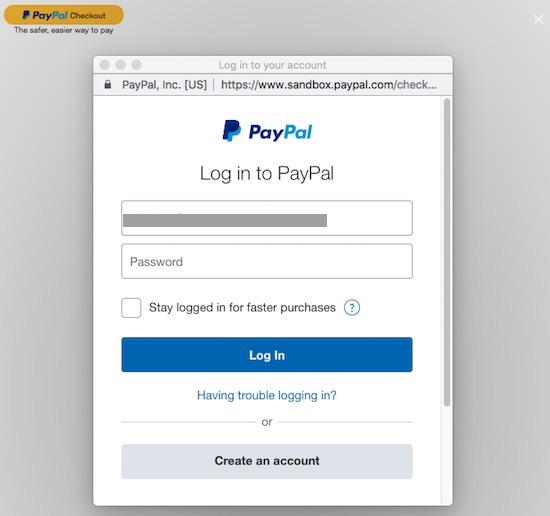
PayPal Checkout Button in an eCommerce Website Output
This is the output of rendering PayPal Checkout button. The login form overlay shows the option to let the buyer login to confirm the payment.
This Checkout button can be customized by specifying the size, color and shape. But it is optional. If nothing is specified, then the button will be rendered in the default style.

Thank you so much.. I think this is the best php paypal integration tutorial available in internet..
Thank you so much Bibin for the appreciations.