Stripe provides payment processing to support eCommerce software and mobile APPs. The key features by Stripe are,
- fast and interactive checkout experience.
- secure, smooth payment flow.
- scope to uplift the conversion rate and business growth.
Stripe is the most popular payment gateway solution supporting card payments along with PayPal. Its complete documentation helps developers to do an effortless integration.
Stripe provides different types of payment services to accept payments. It supports accepting one-time payment, recurring payment, in-person payment and more.
There are two ways to set up the Stripe one-time payment option in a eCommerce website.
- Use the secure prebuilt hosted checkout page.
- Create a custom payment flow.
Let us take the first method to integrate Stripe’s one-time payment. The example code redirects customers to the Stripe hosted checkout page. It’s a pre-built page that allows customers to enter payment details.
Stripe hosted checkout option piggybacks on the Stripe trust factor. If your website is lesser-known, if you are not popular, then it is best to choose this option. Because the end users may feel uncomfortable to enter their card details on your page.
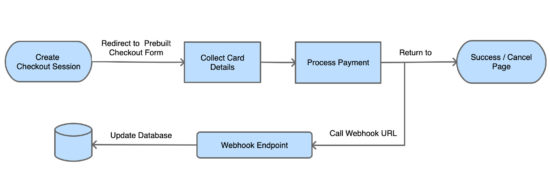
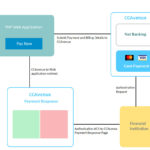
This diagram depicts the Stripe payment flow, redirect and response handling.
In this example, it uses the latest checkout version to set up a one-time payment. If you want to create Stripe subscription payment, then the linked article has an example for it.
What is inside?
- About Stripe Checkout
- Steps to set up Stripe one-time payment flow
- About this example
- Generate and configure Stripe API keys
- Create webhook and map events
- Required libraries to access Stripe API
- Create client-server-side code to initiate checkout
- Capture and process webhook response
- Evaluate integration with test data
- Stripe one-time payment example output
About Stripe Checkout
Latest Stripe Checkout provides a frictionless smooth checkout experience. The below list shows some features of the latest Stripe checkout version.
- Strong Customer Authentication (SCA).
- Checkout interface fluidity over various devices’ viewport.
- Multilingual support.
- Configurable options to enable billing address collection, email receipts, and Button customizations
If you are using the legacy version, it’s so simple to migrate to the latest Stripe Checkout version. The upgraded version supports advanced features like 3D secure, mobile payments and more.
Steps to setup Stripe one-time payment flow
The below steps are the least needs to set up a Stripe one-time payment online.
- Register with Stripe and generate API keys.
- Configure API keys with the application.
- Install and load the required libraries to access API.
- Create client and server-side code to make payments.
- Create endpoints to receive payment response and log into a database.
- Create a UI template to acknowledge customers.
We will see the above steps in this article with example code and screenshots.
About Stripe payment integration example
Stripe API allows applications to access and use its online payment services. It provides Stripe.js a JavaScript library to initiate the payment session flow.
This example code imports the Stripe libraries to access the API functions. It sets the endpoint to build the request and receive the response.
The client and server-side code redirect customers to the Stripe hosted checkout page. In the callback handlers, it processes the payment response sent by the API.
This example uses a database to store payment entries. It uses MySQLi with prepared statements to execute queries.
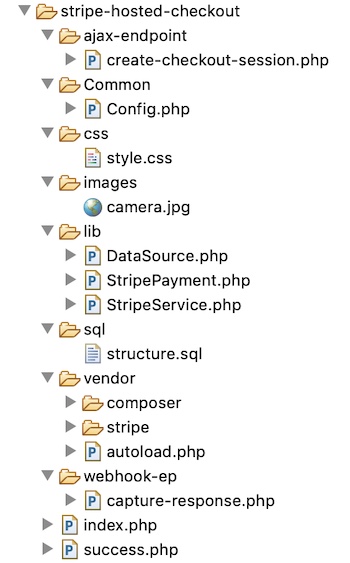
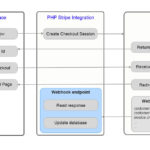
This image shows the simple file architecture of this example.
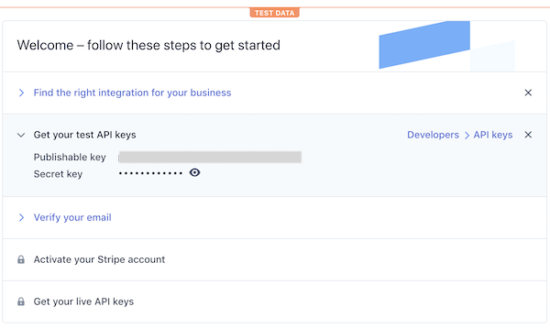
Get and configure Stripe API keys
Register and log in with Stripe to get the API keys. Stripe dashboard will show two keys publishable_key and secret_key.
These keys are the reference to validate the request during the authentication process.
Note: Once finish testing in a sandbox mode, Stripe requires to activate the account to get the live API keys.
This code shows the constants created to configure the API keys for this example.
<?php
namespace Phppot;

class Config
{
    const ROOT_PATH = "https://your-domain/stripe-hosted";

    /* Stripe API test keys */
    const STRIPE_PUBLISHIABLE_KEY = "";
    const STRIPE_SECRET_KEY = "";

    /* PRODUCT CONFIGURATIONS BEGINS */
    const PRODUCT_NAME = 'A6900 MirrorLess Camera';
    const PRODUCT_IMAGE = Config::ROOT_PATH . '/images/camera.jpg';
    const PRODUCT_PRICE = '289.61';
    const CURRENCY = 'USD';
    const PRODUCT_TYPE = 'good';
}
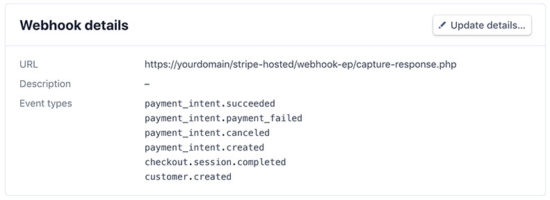
Create webhook and map events
Creating a webhook is a conventional way to get the payment notifications sent by the API. All payment gateway providers give the option to create webhook for callback.
In PayPal payment gateway integration article, we have seen the types of notification mechanisms supported by PayPal.
The code has the webhook endpoint registered with Stripe. It handles the API responses based on the event that occurred.
The below image shows the screenshot of the add-endpoint dialog. It populates the URL and the mapped events in the form fields.
Navigate via Developers->Webhooks and click the Add endpoint button to see the dialog.

Required libraries to access Stripe API
First, download and install the stripe-php library. This will help to send flawless payment initiation request to the Stripe API.
This command helps to install this library via Composer. It is also available to download from GitHub.
composer require stripe/stripe-php
Load Stripe.js JavaScript library into the page which has the checkout button. Load this file by using https://js.stripe.com/v3/ instead of having it in local.
<script src="https://js.stripe.com/v3/"></script>
Create client-server code to process checkout
This section includes the steps needed to create the client-server code for setting up the Stripe one-time payment.
- Add checkout button and load Stripe.js
- Create a JavaScript event handler to initiate checkout session
- Create PHP endpoint to post create-checkout-session request
- Redirect customers to the Stripe hosted checkout page
- Get checkout session-id from the response.
HTML page with Stripe checkout button
This page has HTML code to add the Stripe checkout button. It loads the Stripe.js library.
This page loads a JavaScript that initiates the checkout session and redirects the user to the prebuilt Stripe hosted checkout.
The Stripe hosted checkout form handles the card validation effectively. We have created a custom car validator for Authorize.net payment integration code. Hosted checkout is more secure than handling card details by custom handlers.
index.php
<?php
namespace Phppot;
?>
<html>
<title>Stripe Prebuilt Hosted Checkout</title>
<head>
<link href="css/style.css" type="text/css" rel="stylesheet" />
<script src="https://js.stripe.com/v3/"></script>
</head>
<body>
    <div class="phppot-container">
        <h1>Stripe Prebuilt Hosted Checkout</h1>
        <div id="payment-box">
            <img src="images/camera.jpg" />
            <h4 class="txt-title">A6900 MirrorLess Camera</h4>
            <div class="txt-price">$289.61</div>
            <button id="checkout-button">Checkout</button>
        </div>
    </div>
    <script>
    var stripe = Stripe('<?php  echo Config::STRIPE_PUBLISHIABLE_KEY; ?>');
    var checkoutButton = document.getElementById('checkout-button');

    checkoutButton.addEventListener('click', function() {
      fetch('create-checkout-session.php', {
        method: 'POST',
      })
      .then(function(response) {
        return response.json();
      })
      .then(function(session) {
        return stripe.redirectToCheckout({ sessionId: session.id });
      })
      .then(function(result) {
        if (result.error) {
          alert(result.error.message);
        }
      })
      .catch(function(error) {
        console.error('Error:', error);
      });
    });
    </script>
</body>
</html>
JavaScript event handler initiates checkout session
In the previous section, it loads a JavaScript to do the following.
- Instantiate Stripe Javascript library object with the reference of the Stripe Publishable key.
- Map the checkout button’s click event to initiate a create-checkout-session.
- Redirect customers to the Stripe hosted checkout page with the checkout session id.
It calls the PHP endpoint builds the API request params to start a checkout session.
Then it receives the checkout-session-id as returned by the PHP endpoint. The redirectToCheckout() method sends customers to the prebuilt checkout to complete the payment.
PHP endpoint processing create-checkout-session request
When clicking the checkout button, the JavaScript executes an AJAX request. It fetches the PHP endpoint processing the create-checkout-session request.
The below code shows how to create the Stripe checkout-session via API. The API request is with the required query parameters. It includes the product detail, unit amount, payment method and more.
Then the API will return the session object after processing this request. This endpoint parses the response and grab the session-id and return it.
ajax-endpoint/create-checkout-session.php
<?php
namespace Phppot;

use Phppot\StripeService;
use Phppot\StripePayment;

$orderReferenceId = rand(100000, 999999);

require_once __DIR__ . "/../lib/StripeService.php";
require_once __DIR__ .'/../Common/Config.php';

require_once __DIR__ . '/../lib/StripePayment.php';
$stripePayment = new StripePayment();

$stripeService = new StripeService();

$currency = Config::CURRENCY;

$orderId = $stripePayment->insertOrder(Config::PRODUCT_PRICE, $currency, $orderReferenceId, "Payment in-progress");
$unitAmount = Config::PRODUCT_PRICE * 100;
$session = $stripeService->createCheckoutSession($unitAmount, $orderId);
echo json_encode($session);
The StripeService is a PHP class created to build API requests and process responses.
The createCheckoutSession() function builds the param array for the create-checkout-session request.
This service also handles the webhook responses sent by the API. The API sends the response on the occurrences of the events mapped with the webhook endpoint URL.
lib/StripeService.php
<?php
namespace Phppot;

require_once __DIR__ . '/../Common/Config.php';

class StripeService
{
    function __construct()
    {
        require_once __DIR__ . "/../vendor/autoload.php";
        // Set your secret key. Remember to set your live key in production!
        \Stripe\Stripe::setApiKey(Config::STRIPE_SECRET_KEY);
    }

    public function createCheckoutSession($unitAmount, $clientReferenceId)
    {
        $checkout_session = \Stripe\Checkout\Session::create([
            'payment_method_types' => ['card'],
            'line_items' => [[
                'price_data' => [
                    'currency' => Config::CURRENCY,
                    'unit_amount' => $unitAmount,
                    'product_data' => [
                        'name' => Config::PRODUCT_NAME,
                        'images' => [Config::PRODUCT_IMAGE],
                    ],
                ],
                'quantity' => 1,
            ]],
            'mode' => 'payment',
            'client_reference_id' => $clientReferenceId,
            'success_url' => Config::ROOT_PATH . '/success.php?session_id={CHECKOUT_SESSION_ID}',
            'cancel_url' => Config::ROOT_PATH . '/index.php?status=cancel',
        ]);
        return $checkout_session;
    }

    public function captureResponse()
    {
        $payload = @file_get_contents('php://input');


        $event = json_decode($payload);

        require_once __DIR__ . "/../lib/StripePayment.php";
        $stripePayment = new StripePayment();

        switch($event->type) {
            case "customer.created":
                $param["stripe_customer_id"] = $event->data->object->id;
                $param["email"] = $event->data->object->email;
                $param["customer_created_datetime"] = date("Y,m,d H:i:s", $event->data->object->created);
                $param["stripe_response"] = json_encode($event->data->object);
                $stripePayment->insertCustomer($param);
                break;


            case "checkout.session.completed":
                $param["order_id"] = $event->data->object->client_reference_id;
                $param["customer_id"] = $event->data->object->customer;
                $param["payment_intent_id"] = $event->data->object->payment_intent;
                $param["stripe_checkout_response"] = json_encode($event->data->object);
                $stripePayment->updateOrder($param);
                break;


            case "payment_intent.created":
                $param["payment_intent_id"] = $event->data->object->id;
                $param["payment_create_at"] = date("Y-m-d H:i:s", $event->data->object->created);
                $param["payment_status"] = $event->data->object->status;
                $param["stripe_payment_response"] = json_encode($event->data->object);
                $stripePayment->insertPayment($param);
                break;


            case "payment_intent.succeeded":
                $param["payment_intent_id"] = $event->data->object->id;
                $param["billing_name"] = $event->data->object->charges->data[0]->billing_details->name;
                $param["billing_email"] = $event->data->object->charges->data[0]->billing_details->email;
                $param["payment_last_updated"] = date("Y-m-d H:i:s", $event->data->object->charges->data[0]->created);
                $param["payment_status"] = $event->data->object->charges->data[0]->status;
                $param["stripe_payment_response"] = json_encode($event->data->object);
                $stripePayment->updatePayment($param);
                break;

            case "payment_intent.canceled":
                $param["payment_intent_id"] = $event->data->object->id;
                $param["billing_name"] = $event->data->object->charges->data[0]->billing_details->name;
                $param["billing_email"] = $event->data->object->charges->data[0]->billing_details->email;
                $param["payment_last_updated"] = date("Y-m-d H:i:s", $event->data->object->charges->data[0]->created);
                $param["payment_status"] = $event->data->object->charges->data[0]->status;
                $param["stripe_payment_response"] = json_encode($event->data->object);
                $stripePayment->updatePayment($param);
                break;
            case "payment_intent.payment_failed":
                $param["payment_intent_id"] = $event->data->object->id;
                $param["billing_name"] = $event->data->object->charges->data[0]->billing_details->name;
                $param["billing_email"] = $event->data->object->charges->data[0]->billing_details->email;
                $param["payment_last_updated"] = date("Y-m-d H:i:s", $event->data->object->charges->data[0]->created);
                $param["payment_status"] = $event->data->object->charges->data[0]->status;
                $param["stripe_payment_response"] = json_encode($event->data->object);
                $stripePayment->updatePayment($param);
                break;
        }
        http_response_code(200);
    }
}
Capture and process response
The capture-response.php file calls the StripeService class to handle the webhook response.
The registered webhook endpoint has the mapping for the events. The figure shows the mapped events and the webhook URL below.
The captureResponse() function handles the API response based on the events that occurred.
On each event, it updates the customer, order database tables. It creates the payment response log to put entries into the tbl_stripe_response table.
webhook-ep/capture-response.php
<?php
namespace Phppot;

use Phppot\StriService;

require_once __DIR__ . "/../lib/StripeService.php";

$stripeService = new StripeService();

$stripeService->captureResponse();

?>
It invokes the StripeService function captureResponse(). It calls StripePayment to store Orders, Customers and Payment data into the database.
The StripePayment class it uses DataSource to connect the database and access it.
lib/StripePayment.php
<?php
namespace Phppot;

use Phppot\DataSource;

class StripePayment
{
    private $ds;

    function __construct()
    {
        require_once __DIR__ . "/../lib/DataSource.php";
        $this->ds = new DataSource();
    }

    public function insertOrder($unitAmount, $currency, $orderReferenceId, $orderStatus)
    {
        $orderAt = date("Y-m-d H:i:s");
        $insertQuery = "INSERT INTO tbl_order(order_reference_id, amount, currency, order_at, order_status) VALUES (?, ?, ?, ?, ?) ";
        $paramValue = array(
            $orderReferenceId,
            $unitAmount,
            $currency,
            $orderAt,
            $orderStatus
        );
        $paramType = "sisss";
        $insertId = $this->ds->insert($insertQuery, $paramType, $paramValue);
        return $insertId;
    }

    public function updateOrder($param)
    {
        $paymentDetails = $this->getPaymentByIntent($param["payment_intent_id"]);
        if (! empty($paymentDetails)) {
            if($paymentDetails[0]["payment_status"] == "succeeded")
            {
                $paymentStatus = "Paid";
            }
            else if($paymentDetails[0]["payment_status"] == "requires_source")
            {
                $paymentStatus = "Payment in-progress";
            }
            $query = "UPDATE tbl_order SET stripe_customer_id = ?, stripe_payment_intent_id = ?, stripe_checkout_response = ?, order_status = ? WHERE id = ?";

            $paramValue = array(
                $param["customer_id"],
                $param["payment_intent_id"],
                $param["stripe_checkout_response"],
                $paymentStatus,
                $param["order_id"]
            );
            $paramType = "ssssi";
            $this->ds->execute($query, $paramType, $paramValue);
        }
    }

    public function insertCustomer($customer)
    {
        $insertQuery = "INSERT INTO tbl_customer(stripe_customer_id, email, customer_created_datetime, stripe_response) VALUES (?, ?, ?, ?) ";
        $paramValue = array(
            $customer["stripe_customer_id"],
            $customer["email"],
            $customer["customer_created_datetime"],
            $customer["stripe_response"]
        );
        $paramType = "ssss";
        $this->ds->insert($insertQuery, $paramType, $paramValue);
    }

    public function insertPayment($param)
    {
        $insertQuery = "INSERT INTO tbl_payment(stripe_payment_intent_id, payment_create_at, payment_status, stripe_payment_response) VALUES (?, ?, ?, ?) ";
        $paramValue = array(
            $param["payment_intent_id"],
            $param["payment_create_at"],
            $param["payment_status"],
            $param["stripe_payment_response"]
        );
        $paramType = "ssss";
        $this->ds->insert($insertQuery, $paramType, $paramValue);
    }

    public function updatePayment($param)
    {
        $query = "UPDATE tbl_payment SET billing_name = ?, billing_email = ?, payment_last_updated = ?, payment_status = ?, stripe_payment_response = ? WHERE stripe_payment_intent_id = ?";
        $paramValue = array(
            $param["billing_name"],
            $param["billing_email"],
            $param["payment_last_updated"],
            $param["payment_status"],
            $param["stripe_payment_response"],
            $param["payment_intent_id"]
        );

        $paramType = "ssssss";
        $this->ds->execute($query, $paramType, $paramValue);
    }

    public function getPaymentByIntent($paymentIntent)
    {
        $query = "SELECT * FROM tbl_payment WHERE stripe_payment_intent_id = ?";
        $paramValue = array(
            $paymentIntent
        );
        $paramType = "s";
        $result = $this->ds->select($query, $paramType, $paramValue);
        return $result;
    }
}
?>
Showing success page after payment
As sent with the create-checkout-session request, Stripe invokes the success page URL after payment.
The below code has the payment success message to acknowledge customers.
success.php
<?php
namespace Phppot;

require_once __DIR__ . '/Common/Config.php';
?>
<html>
<head>
<title>Payment Response</title>
<link href="./css/style.css" type="text/css" rel="stylesheet" />
</head>
<body>
    <div class="phppot-container">
        <h1>Thank you for shopping with us.</h1>
        <p>You have purchased "<?php echo Config::PRODUCT_NAME; ?>" successfully.</p>
        <p>You have been notified about the payment status of your
            purchase shortly.</p>
    </div>
</body>
</html>
Database script
Import the following SQL script to execute this example in your environment. It has the SQL to create tables created for this example and to build a relationship between them.
sql/structure.sql
--
-- Table structure for table `tbl_customer`
--

CREATE TABLE `tbl_customer` (
  `id` int(11) NOT NULL,
  `stripe_customer_id` varchar(255) NOT NULL,
  `email` varchar(50) NOT NULL,
  `customer_created_datetime` timestamp NOT NULL DEFAULT CURRENT_TIMESTAMP ON UPDATE CURRENT_TIMESTAMP,
  `stripe_response` text NOT NULL,
  `create_at` timestamp NOT NULL DEFAULT CURRENT_TIMESTAMP ON UPDATE CURRENT_TIMESTAMP
) ENGINE=InnoDB DEFAULT CHARSET=latin1;

-- --------------------------------------------------------

--
-- Table structure for table `tbl_order`
--

CREATE TABLE `tbl_order` (
  `id` int(11) NOT NULL,
  `order_reference_id` varchar(255) NOT NULL,
  `stripe_customer_id` varchar(255) DEFAULT NULL,
  `stripe_payment_intent_id` varchar(255) DEFAULT NULL,
  `amount` decimal(10,2) NOT NULL,
  `currency` varchar(10) NOT NULL,
  `order_at` timestamp NOT NULL DEFAULT CURRENT_TIMESTAMP ON UPDATE CURRENT_TIMESTAMP,
  `order_status` varchar(25) NOT NULL,
  `stripe_checkout_response` text NOT NULL,
  `create_at` timestamp NOT NULL DEFAULT CURRENT_TIMESTAMP ON UPDATE CURRENT_TIMESTAMP
) ENGINE=InnoDB DEFAULT CHARSET=latin1;

-- --------------------------------------------------------

--
-- Table structure for table `tbl_payment`
--

CREATE TABLE `tbl_payment` (
  `id` int(11) NOT NULL,
  `stripe_payment_intent_id` varchar(255) NOT NULL,
  `payment_create_at` timestamp NULL DEFAULT NULL,
  `payment_last_updated` timestamp NULL DEFAULT '0000-00-00 00:00:00',
  `billing_name` varchar(255) NOT NULL,
  `billing_email` varchar(255) NOT NULL,
  `payment_status` varchar(255) NOT NULL,
  `stripe_payment_response` text NOT NULL,
  `create_at` timestamp NOT NULL DEFAULT CURRENT_TIMESTAMP ON UPDATE CURRENT_TIMESTAMP
) ENGINE=InnoDB DEFAULT CHARSET=latin1;

--
-- Indexes for dumped tables
--

--
-- Indexes for table `tbl_customer`
--
ALTER TABLE `tbl_customer`
  ADD PRIMARY KEY (`id`),
  ADD UNIQUE KEY `stripe_customer_id` (`stripe_customer_id`);

--
-- Indexes for table `tbl_order`
--
ALTER TABLE `tbl_order`
  ADD PRIMARY KEY (`id`),
  ADD KEY `stripe_payment_intent_id` (`stripe_payment_intent_id`),
  ADD KEY `stripe_customer_id` (`stripe_customer_id`);

--
-- Indexes for table `tbl_payment`
--
ALTER TABLE `tbl_payment`
  ADD PRIMARY KEY (`id`),
  ADD UNIQUE KEY `stripe_payment_intent_id` (`stripe_payment_intent_id`);

--
-- AUTO_INCREMENT for dumped tables
--

--
-- AUTO_INCREMENT for table `tbl_customer`
--
ALTER TABLE `tbl_customer`
  MODIFY `id` int(11) NOT NULL AUTO_INCREMENT;

--
-- AUTO_INCREMENT for table `tbl_order`
--
ALTER TABLE `tbl_order`
  MODIFY `id` int(11) NOT NULL AUTO_INCREMENT;

--
-- AUTO_INCREMENT for table `tbl_payment`
--
ALTER TABLE `tbl_payment`
  MODIFY `id` int(11) NOT NULL AUTO_INCREMENT;

--
-- Constraints for dumped tables
--

--
-- Constraints for table `tbl_order`
--
ALTER TABLE `tbl_order`
  ADD CONSTRAINT `tbl_order_ibfk_1` FOREIGN KEY (`stripe_payment_intent_id`) REFERENCES `tbl_payment` (`stripe_payment_intent_id`),
  ADD CONSTRAINT `tbl_order_ibfk_2` FOREIGN KEY (`stripe_customer_id`) REFERENCES `tbl_customer` (`stripe_customer_id`);
COMMIT;
Evaluate integration with test data
After integrating Stripe one-time payment, evaluate the integration with test card details.
The following test card details help to try a successful payment flow.
| Card Number | 4242424242424242 |
| Expiry Month/Year | Any future date |
| CVV | Three-digit number |
Stripe provides more test card details to receive more types of responses.
Stripe one-time payment example output
This example displays a product tile with the Stripe Checkout button as shown below.

On clicking the Checkout button, it redirects customers to the prebuilt Stripe hosted checkout page.
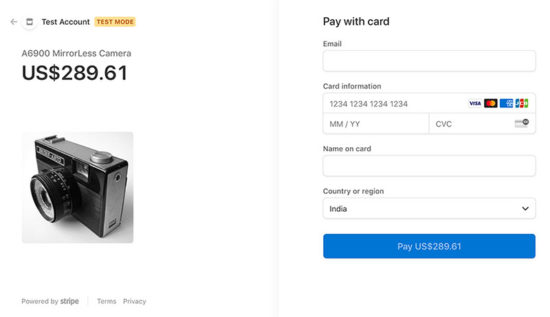
After processing the payment, Stripe will redirect customers to the success page URL.

Conclusion
We have seen how to integrate the stripe hosted checkout in PHP with an example. Hope it is simple and easy to follow.
It helps to have a quick glance with the bullet points pre-requisites, implementation steps. It pinpoints the todo items in short.
The downloadable source code has the required vendor files. It is not needed to download libraries and SDK from anywhere.
With database intervention, the code is ready to integrate with a full-fledged application.
With the latest Stripe checkout version, it provides payment services with SCA and more advanced features.


Great work!
Thank you
Welecome Salah.
Hello, your scrips are great.
Do you have any example with stripe payment but without composer?
Thank you!!
Thank you Dimitris. I have not done any examples for Stripe without composer. It is easier to manage the dependency with composer.