Stripe provides online payment processing for Internet businesses. It enables individuals and businesses to receive and make payments. Stripe is being used by tiny startups to the world’s largest companies.
With my experience, Stripe is the go-to provider when it comes to,
- processing card payments.
- subscription-based recurring payments.
I am a freelance web developer building websites and experiences for more than a decade. Integrating a payment gateway solution is one of the most repeated works for me. I work on small size shopping carts, single-product websites, e-product portals most of the time.
As a developer working on payment products, I wish to highlight the following two points,
- Excellent documentation: Stripe documentation has updated content and usable presentation. It is easy to find what I am looking for.
- Ease of use: The Stripe API is one of the best in the Industry. It is easy to learn and use it for integration.
Stripe has a large collection of tools for payment processing. I have taken recurring payments with checkout for this article.
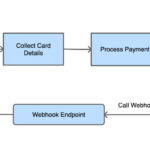
We are going to learn about how to implement recurring payments using Stripe. The following image gives you a highlight of what we are going to see in detail.
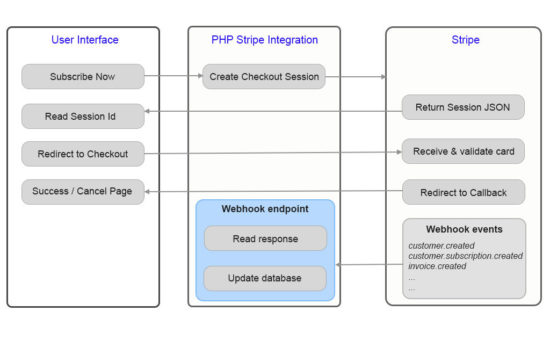
Subscription or recurring payment is an automatic payment. It will occur on a regular periodic interval until the subscriber unsubscribes. In general, the user will give consent for the first time. From there onwards payments gets automated.
What is inside?
- Key features of Stripe Checkout
- Steps to set up a subscription
- Create products and pricing plans
- Install Stripe PHP Library
- About Stripe recurring payment example
- Subscription life cycle and events
- Database ERD
- Test card details
- Go live
- Stripe subscription example output
Key features of Stripe Checkout
The latest Stripe Checkout gives a feature-packed payment solution that we couldn’t refuse. The key features are,
- Built-in card validation and error handling.
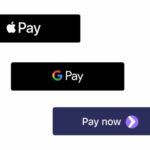
- Supports mobile wallets like Google Pay and Apple Pay with a responsive interface.
- Internationalized with multilingual and multi-payment support.
- Allows customizable payment elements for attaching merchant’s brand.
- Provides Strong Customer Authentication(SCA) with 3D secure2.
- Supports configuration-based address collection, email receipt features.
Steps to set up a subscription
By setting up a subscription you can sell your product plan with recurring payments. These are the steps to set up a subscription payment option for your products.
- Create products and pricing plans.
- Install Stripe PHP Library.
- Create a checkout session.
- Redirect to checkout.
- Test your integration.
- Turn on live mode.
Create products and pricing plans
Creating products is the first step. The product can be goods or services. The Stripe dashboard has the option to create your products.
Create a Stripe account and login. Go to the Products section and click New to see the product-add form.

After adding products the next step will ask you to add a pricing plan. The payment occurrence will happen based on the plan pricing and intervals.
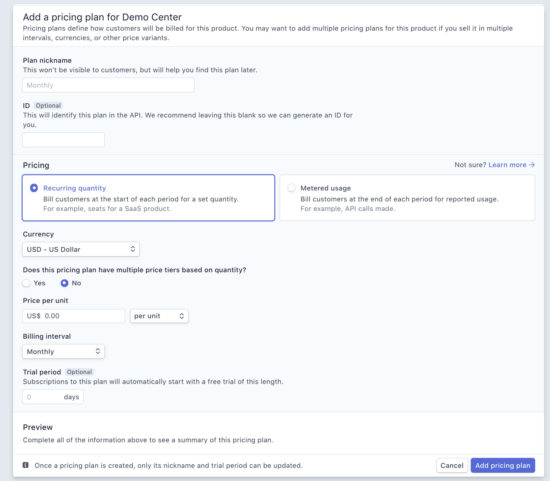
You can also create products via API other than the dashboard. In this example, I have used API to create products and pricing plans.
I have created a monthly plan and mapped the plan_id with the config. While creating a Checkout session, it uses the plan id to start a subscription.
init.php
<?php
namespace Phppot;

use Phppot\Service;

require_once __DIR__ . '/Service/StripeService.php';
$stripeService = new StripeService();

$product = $stripeService->createProduct();
$planId = $stripeService->createPlan($product->id);

if(!empty($planId))
{
    echo "Product pricing plan is created and the plan id id is: ";
    print_r($planId);
}
?>
Install Stripe PHP Library
Stripe official libraries help to access API from the application. Download the Stripe PHP library from Github and integrate it into your web application.
You can also use the composer (excellent package management tool) to install the PHP library. Enter this command in your terminal to install Stripe library.
# Install the PHP library via Composer
composer require stripe/stripe-php
About Stripe recurring payment example
I have implemented stripe recurring payment by using Checkout with Billing. This example code is simple to follow, keep reading.
I have created a database to manage customers, invoices and Stripe transactions log.
This file structure shows the files used in this recurring payment example.
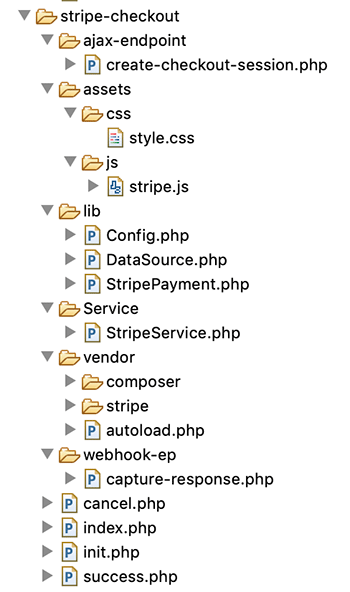
The init.php file in the root has the code to create a Product and plan via API.
The index.php is the landing page that shows the example product plan to subscribe. The lib/Config.php has the configurations to store API keys and plan id.
lib/Config.php
<?php
namespace Phppot;

class Config
{
    const STRIPE_PUBLISHIABLE_KEY = "set your Stripe publishiable key";

    const STRIPE_SECRET_KEY = "set your Stripe secret key";

    const SUBSCRIPTION_PLAN_ID = "Configure the plan id";

    const PRODUCT_NAME = 'PHP Video Tutorials with eBook';

    const PRODUCT_TYPE = 'service';
}
?>
On clicking the subscribe button, then the checkout session will start a subscription. The Service/StripeService.php does the API call using Stripe library. The vendor directory has the PHP Stripe library dependency.
The lib/StripePayment.php prepares queries to manage transactional data in the database.
I have used MySQLi with prepared statement to perform database operations. The success.php and cancel.php files are the return pages. The Stripe will redirect the customer to these pages after payment based on the payment action by the user.
Create checkout session
The landing page has the plan details with a subscribe button. On clicking this button, the script will send a request to create a checkout session.
The below code has the Stripe JavaScript library include. It helps to build Stripe payment flow.
index.php
<?php
use Phppot\Config;

require_once __DIR__ . "/lib/Config.php";
?>
<html>
<head>
<title>Checkout</title>
<link href="./assets/css/style.css" type="text/css" rel="stylesheet" />
<script src="https://js.stripe.com/v3/"></script>
<script src="./assets/js/stripe.js"></script>
</head>
<body>
    <div class="product-plan-tile">
    <h2><?php echo Config::PRODUCT_NAME; ?></h2>
    <p>Best reference suitable for beginners to experts.</p>
    <div class="plan-pricing">$20 / month</div>
    <input type="button" id="subscribe" value="Subscribe Now" />
    </div>
    <div id="error-message"></div>
<script>
var stripe = Stripe('<?php echo Config::STRIPE_PUBLISHIABLE_KEY; ?>');
//Setup event handler to create a Checkout Session when button is clicked
document.getElementById("subscribe").addEventListener("click", function(evt) {
    createCheckoutSession('<?php echo Config::SUBSCRIPTION_PLAN_ID; ?>').then(function(data) {
      // Call Stripe.js method to redirect to the new Checkout page
      stripe.redirectToCheckout({
          sessionId: data.id
      }).then(handleResult);
    });
  });
</script>
</body>
</html>
The script.js file has the function createCheckoutSession. It fetches the corresponding PHP to start a new checkout session.
It sends the subscription plan id as a parameter.
assets/js/stripe.js
var createCheckoutSession = function(planId) {
	var plan = {
		    plan_id: planId
		};

		var data = new FormData();
		data.append( "plan", JSON.stringify( plan ) );
  return fetch("ajax-endpoint/create-checkout-session.php", {
    method: "POST",
    body: data
  }).then(function(result) {
	  console.log(result);
    return result.json();
  });
};

// Handle any errors returned from Checkout
var handleResult = function(result) {
  if (result.error) {
    var displayError = document.getElementById("error-message");
    displayError.textContent = result.error.message;
  }
};
This PHP file processes the AJAX request sent via the JavaScript. It receives the plan details in a JSON format and decodes to get the plan id.
It passes the plan id to the PHP function to create a checkout session. This function will return the created checkout session.
ajax-endpoint/create-checkout-session.php
<?php
namespace Phppot;

use Phppot\StripeService;

require_once __DIR__ . '/../Service/StripeService.php';
$stripeService = new StripeService();

$plan = json_decode($_POST["plan"]);
$planId = $plan->plan_id;

$session  = $stripeService->createCheckoutSession($planId);

echo json_encode($session);
?>
The below code shows the complete code of the StripeService.php. This file has the function createCheckoutSession that invokes the Stripe API.
It sends the plan id with the subscription data parameter. It also sends success_url and cancel_url. It helps to redirect the user back to your application after the purchase.
Service/StripeService.php
<?php
namespace Phppot;

use Phppot\Config;
require_once __DIR__ . '/../lib/Config.php';

class StripeService
{
    function __construct()
    {
        require_once __DIR__ . "/../vendor/autoload.php";
        // Set your secret key. Remember to switch to your live secret key in production!
        // See your keys here: https://dashboard.stripe.com/account/apikeys
        \Stripe\Stripe::setApiKey(Config::STRIPE_SECRET_KEY);
    }

    public function createProduct()
    {
        $product = \Stripe\Product::create([
            'name' => Config::PRODUCT_NAME,
            'type' => Config::PRODUCT_TYPE,
        ]);
        return $product;
    }

    public function createPlan()
    {
        $plan = \Stripe\Plan::create([
            'amount' => 100,
            'currency' => 'usd',
            'interval' => 'month',
            'product' => ['name' => Config::PRODUCT_NAME],
        ]);
        return $plan;
    }

    public function createCheckoutSession($planId)
    {
        $session = \Stripe\Checkout\Session::create([
            'payment_method_types' => ['card'],
            'subscription_data' => [
                'items' => [[
                    'plan' => $planId,
                ]],
            ],
            'success_url' => 'https://www.yourdomain.com/stripe-checkout/success.php?session_id={CHECKOUT_SESSION_ID}',
            'cancel_url' => 'https://www.yourdomain.com/stripe-checkout/cancel.php',
        ]);
        return $session;
    }

    public function getStripeResponse()
    {
        $body = @file_get_contents('php://input');
        $event_json = json_decode($body);
        return $event_json;
    }
}
?>
Redirect to Checkout
With the create-checkout-session response, the script receives the session-id. This id is the parameter to send while invoking the redirectToCheckout() function.
This step shows the Stripe checkout form to the user to complete the subscription.
In older version, we have to embed the script element to the HTML to display the checkout form. But, the latest version makes it easier, secured, with a stripe-hosted checkout interface.
Subscription life cycle and events
When a customer starts a subscription, the following events will occur.
- cutomer.created
- customer.subscription.created
- invoice.created
- invoice.finalized
- charge.succeeded
- invoice.payment_succeeded
With automatic billing, the invoice events will occur in a planned interval. The billing interval depends on the specification registered with the subscription plan.
The Stripe dashboard has the events list that occurs on the subscription flow. Go to Developers->Events to see the Stripe subscription lifecycle events.
Set the Webhook URL to capture events from the application. Navigate with Developers->Webhooks to set the webhook URL and map the events with it.
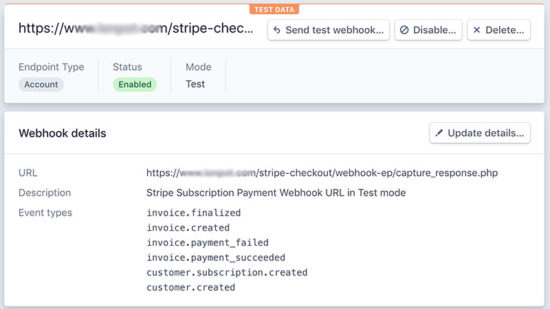
In this example, the file webhook-ep/capture-response.php file path is the Webhook URL. On capturing the events, this file receives the Stripe response and saves the data to the database.
webhook-ep/capture-response.php
<?php
namespace Phppot;

use Phppot\StripePayment;
use Phppot\StriService;

require_once __DIR__ . "/../lib/StripePayment.php";
require_once __DIR__ . "/../Service/StripeService.php";

$stripeService = new StripeService();

$response = $stripeService->getStripeResponse();

$stripePayment = new StripePayment();

if(!empty($response))
{
    switch($response->type) {
        case "invoice.payment_succeeded":
            $param["id"] = $response->data->object->id;
            $param["invoice_status"] = $response->data->object->status;
            $stripePayment->updateInvoiceStatus($param);
            break;

        case "invoice.payment_failed":
            $param["id"] = $response->data->object->id;
            $param["invoice_status"] = $response->data->object->status;
            $stripePayment->updateInvoiceStatus($param);
            break;

        case "customer.created":
            $param = array();
            $param["customer_id"] = $response->data->object->id;
            $param["customer_email"] = $response->data->object->email;
            $stripePayment->insertCustomer($param);
            break;

        case "customer.subscription.created":
            $param = array();
            $param["id"] = $response->data->object->id;
            $param["customer_id"] = $response->data->object->customer;
            $param["subscription_plan"] = $response->data->object->plan->id;
            $param["subscription_interval"] = $response->data->object->plan->interval_count . " " .$response->data->object->plan->interval;
            $param["subscription_status"] = $response->data->object->status;
            $param["current_period_start"] = date("Y-m-d H:i:s", $response->data->object->current_period_start);
            $param["current_period_end"] = date("Y-m-d H:i:s", $response->data->object->current_period_end);
            $param["subscription_created_date"] = date("Y-m-d H:i:s", $response->data->object->created);
            $stripePayment->insertSubscription($param);
            break;

        case "customer.subscription.updated":
            $param = array();
            $param["id"] = $response->data->object->id;
            $param["subscription_status"] = $response->data->object->status;
            $stripePayment->updateSubscription($param);
            break;

        case "invoice.created":
            $param = array();
            $param["id"] = $response->data->object->id;
            $param["subscription_id"] = $response->data->object->subscription;
            $param["invoice_number"] = $response->data->object->number;
            $param["customer_id"] = $response->data->object->customer;
            $param["billing_email"] = $response->data->object->customer_email;
            $param["currency"] = $response->data->object->currency;
            $param["invoice_status"] = $response->data->object->status;
            $param["invoice_created_date"] = date("Y-m-d H:i:s", $response->data->object->created);

            $i = 0;
            foreach($response->data->object->lines->data as $data)
            {
                $param["invoice_items"][$i]["amount"] = $data->amount;
                $param["invoice_items"][$i]["currency"] = $data->currency;
                $param["invoice_items"][$i]["quantity"] = $data->quantity;
                $param["invoice_items"][$i]["description"] = $data->description;
                $i++;
            }

            $stripePayment->insertInvoice($param);
            break;

        case "invoice.finalized":
            $param["id"] = $response->data->object->id;
            $param["invoice_finalized_date"] = date("Y-m-d H:i:s", $response->data->object->finalized_at);
            $param["invoice_status"] = $response->data->object->status;
            $stripePayment->updateInvoice($param);
            break;
    }
}
?>
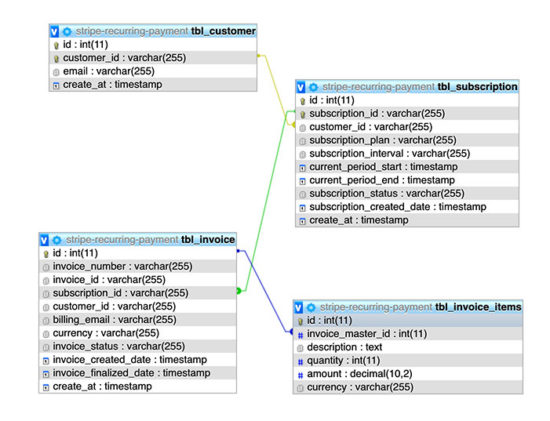
Database ERD
The Stripe dashboard has an elaborate detail on the payment instance. Apart from that, a application-specific log will help for auditing or a quick look.
Let’s manage the customer, subscription and invoice details in the database.
This Entity Relationship Diagram shows the database tables and relationshiops of this stripe subscription payment example.
This PHP class prepares queries to perform the database operations. It sends the query params as an array. In the DataSource class, it iterates this array to bind the query params.
lib/StripePayment.php
<?php
namespace Phppot;

use Phppot\DataSource;

class StripePayment
{
    private $ds;

    function __construct()
    {
        require_once __DIR__ . "/../lib/DataSource.php";
        $this->ds = new DataSource();
    }
    public function insertCustomer($customer)
    {
        $insertQuery = "INSERT INTO tbl_customer(customer_id, email) VALUES (?, ?) ";

        $paramValue = array(
            $customer["customer_id"],
            $customer["customer_email"],
        );

        $paramType = "ss";
        $this->ds->insert($insertQuery, $paramType, $paramValue);
    }

    public function insertSubscription($subscription)
    {
        $insertQuery = "INSERT INTO tbl_subscription(subscription_id, customer_id, subscription_plan, subscription_interval, current_period_start, current_period_end, subscription_status, subscription_created_date) VALUES (?, ?, ?, ?, ?, ?, ?, ?) ";

        $paramValue = array(
            $subscription["id"],
            $subscription["customer_id"],
            $subscription["subscription_plan"],
            $subscription["subscription_interval"],
            $subscription["current_period_start"],
            $subscription["current_period_end"],
            $subscription["subscription_status"],
            $subscription["subscription_created_date"],
        );

        $paramType = "ssssssss";
        $this->ds->insert($insertQuery, $paramType, $paramValue);
    }

    public function insertInvoice($invoice)
    {
        $insertQuery = "INSERT INTO tbl_invoice(invoice_number, subscription_id, invoice_id, customer_id, billing_email, currency, invoice_status, invoice_created_date) VALUES (?, ?, ?, ?, ?, ?, ?, ?) ";

        $paramValue = array(
            $invoice["invoice_number"],
            $invoice["subscription"],
            $invoice["id"],
            $invoice["customer_id"],
            $invoice["billing_email"],
            $invoice["currency"],
            $invoice["invoice_status"],
            $invoice["invoice_created_date"],
        );

        $paramType = "ssssssss";
        $inserId = $this->ds->insert($insertQuery, $paramType, $paramValue);
        if(!empty($inserId))
        {
            $this->insertInvoiceItem($invoice["invoice_items"], $inserId);
        }
    }

    public function insertInvoiceItem($invoiceItem, $invoiceMasterId)
    {
        $insertQuery = "INSERT INTO tbl_invoice_items(invoice_master_id, description, quantity, amount, currency) VALUES (?, ?, ?, ?, ?) ";

        $paramValue = array(
            $invoiceMasterId,
            $invoiceItem[0]["description"],
            $invoiceItem[0]["quantity"],
            $invoiceItem[0]["amount"],
            $invoiceItem[0]["currency"],
        );

        $paramType = "issss";
        $this->ds->insert($insertQuery, $paramType, $paramValue);
    }

    public function updateInvoice($invoice)
    {
        $query = "UPDATE tbl_invoice SET invoice_finalized_date = ?, invoice_status = ? WHERE invoice_id = ?";

        $paramValue = array(
            $invoice["invoice_finalized_date"],
            $invoice["invoice_status"],
            $invoice["id"]
        );

        $paramType = "sss";
        $this->ds->execute($query, $paramType, $paramValue);
    }

    public function updateInvoiceStatus($invoice)
    {
        $query = "UPDATE tbl_invoice SET invoice_status = ? WHERE invoice_id = ?";

        $paramValue = array(
            $invoice["invoice_status"],
            $invoice["id"]
        );

        $paramType = "ss";
        $this->ds->execute($query, $paramType, $paramValue);
    }

    public function updateSubscription($subscription)
    {
        $query = "UPDATE tbl_subscription SET subscription_status = ? WHERE subscription_id = ?";

        $paramValue = array(
            $subscription["subscription_status"],
            $subscription["id"]
        );

        $paramType = "ss";
        $this->ds->execute($query, $paramType, $paramValue);
    }
}
?>
Test card details
Stripe gives test card details. Those are helpful to verify and validate the payment integration.
Try the below test card details for testing the integration. This test data will return a success response.
| Card number | 4242424242424242 |
| Expiry Month and Year | Any future Month andYear |
| CVV | Any 3 digit number |
If you want to try with other test cases, Stripe testing documentation has more test card details.
Go live
After completing all possible trials, switch to live from the test mode.
Switching to the live mode is a simple step. It is just a matter of flipping the account’s setting to access the live data.
Before that, Stripe needs to verify your email and activate your account. Then, we can get live credentials.
In the live mode, the test card details will not work. In case, if the Stripe fails to access the webhook URL, it will retry the URL 3 times within a period of hours.
Stripe subscription example output
The below screenshot shows the subscription plan details with a subscribe button. The landing page of this example will show this screen.

Conclusion
I hope, this tutorial has given you good knowledge about recurring payments and help to integrate Stripe subscription payment in your website.
We have discussed how Stripe checkout works with Billing for recurring payment integration.
Also, we learned about the added features that the Stripe checkout has in its latest version.
The example code covers the key steps on implementing Stripe subscription. You can download the example tutorial code and use it in your projects. Absolutely free!
Feel free to get in touch with me if you require any assistance.
Download


Hi
I am Ajith Peiris from Sri Lanka.
These lessons that you have prepared and incorporated into the Internet are invaluable.
It makes the lesson very clear. It is a great website for anyone studying.
Another advantage of this site is that it allows us to download the required coding.
Thank you very much I wish your knowledge to increase.
Thank you Peiris for the nice words, appreciations and wishes. It helps, thank you :-)
Hi,
This is helpful demo.
Thank you for creating.
Thank you Hitesh.
Great job keep it up , very helpful article
Thank you Masood.
great job
Thank you Masood.
can you update with the new stripe checkout api?
It is updated now Michel.
What changes do I need to make if I cannot install using composer?
Hi JBolts,
You need to download it as a zip and manually unzip inside your project. Then require_once(‘/path/to/stripe-php/init.php’); put this to include library in your project.
Hello,
Very good demo which helped me a lot.
But according to the doc, tracking webhooks for subscription should be done only with invoice.payment_succeeded:
https://stripe.com/docs/billing/subscriptions/webhooks#tracking
Why?
Because Stripe does not ensure the order in which events are received, so you can receive for example customer.subscription.updated before customer.subscription.created !!!
Thanks for this tutorial.
We wanted to have apple pay and Google pay with recurring subscriptions. How that is possible? How the apple pay users will validate it next time?
Also how this script handles SCA (3d secure)?
Hi Girish,
This script is 3DS compatible.