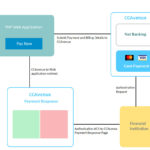
Authorize.Net payment gateway is one of the widely used payment-enabling mechanisms in many eCommerce software. It supports the standard Visa, MasterCard, Discover, Apple Pay, Google Pay, PayPal and all popular similar services.
In this tutorial, we are going to see how to integrate the Authorize.Net Payment Gateway. This payment provider gives API to make Payment Transactions. It sets the payment inputs to the API properties and charges a credit card processed by the customer.
Steps to Integrate Authorize.Net Payment Gateway
- Create an Authorize.Net account to get the API login ID and key.
- Import PHP SDK to access Authorize.Net API.
- Create a payment form to get credit card information from the user.
- Configure API credentials and request payment process.
- Handle API response and store the data in the database.
About the example
For charging a credit card using Authorize.Net, this example uses a sample Hello Word program. This program can be found in the Authorize.Net API developer documentation.
It makes test transactions by creating a sandbox account in Authorize.Net. The card information will be obtained from the user by using an HTML form. While submitting this form, the card details are validated before sending it to PHP.
In PHP code, the API returns the response in JSON format. By parsing the response the user acknowledgment message will be shown with the transaction ID.
1. Create an Authorize.Net account to get the API login ID and key
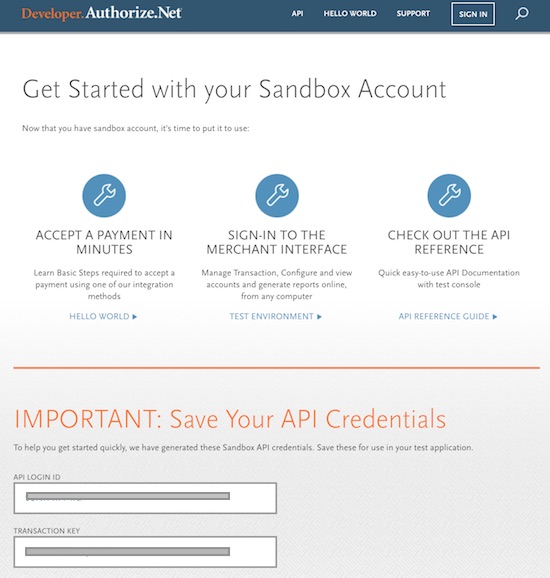
Signup to the Authorize.Net sandbox environment to get the API credentials. These are for authentication while sending the payment request.
Sandbox is safe for testing purposes before turning the integration to live. The following screenshot shows the Authorize.Net page with the generated API login id and key.
Import PHP SDK to access Authorize.Net API
We need the PHP SDK for accessing the Authorize.Net API to process payments. This SDK can be imported by using the composer. Make sure that the composer is installed in your machine and create the composer.json file and add the below script into it.
{
  "require": {
    "php": ">=5.6",
    "ext-curl": "*",
    "authorizenet/authorizenet": ">=1.9.3"
  }
}
Then, run the following command.
composer update
Create Payment Form to Get Card Information
This HTML has the form to collect the card information from the customer. This page includes a custom card validation script to do a client-side validation on the submitted form data.
Below the payment form, it contains a table of test card numbers provided by the Authorize.net. The validation will take care of checking if the form inputs are not empty.
<html>
<head>
<link href="style.css" rel="stylesheet" type="text/css"/ >
<title>Authorize.net Payment Gateway Integration using PHP</title>
</head>
<body>
    <?php if(!empty($message)) { ?>
    <div id="response-message" class="<?php echo $reponseType; ?>"><?php echo $message; ?></div>
    <?php  } ?>
    <div id="error-message"></div>

            <form id="frmPayment" action=""
                method="post"
                        onSubmit="return cardValidation();">
                <div class="field-row">
                    <label>Card Number</label> <span
                        id="card-number-info" class="info"></span><br> <input
                        type="text" id="card-number" name="card-number"
                        class="demoInputBox">
                </div>
                <div class="field-row">
                    <div class="contact-row column-right">
                        <label>Expiry Month / Year</label> <span
                            id="userEmail-info" class="info"></span><br>
                        <select name="month" id="month"
                            class="demoSelectBox">
                            <option value="09">09</option>
                            <option value="10">10</option>
                            <option value="11">11</option>
                            <option value="12">12</option>
                        </select> <select name="year" id="year"
                            class="demoSelectBox">
                            <option value="2018">2018</option>
                            <option value="2019">2019</option>
                            <option value="2020">2020</option>
                            <option value="2021">2021</option>
                            <option value="2022">2022</option>
                            <option value="2023">2023</option>
                            <option value="2024">2024</option>
                            <option value="2025">2025</option>
                            <option value="2026">2026</option>
                            <option value="2027">2027</option>
                            <option value="2028">2028</option>
                            <option value="2029">2029</option>
                            <option value="2030">2030</option>
                        </select>
                    </div>
                </div>
                <div>
                    <input type="submit" name="pay_now" value="Submit"
                        id="submit-btn" class="btnAction">

                    <div id="loader">
                        <img alt="loader" src="LoaderIcon.gif">
                    </div>
                </div>
                <input type='hidden' name='amount' value='151.51'>
            </form>
    <div class="test-data">
        <h3>Test Card Information</h3>
        <p>Use these test card numbers with valid expiration month
            / year for testing.</p>
        <table class="tutorial-table" cellspacing="0" cellpadding="0" width="100%">
            <tr>
                <th>CARD NUMBER</th>
                <th>BRAND</th>
            </tr>
            <tr>
                <td>4111111111111111</td>
                <td>Visa</td>
            </tr>

            <tr>
                <td>5424000000000015</td>
                <td>Mastercard</td>
            </tr>

            <tr>
                <td>370000000000002</td>
                <td>American Express</td>
            </tr>

            <tr>
                <td>6011000000000012</td>
                <td>Discover</td>
            </tr>

            <tr>
                <td>38000000000006</td>
                <td>Diners Club/ Carte Blanche</td>
            </tr>

            <tr>
                <td>3088000000000017</td>
                <td>JCB</td>
            </tr>

        </table>
    </div>
    <script src="vendor/jquery/jquery-3.2.1.min.js"
        type="text/javascript"></script>
    <script>
function cardValidation () {
    var valid = true;
    var cardNumber = $('#card-number').val();
    var month = $('#month').val();
    var year = $('#year').val();

    $("#error-message").html("").hide();

    if (cardNumber.trim() == "") {
    	   valid = false;
    }

    if (month.trim() == "") {
    	    valid = false;
    }
    if (year.trim() == "") {
        valid = false;
    }

    if(valid == false) {
        $("#error-message").html("All Fields are required").show();
    }

    return valid;
}
</script>
</body>
</html>
Configure API Credentials and Request Payment Process
The API auth credentials are defined as PHP constants in a configuration file. A PHP class named AuthorizeNetPayment is used to handle the functions to set the merchant authentication, credit card type, transaction request type and more setup that are required to process payment via Authorize.Net API.
<?php
require 'vendor/autoload.php';
use net\authorize\api\contract\v1 as AnetAPI;
use net\authorize\api\controller as AnetController;

class AuthorizeNetPayment
{

    private $APILoginId;
    private $APIKey;
    private $refId;
    private $merchantAuthentication;
    public $responseText;


    public function __construct()
    {
        require_once "config.php";
        $this->APILoginId = API_LOGIN_ID;
        $this->APIKey = TRANSACTION_KEY;
        $this->refId = 'ref' . time();

        $this->merchantAuthentication = $this->setMerchantAuthentication();
        $this->responseText = array("1"=>"Approved", "2"=>"Declined", "3"=>"Error", "4"=>"Held for Review");
    }

    public function setMerchantAuthentication()
    {
        $merchantAuthentication = new AnetAPI\MerchantAuthenticationType();
        $merchantAuthentication->setName($this->APILoginId);
        $merchantAuthentication->setTransactionKey($this->APIKey);

        return $merchantAuthentication;
    }

    public function setCreditCard($cardDetails)
    {
        $creditCard = new AnetAPI\CreditCardType();
        $creditCard->setCardNumber($cardDetails["card-number"]);
        $creditCard->setExpirationDate( $cardDetails["year"] . "-" . $cardDetails["month"]);
        $paymentType = new AnetAPI\PaymentType();
        $paymentType->setCreditCard($creditCard);

        return $paymentType;
    }

    public function setTransactionRequestType($paymentType, $amount)
    {
        $transactionRequestType = new AnetAPI\TransactionRequestType();
        $transactionRequestType->setTransactionType("authCaptureTransaction");
        $transactionRequestType->setAmount($amount);
        $transactionRequestType->setPayment($paymentType);

        return $transactionRequestType;
    }

    public function chargeCreditCard($cardDetails)
    {
        $paymentType = $this->setCreditCard($_POST);
        $transactionRequestType = $this->setTransactionRequestType($paymentType, $_POST["amount"]);

        $request = new AnetAPI\CreateTransactionRequest();
        $request->setMerchantAuthentication($this->merchantAuthentication);
        $request->setRefId( $this->refId);
        $request->setTransactionRequest($transactionRequestType);
        $controller = new AnetController\CreateTransactionController($request);
        $response = $controller->executeWithApiResponse(\net\authorize\api\constants\ANetEnvironment::SANDBOX);

        return $response;
    }
}
Authorize.net Payment Response and Update Database
In this PHP code, the AuthorizeNetPayment class instance is created and the charge credit card request is created. As a result, the function will return the payment response in JSON format. This JSON object is parsed and the payment data like responseCode, authCode, responseText, tranId and more are stored in the database.
<?php

require_once "config.php";

$type = "";
$message = "";
if (!empty($_POST["pay_now"])) {
    require_once 'AuthorizeNetPayment.php';
    $authorizeNetPayment = new AuthorizeNetPayment();

    $response = $authorizeNetPayment->chargeCreditCard($_POST);

    if ($response != null)
    {
        $tresponse = $response->getTransactionResponse();

        if (($tresponse != null) && ($tresponse->getResponseCode()=="1"))
        {
            $authCode = $tresponse->getAuthCode();
            $paymentResponse = $tresponse->getMessages()[0]->getDescription();
            $reponseType = "success";
            $message = "This transaction has been approved. <br/> Charge Credit Card AUTH CODE : " . $tresponse->getAuthCode() .  " <br/>Charge Credit Card TRANS ID  : " . $tresponse->getTransId() . "\n";
        }
        else
        {
            $authCode = "";
            $paymentResponse = $tresponse->getErrors()[0]->getErrorText();
            $reponseType = "error";
            $message = "Charge Credit Card ERROR :  Invalid response\n";
        }

        $transactionId = $tresponse->getTransId();
        $responseCode = $tresponse->getResponseCode();
        $paymentStatus = $authorizeNetPayment->responseText[$tresponse->getResponseCode()];
        require_once "DBController.php";
        $dbController = new DBController();

        $param_type = 'sssdss';
        $param_value_array = array(
            $transactionId,
            $authCode,
            $responseCode,
            $_POST["amount"],
            $paymentStatus,
            $paymentResponse
        );
        $query = "INSERT INTO tbl_authorizenet_payment (transaction_id, auth_code, response_code, amount, payment_status, payment_response) values (?, ?, ?, ?, ?, ?)";
        $id = $dbController->insert($query, $param_type, $param_value_array);
    }
    else
    {
        $reponseType = "error";
        $message= "Charge Credit Card Null response returned";
    }
}
?>
Switch Authorize.Net Payment Mode from Sandbox to Live
After testing the payment flow in the Authorize.Net sandbox environment, it’s time to go live. It is very simple from switching the payment mode from sandbox to live. The below list of changes has to be done to process Authorize.Net live payment.
- Create merchant account and get the API Login id and the Transaction key to use in live mode.
- Use the real card information.
- Change the API endpoint from SANDBOX to PRODUCTION.
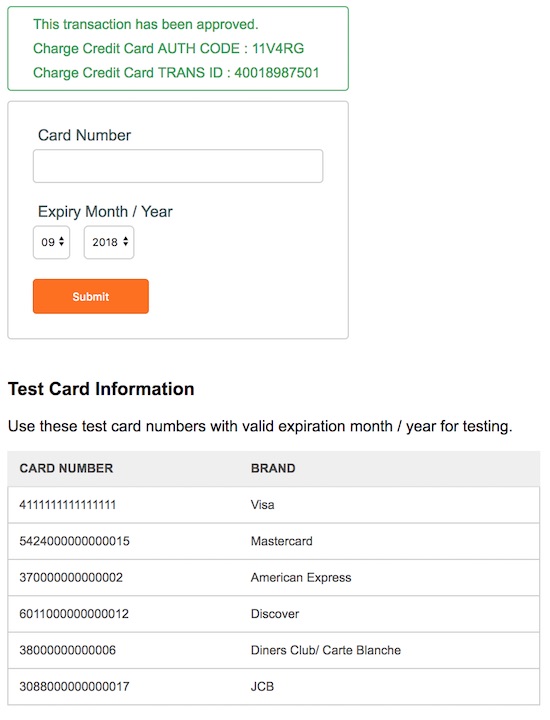
Authorize.Net Payment Form Output
Authorize.Net payment gateway integration is one of the easiest to achieve. The following screenshot shows the payment form to enter the card information to process payment via Authorize.Net API. In this output, the success response is shown with the transaction id. In this HTML view, the test card details are shown.
Conclusion
Authorize.Net provides API services with features like payment transactions, webhooks and more for building a payment solution in our application. We have seen the simple steps to integrate the this payment gateway easily.
In previous articles, we have seen examples for enabling payment gateway by using different providers. If you want to see how to integrate PayPal payment gateway, Stripe one time payment or Sage Pay solutions, the linked tutorials will be useful. The Sage Pay payment gateway integration is a similar popular service in UK and Europe.

Hello nice one Vincy
Quick question so I can use this and create a donation platform or e-commerce and then I would get credited for any transaction
Hi Chiemelu,
Yes definitely you can use this Authorize.net payment gateway integration script and create a donation platform.