Cropping is an action to cut a selected portion from the original image. Image editor software like Photoshop will always have the crop tool. A cropping tool is a minimum necessity when we build an application to manipulate images.
In this article, we will create a crop tool in a PHP web application to crop images using jQuery. I have used the Jcrop plugin to implement dynamic image cropping functionality. This is a jQuery-based plugin, and it is simple and easy to integrate.
This screenshot shows the original image with the crop button control. Also, the cropped image output is displayed at the bottom of this screenshot.
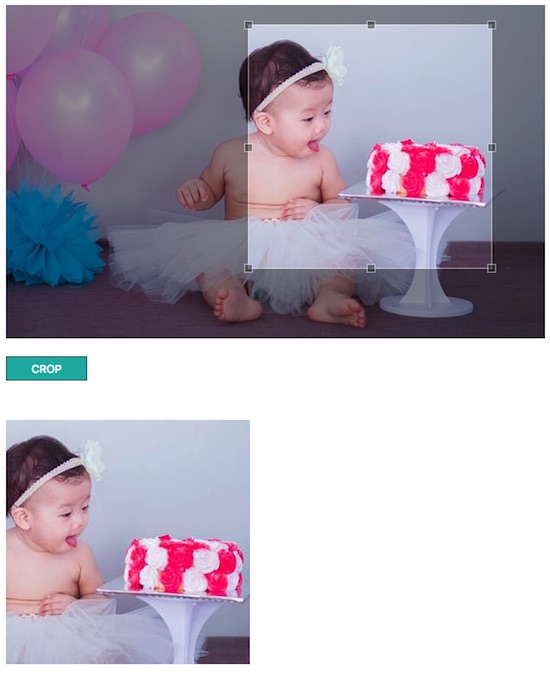
The original image will be loaded on a landing page by executing this example. We can select the crop area by using the mouse drag events. Once the crop area is selected, it can be manipulated by changing the selected dimensions. The crop button’s click event will trigger the code execution to return the image blob for the cropped area. This blob data will be set as the source of the resultant image. If you are looking for a pure PHP server-side solution without using jQuery, check my earlier article on PHP image resize.
Loading Original Image in Crop Mode
This is the initial page that loads the original image. The user can select and manage crop boundaries using mouse drag events. This page contains the crop button on clicking, of which the jQuery script will be executed to prepare cropped image output (using PHP) to show it to the browser.
<html>
<head>
<title>How to Crop Image using jQuery</title>
<link rel="stylesheet" href="jquery.Jcrop.min.css" type="text/css" />
<script src="jquery.min.js"></script>
<script src="jquery.Jcrop.min.js"></script>

<style>
body {
    width: 550px;
    font-family: Arial;
}

input#crop {
    padding: 5px 25px 5px 25px;
    background: lightseagreen;
    border: #485c61 1px solid;
    color: #FFF;
    visibility: hidden;
}

#cropped_img {
    margin-top: 40px;
}
</style>
</head>
<body>
    <div>
        <img src="img.jpg" id="cropbox" class="img" /><br />
    </div>
    <div id="btn">
        <input type='button' id="crop" value='CROP'>
    </div>
    <div>
        <img src="#" id="cropped_img" style="display: none;">
    </div>

</body>
</html>
jQuery Script to Prepare Cropped Image Source
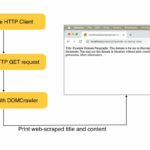
This jQuery script handles the crop area selection and the crop action events. When the user selects the crop boundary, the crop area coordinates and the dimensions are indexed using the onSelect callback of the Jcorp plugin. In this script, we have specified the aspectRatio option while initializing the jCorp plugin.
The indexed data is passed to a PHP file to create the cropped image using the PHP GD functions dynamically. Previously, we have seen how to create images using PHP image functions.
<script type="text/javascript">
  $(document).ready(function(){
        var size;
        $('#cropbox').Jcrop({
          aspectRatio: 1,
          onSelect: function(c){
           size = {x:c.x,y:c.y,w:c.w,h:c.h};
           $("#crop").css("visibility", "visible");
          }
        });

        $("#crop").click(function(){
            var img = $("#cropbox").attr('src');
            $("#cropped_img").show();
            $("#cropped_img").attr('src','image-crop.php?x='+size.x+'&y='+size.y+'&w='+size.w+'&h='+size.h+'&img='+img);
        });
  });
</script>
PHP Code to Create Dynamic Image Layer to Display Cropped Image
This PHP code receives the cropped image dimensions and coordinates. These data are used to create a dynamic image layer to plot the cropped image. By setting the content type by using PHP header function the output image will be displayed to the browser.
<?php
  $img_r = imagecreatefromjpeg($_GET['img']);
  $dst_r = ImageCreateTrueColor( $_GET['w'], $_GET['h'] );

  imagecopyresampled($dst_r, $img_r, 0, 0, $_GET['x'], $_GET['y'], $_GET['w'], $_GET['h'], $_GET['w'],$_GET['h']);

  header('Content-type: image/jpeg');
  imagejpeg($dst_r);

  exit;
?>


Superb!
Thanks Amit.
wow this is beautiful
Thank you Tabu.
Great Article, thank you so much
Welcome Agushi!