A file explorer, specially designed for showcasing image files will be a cool addition to your PHP web application when you are handling images.
Imagine an image file explorer built in PHP with options to options to browse files in icon, list and detailed view. That is what we are going to see and build in this article.
Having feature to explore image files with different modes of display will enrich your web applications. Image gallery is a popular choice but if it comes added with other views, it will be a definite win for the users.
Creating an image file explorer with PHP is simple and useful for the image centric web applications. There are numerous web applications implemented this image file exploring with advanced features.
In this example, I have created a simple example for exploring only the files of a specific target folder. We can enhance this code by supporting to explore image directories including its sub directories instead of viewing only files.
What is inside?
- The Advantages of Creating Custom Explorer for images
- Existing PHP / jQuery Libraries to integrate image explorer
- About Custom Image Explorer Example
- Code Implementation for Image File Explorer Example
- Fetch image file explorer view results from database
- Create HTML interface for the image file explorer
- File Structure
- Database Script
- Custom Image Explorer Output
The Advantages of Creating Custom Explorer for images
Custom image file explorer has many advantages as listed below.
- It has options to explore image file in different views like list, details, gallery, slideshow and more.
- It can be customized to display dynamic images from database or directory source.
- It will have setting to configure default view and also has controls to switch to another view.
- It helps to showcase photo gallery by its gallery view.
- Slideshow feature of the image file explorer will help in giving pictorial presentation.
Existing PHP / jQuery Libraries to integrate image explorer
Most of the existing image file explorer plugins either support gallery view or sideshow. For example, explr-js, file-explore.js and more.
These plugins are used to explore files in a tree view. Using these plugins, the file structure displayed with a nested <ul> will be converted into a tree like hierarchical format.
In this PHP example, the image file explorer has no plugins used for exploring files in a list or gallery. The slideshow is shown with use of the jQuery lightbox script.
About Custom Image File Explorer Example
In this PHP example, I have created an interface to show image file explorer to browse images. The images can be explored in three kind of views Gallery view, List view and Slideshow.
The image data are dynamic which are physically located in a folder and the path is stored in the database.
The gallery view is used to project image files in the form of photo gallery. In a previous tutorial, we have seen how to display an image gallery and how to reorder images in a gallery format.
The list view will display the image file names from the database with iconic bullet points. The slideshow is an advance view which will allow to see the enlarged image in a popup by clicking the image slides.
This image file explorer is with three buttons on the header to change the views among list, gallery and slideshow. By clicking these buttons the selected view name is received and used to change the view accordingly.
Code Implementation for Image File Explorer Example
This example code can be seen as three major components. Those are to fetch image data from the database, to create image file explorer interface with HTML and CSS and to render the dynamic results.
The image results fetched from the databases are physically located in a sub folder of the example application. With the reference of the file path, the image files are displayed in the HTML view.
In the following sections we can see how each view is design and the navigation controls added to explore files. By clicking the navigation control, the selected view is posted to the PHP to switch the image file explorer view appropriately.
Fetch image file explorer view results from database
In the image explorer interface the image data are dynamic that are fetched from the database. The image path are stored in the tbl_image database table.
Below code includes PHP script into the image file explorer HTML. In this script, the MySQL query is created and executed to fetch the image data from the database.
The database result is stored into an array variable which will be iterated to display images in the selected format.
<?php include 'DBController.php';
$db_handle = new DBController();
?>
<!DOCTYPE html>
<html>
<head>
<meta name="viewport" content="width=device-width, initial-scale=1">
<meta charset="utf-8">
<meta name="viewport" content="initial-scale=1">
<!-- Main CSS -->
<link rel="stylesheet" href="main.css">
</head>
<body>
    <div id="gridview">
        <div class="heading">Image File Explorer</div>
        <div class="btn">
            <form name='subimg' id="subimg" method="post" action="" enctype="multipart/form-data">
                <button class="gallery-icon" id="gallery-icon" name="gallery-icon" >Gallery view</button>
                <button class="list-icon" id="list-icon" name="list-icon">List view</button>
                <input type="button" class="slideshow-icon" id="slideshow-icon" name="slideshow-icon" value="Slideshow">
            </form>
        </div>

<?php
$query = $db_handle->runQuery("SELECT * FROM tbl_image ORDER BY id ASC");
if (! empty($query)) {
    foreach ($query as $key => $value) {
    // Image file explorer view HTML
    }
}
?>
       </div>

<script src="https://code.jquery.com/jquery-3.3.1.min.js"></script>
    <!-- Main JS -->
<script src="main.js"></script>
</body>
</html>
Create HTML interface for the image file explorer
This part covers the main purpose of this example which is to create multiple image file exploring views with an option to switch over. In the following sub sections, The HTML code for the (list, gallery, slideshow) views are shown.
HTML code to display list view
This is to show the list view of the image file explorer. It shows the list of image names with iconic image bullet points.
<?php
if(isset($_POST['list-icon'])) {
?>
     <div class="image1">
          <img src="<?php echo $query[$key]["image_path"] ; ?>" />
          <?php echo $query[$key]["name"] ; ?>
     </div>
<?php
}
?>
Dynamic image gallery from database
The gallery view is the default view in this example. In this gallery, each tile will be shown by iterating the database query result.
Same loop iteration is used for both list and gallery views. On each iteration, the selected view option is checked to render the appropriate tile on the image explorer window.
In this example, the gallery tiles shows only images. In a previous tutorial, we have shown a shopping cart product gallery where more details put over on each gallery tile.
<?php
if (! empty($query)) {
    foreach ($query as $key => $value) {
?>
    <div class="image">
        <img src="<?php echo $query[$key]["image_path"] ; ?>" />
    </div>
<?php
    }
}
?>
Running jQuery Image slideshow
This slideshow container is used to display the image slides with left right navigation. The galleryModal container is the target dialog box to display image slideshow with close option.
In this code, the main.js file contains the jQuery light box library script. This library methods are used to initialize the slideshow from the image file explorer interface.
By clicking the Slideshow button on the action menu header of this example, the slideshow will be started. The close icon in the top right corner of the slideshow window is used to stop the slideshow and back to the list or gallery view.
The previous next icons on both sides of the image slides are used to move the slideshow back and forth. In this example, the slideshow open/close events are handled with a smooth fade in fade out effect with jQuery.
<div class="galleryShadow"></div>
        <div class="galleryModal">
          <i class="galleryIcon gIquit close"></i>
          <i class="galleryIcon gIleft nav-left"></i>
          <i class="galleryIcon gIright nav-right"></i>
          <div class="galleryContainer">
              <img src="">
          </div>
        </div>
</div>

<script src="https://code.jquery.com/jquery-3.3.1.min.js"></script>
    <!-- Main JS -->
<script src="main.js"></script>
Stylesheet for the image file explorer interface
These are the styles added with main.css. These styles are used for the slideshow and other image file explorer UI.
.galleryShadow {
    display: none;
    -webkit-transition: ease all .5s;
    transition: ease all .5s;
    position: fixed;
    top: 0;
    left: 0;
    width: 100%;
    height: 100vh;
    background-color: rgba(0, 0, 0, 0.9);
}

.galleryModal {
    -webkit-transform: scale(0);
    transform: scale(0);
    -webkit-transition: ease all .5s;
    transition: ease all .5s;
    position: fixed;
    top: 0;
    left: 0;
    width: 100%;
    height: 100vh;
}

.galleryModal .galleryContainer {
    position: absolute;
    left: 50%;
    top: 50%;
    -webkit-transform: translate(-50%, -50%);
    transform: translate(-50%, -50%);
    width: 80%;
    height: 80%;
}

.galleryModal .galleryContainer img {
    position: absolute;
    left: 50%;
    top: 50%;
    -webkit-transform: translate(-50%, -50%);
    transform: translate(-50%, -50%);
    max-width: 100%;
    max-height: 100%;
    border: 10px solid #fff;
    border-radius: 10px;
}

.galleryModal .galleryContainer .galleryText {
    position: absolute;
    width: 100%;
    height: auto;
    top: 100%;
    color: #fff;
    text-align: center;
    font-size: 1.5em;
}

.galleryModal .galleryIcon {
    position: absolute;
    font-size: 2rem;
    width: 4rem;
    height: 4rem;
    text-align: center;
    color: #fff;
}

.galleryModal .gIquit {
    right: 10px;
    top: 10px;
}

.galleryModal .gIleft {
    top: 50%;
    left: 10px;
    -webkit-transform: translateY(-50%);
    transform: translateY(-50%);
}

.galleryModal .gIright {
    top: 50%;
    right: 10px;
    -webkit-transform: translateY(-50%);
    transform: translateY(-50%);
}

.close {
    background: url("./icons/icon-close.png") no-repeat;
    cursor: pointer;
}

.nav-left {
    background: url("./icons/icon-left.png") no-repeat;
    cursor: pointer;
}

.nav-right {
    background: url("./icons/icon-right.png") no-repeat;
    cursor: pointer;
}

.list-icon, .gallery-icon, .slideshow-icon {
    padding: 10px 40px;
    background: #586e75;
    border: #485c61 1px solid;
    color: #FFF;
    border-radius: 2px;
    cursor: pointer;
}

div.image {
    margin: 10px;
    display: inline-block;
    position: relative;
}

div.image img {
    width: 100%;
    max-width: 300px;
    height: auto;
    border: 1px solid #ccc;
}

.heading {
    padding: 10px 10px;
    margin-bottom: 10px;
    font-size: 1.2em;
}

div.image1 img {
    width: 40px;
    height: 40px;
    border-radius: 50%;
    vertical-align: middle;
    margin: 8px 15px;
    padding: 2px;
}

div.image1 {
    border-bottom: #F0F0F0 1px solid;
}

.image-container {
    margin: 25px 0px;
    background: #f5f5f5;
}

body {
    font-family: Arial;
    color: #212121;
    font-size: 0.95em;
}
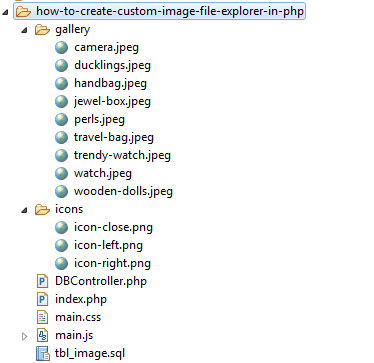
File Structure
The custom image explorer example file structure is shown below. In this structure, the images stored in the database are physically located in the gallery folder. The icon folder contains the slideshow navigation and close icons.
The index.php is the landing page includes the HTML code to display various view while exploring image files. The DBController.php handles the database related functionalities to fetch the dynamic images from the database.
The main.js and main.css files are containing the slideshow and lightbox script. Also, it includes additional styles to render the image gallery and list view on the browser.
Database Script
This is the database script containing tbl_image table’s create statement. By importing this database table, you can run this example and make it work on your environment to use custom image explorer example.
CREATE TABLE IF NOT EXISTS `tbl_image` (
  `id` int(2) NOT NULL AUTO_INCREMENT,
  `name` varchar(30) COLLATE latin1_bin NOT NULL,
  `image_path` text COLLATE latin1_bin NOT NULL,
  PRIMARY KEY (`id`)
) ENGINE=InnoDB AUTO_INCREMENT=9 DEFAULT CHARSET=latin1 COLLATE=latin1_bin;

INSERT INTO `tbl_image` (`id`, `name`, `image_path`) VALUES
(1, 'handbag.jpeg', 'gallery/handbag.jpeg'),
(2, 'watch.jpeg', 'gallery/watch.jpeg'),
(3, 'Trendy Watch', 'gallery/trendy-watch.jpeg'),
(4, 'Travel Bag', 'gallery/travel-bag.jpeg'),
(5, 'ducklings.jpeg', 'gallery/ducklings.jpeg'),
(6, 'wooden-dolls.jpeg', 'gallery/wooden-dolls.jpeg'),
(7, 'camera.jpeg', 'gallery/camera.jpeg'),
(8, 'perls.jpeg', 'gallery/perls.jpeg');
COMMIT;
Custom Image Explorer Output
The following screenshot shows the images in multiple views. These three different type of views can be seen by selecting the views from the header menu bar shown in the screenshot.
Gallery view

List view
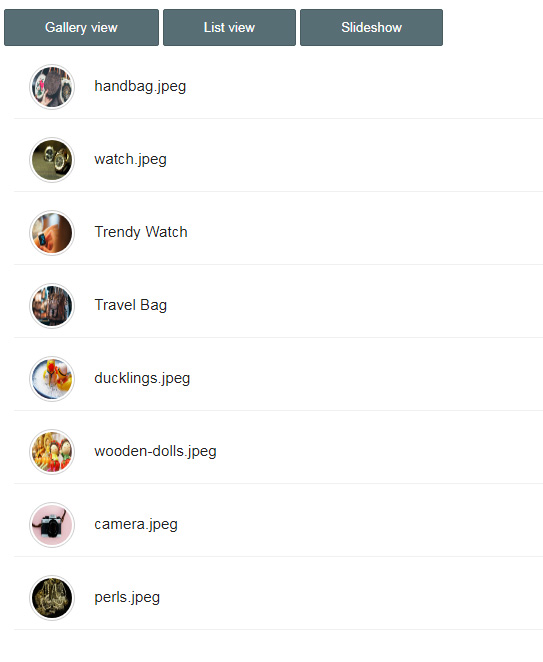
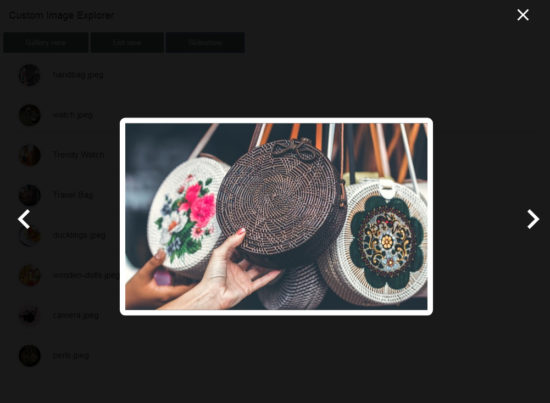
Slideshow
The image slideshow is triggered by clicking the Slideshow button on the header menu. The content of the successive slides on the slideshow is taken from the image list markup added in the landing page.
The class selector on the image record or tile is used as a reference to grab the data to be shown on each slides.
Conclusion
Image file explorer can be designed in various ways based on the application requirement. Specifically, the view will be varied among tree-like hierarchical view, (small, medium, large) iconic representation, gallery view and more.
This example code is exclusive for exploring only image files from the database. Sometimes the image file resource target has be a directory instead of a database.
This code will help to implement image file explorer with three different views. The button navigation make it smooth to switch the image views from one another.


great job!
Thank you Ravina.
Hi,
I thought I would use the script on my php Bootstrap page. When I click “Slideshow” the first image appears, without the navigation arrows or closing “x”.
What do I need to change to make the script work on a Bootstrap page?
Thanks so much!
I left you a message yesterday about the arrows not showing in the Slideshow on a Bootstrap page. I found that I had to adjust my main.css file. It was how I set up the page.
Thanks for your time and for an excellent script.
Wow, what a very helpful tutorial, thanks…
Welcome Raphy