In an eCommerce Software, the product gallery is a key interface to showcase the online store products. Many popular online shopping cart applications have wonderful gallery pages to make the user see a maximum of their store products.
Not only for e-business the 80-20 rule applies to many businesses. So, you have to showcase more the number of products on the shelf which let the users come and visit. More the visits help to make the user as your customer. The gallery page is the right place to show off your store’s potential and volume.
Sometimes, the gallery interface contains many features and functionality like product image slideshow, product quick view, add-to-cart and more. In the simple shopping cart example, we have added the feature to add the product to the cart from the gallery. In a previous tutorial, I have consolidated the key design factors for a shopping cart gallery page.

In this tutorial, we are going see how to add image slideshow in an eCommerce software product gallery page. I have used jQuery lightbox overlay for the slides while running the slideshow. Each slide will contain the previous next navigation to move back and forth during the slideshow.
This example code will show responsive slideshow output. The gallery and the slideshow product images are scaled to the viewport size. The slides overlay control elements are also smoothly acquired into the screen boundary of various devices.
In this example, the gallery product results are dynamic from the database. The results are iterated in a loop to display the gallery product tiles. By clicking the product tile, the slide overlay will be shown with the enlarged product image and title.
eCommerce Software Product Gallery Interface
This HTML code contains PHP scriptlets to get the MySQL database results and to iterate the resultant array. On each iteration, the product tile HTML will be added. Each tile’s click event is mapped with a jQuery handler to run the slideshow.
The gallery tiles are added with the CSS class selector. With the reference of this class selector, the gallery tile click event is captured in the jQuery script. Then, the currently clicked product will be loaded to the jQuery lightbox overlay.
Inside the gallery tile div, the product image tag is added with a HTML5 data attribute data-text. The product name is added with this user-defined data attribute. By reading this data attribute‘s value the product name is dynamically loaded to the slide.
The slides overlay contains an option to quit from the slideshow to go back to the gallery interface. The iconic controls on the overlay are used to perform the slide navigation and the quit action.
<?php
include 'DBController.php';
$db_handle = new DBController();
?>
<!doctype html>
<html lang="en">

<head>
<title>eCommerce Software Product Gallery Slideshow with jQuery Lightbox</title>
</head>
<body>
    <div class="container py-4">
        <h1>eCommerce Software Product Gallery Slideshow with jQuery
            Lightbox</h1>
        <div>
            <!-- gallery class need for using gallery -->
            <div class="gallery">
                <!-- need a div for contains img tag -->
          <?php
        $query = $db_handle->runQuery("SELECT * FROM tbl_products ORDER BY id ASC");
        if (! empty($query)) {
            foreach ($query as $key => $value) {
                ?>
          <div class="galleryItem">
                    <img
                        src="<?php echo $query[$key]["product_image"] ; ?>"
                        data-text="<?php echo $query[$key]["name"] ; ?>">
                </div>
          <?php
            }
        }
        ?>
        </div>
        </div>
    </div>
    <div class="galleryShadow"></div>
    <div class="galleryModal">
        <i class="galleryIcon gIquit close"></i> <i
            class="galleryIcon gIleft nav-left"></i> <i
            class="galleryIcon gIright nav-right"></i>
        <div class="galleryContainer">
            <img src="">
        </div>
    </div>
    <script src="https://code.jquery.com/jquery-3.3.1.min.js"></script>
    <!-- Main JS -->
    <script src="assets/js/main.js"></script>
</body>
</html>
jQuery Lightbox Script to Run Shopping Cart Product Image Slideshow
I have used the following jQuery script and CSS for implementing the product image slideshow in this eCommerce example.
main.js
In this script, the gallery tile element click event is handled to start the product slideshow. On clicking the image tile, the slideshow will start from the clicked product slide and loop around the array of slides. On loading and quitting the slideshow component, the jquery fade-in fade-out effects are applied.
The slideshow component of the eCommerce page will contain the navigation control with respective class selectors. This script uses the class name as a reference to call the function to shift to the subsequent slides.
The galleryNavigate function is used to move the slides back and forth. It accepts two parameters gData and direction. The title and the product image source path are grabbed from the gallery tile container and added to this gData instance. Later these data are read with the reference of the gData object and loaded to the slide HTML target element.
The possible values of the direction parameter are left and right. Depends on the direction specified in the galleryNavigate function, the slide movement will be handled horizontally. On loading each slide, the gallery image source is checked in a conditional statement before loading it to the slide component.
$(function () {
    $('.gIquit').click(function () {
        $('.galleryModal').css({ 'transform': 'scale(0)' })
        $('.galleryShadow').fadeOut()
    })
    $('.gallery').on('click', '.galleryItem', function () {
        galleryNavigate($(this), 'opened')
        $('.galleryModal').css({ 'transform': 'scale(1)' })
        $('.galleryShadow').fadeIn()
    })
    let galleryNav
    let galleryNew
    let galleryNewImg
    let galleryNewText
    $('.gIleft').click(function () {
        galleryNew = $(galleryNav).prev()
        galleryNavigate(galleryNew, 'last')
    })
    $('.gIright').click(function () {
        galleryNew = $(galleryNav).next()
        galleryNavigate(galleryNew, 'first')
    })
    function galleryNavigate(gData, direction) {
        galleryNewImg = gData.children('img').attr('src')
        if (typeof galleryNewImg !== "undefined") {
            galleryNav = gData
            $('.galleryModal img').attr('src', galleryNewImg)
        }
        else {
            gData = $('.galleryItem:' + direction)
            galleryNav = gData
            galleryNewImg = gData.children('img').attr('src')
            $('.galleryModal img').attr('src', galleryNewImg)
        }
        galleryNewText = gData.children('img').attr('data-text')
        if (typeof galleryNewText !== "undefined") {
            $('.galleryModal .galleryContainer .galleryText').remove()
            $('.galleryModal .galleryContainer').append('<div class="galleryText">' + galleryNewText + '</div>')
        }
        else {
            $('.galleryModal .galleryContainer .galleryText').remove()
        }
    }
})
And the Library CSS is shown below. It contains styles for the gallery and slideshow element selectors. This is to position the product tiles on the card-like gallery view and to pop over the lightbox overlay to run the slideshow. In a previous tutorial, we have seen how to view shopping cart product Quicklook from the gallery using the Bootstrap tooltip.
main.css
.gallery .card {
  cursor: pointer;
}

.galleryShadow {
  display: none;
  -webkit-transition: ease all .5s;
  transition: ease all .5s;
  position: fixed;
  top: 0;
  left: 0;
  width: 100%;
  height: 100vh;
  background-color: rgba(0, 0, 0, 0.9);
}

.galleryModal {
  -webkit-transform: scale(0);
          transform: scale(0);
  -webkit-transition: ease all .5s;
  transition: ease all .5s;
  position: fixed;
  top: 0;
  left: 0;
  width: 100%;
  height: 100vh;
}

.galleryModal .galleryContainer {
  position: absolute;
  left: 50%;
  top: 50%;
  -webkit-transform: translate(-50%, -50%);
          transform: translate(-50%, -50%);
  width: 80%;
  height: 80%;
}

.galleryModal .galleryContainer img {
  position: absolute;
  left: 50%;
  top: 50%;
  -webkit-transform: translate(-50%, -50%);
          transform: translate(-50%, -50%);
  max-width: 100%;
  max-height: 100%;
  border: 10px solid #fff;
  border-radius: 10px;
}

.galleryModal .galleryContainer .galleryText {
  position: absolute;
  width: 100%;
  height: auto;
  top: 100%;
  color: #fff;
  text-align: center;
  font-size: 1.5em;
}

.galleryModal .galleryIcon {
  position: absolute;
  font-size: 2rem;
  width: 4rem;
  height: 4rem;
  text-align: center;
  color: #fff;
}

.galleryModal .gIquit {
  right: 10px;
  top: 10px;
}

.galleryModal .gIleft {
  top: 50%;
  left: 10px;
  -webkit-transform: translateY(-50%);
          transform: translateY(-50%);
}

.galleryModal .gIright {
  top: 50%;
  right: 10px;
  -webkit-transform: translateY(-50%);
          transform: translateY(-50%);
}
.close {
    background: url("../icons/icon-close.png") no-repeat;
    cursor: pointer;
}
.nav-left {
    background: url("../icons/icon-left.png") no-repeat;
    cursor: pointer;
}
.nav-right {
    background: url("../icons/icon-right.png") no-repeat;
    cursor: pointer;
}
Product Database Table Script
The following SQL script is with the product database table structure and the data. The product table contains details like name, price, category, product image and average rating. In this example, I have used the product image and name data while running the slideshow. You can also display more details on the slides from the database. Import this script in your local environment to run this example.
--
-- Table structure for table `tbl_products`
--

CREATE TABLE `tbl_products` (
  `id` int(8) NOT NULL,
  `name` varchar(255) NOT NULL,
  `price` double(10,2) NOT NULL,
  `category` varchar(255) NOT NULL,
  `product_image` text NOT NULL,
  `average_rating` float(3,1) NOT NULL
) ENGINE=InnoDB DEFAULT CHARSET=latin1;

--
-- Dumping data for table `tbl_products`
--

INSERT INTO `tbl_products` (`id`, `name`, `price`, `category`, `product_image`, `average_rating`) VALUES
(1, 'Tiny Handbags', 100.00, 'Fashion', 'gallery/handbag.jpeg', 5.0),
(2, 'Men\'s Watch', 300.00, 'Generic', 'gallery/watch.jpeg', 4.0),
(3, 'Trendy Watch', 550.00, 'Generic', 'gallery/trendy-watch.jpeg', 4.0),
(4, 'Travel Bag', 820.00, 'Travel', 'gallery/travel-bag.jpeg', 5.0),
(5, 'Plastic Ducklings', 200.00, 'Toys', 'gallery/ducklings.jpeg', 4.0),
(6, 'Wooden Dolls', 290.00, 'Toys', 'gallery/wooden-dolls.jpeg', 5.0),
(7, 'Advanced Camera', 600.00, 'Gadget', 'gallery/camera.jpeg', 4.0),
(8, 'Jewel Box', 180.00, 'Fashion', 'gallery/jewel-box.jpeg', 5.0),
(9, 'Perl Jewellery', 940.00, 'Fashion', 'gallery/perls.jpeg', 5.0);

--
-- Indexes for dumped tables
--

--
-- Indexes for table `tbl_products`
--
ALTER TABLE `tbl_products`
  ADD PRIMARY KEY (`id`);

--
-- AUTO_INCREMENT for dumped tables
--

--
-- AUTO_INCREMENT for table `tbl_products`
--
ALTER TABLE `tbl_products`
  MODIFY `id` int(8) NOT NULL AUTO_INCREMENT, AUTO_INCREMENT=10;
COMMIT;
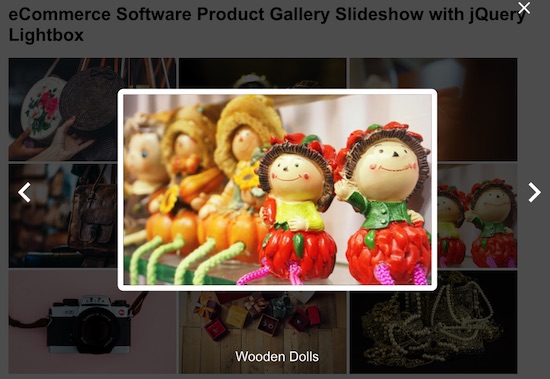
eCommerce Software Product Gallery Slideshow Output
The below screenshot shows the eCommerce product gallery slideshow output with jQuery lightbox effect. the lightbox overlay contains the prev-next and close icons to perform the navigation and exit action respectively.