In this tutorial, we are going to access the MySQL database from PHP. Accessing MySQL from PHP is very simple and easy to implement. PHP contains MySQLi class functions to connect and access the database. Some of those are used in this article.
- prepare() – To prepare query statement object
- fetch_row() – To read row data as an associative array. There are many MySQL fetch functions in PHP to read table rows.
- execute() – executes queries with the reference of the statement object created.
This article contains a short example of accessing databases using PHP and MySQL. The upcoming sections explain the example code to guide beginners.
Example files and database script
This example uses the database table named animals. It performs the create, read, update and delete (CRUD) functionalities with the database.
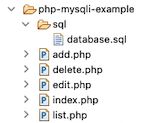
File Structure
This is the example code file structure. It contains the files in the root to perform read-write operations. The landing page contains a navigation link to go to the list page.
Database script
Import this database script into the development environment. It contains the CREATE statement of the target table on which the CRUD is performed.
Then configure the database details at the top of each file in the example code.
CREATE TABLE `animals` (
  `id` int(11) NOT NULL,
  `animal_name` varchar(255) NOT NULL,
  `animal_color` varchar(255) NOT NULL
) ENGINE=InnoDB DEFAULT CHARSET=utf8mb4;

--
-- Indexes for dumped tables
--

--
-- Indexes for table `animals`
--
ALTER TABLE `animals`
  ADD PRIMARY KEY (`id`);

--
-- AUTO_INCREMENT for dumped tables
--

--
-- AUTO_INCREMENT for table `animals`
--
ALTER TABLE `animals`
  MODIFY `id` int(11) NOT NULL AUTO_INCREMENT;
Create and Configure Database
Open PHPMyAdmin or any other database client to create the database. Select the newly created database and create the table on which the CRUD is going to be performed.
After creating the database and tables connect this from PHP by setting the configuration. The following code is used to connect MySQL from PHP. It requires hostname, database name, database username, database password.
This example code uses the procedural way of connecting the MySQL database.
<?php
// to be replaced with your own information
$conn = mysqli_connect("localhost", "root", "admin", "blog_samples");
?>
Create New Record
The code shows the INSERT query to add a new row to the database table animals by mapping values to its columns animal_name and animal_color.
Since the column values are string data, those are enclosed with single quotes. The prepare() function creates the SQL statement object to bind the params. Then, the code executes the query with the reference of this object.
<?php
// Configure your database details here
$conn = mysqli_connect("localhost", "root", "", "blog_eg");

$animalName = 'Elephant';
$animalColor = 'Grey';
$sqlStatement = $conn->prepare("INSERT INTO animals (animal_name, animal_color) VALUES (?, ?)");
$sqlStatement->bind_param("ss", $animalName, $animalColor);
if ($sqlStatement->execute()) {
    $message = "Added Successfully.";
} else {
    $message = "Problem in Adding New Record.";
}
$sqlStatement->close();
$conn->close();
print $message;
?>
Read Data from Table
The SELECT query is used to read database table rows. The following code shows how to read all rows from the “animals” table. I used the fetch_assoc() function to get the associative array column fields and values for each row.
The code will return a list of animal names and it’s color in an associative array.
After MySQL fetch, it iterates the result using PHP foreach() and prints the data into the browser.
<?php
// Configure your database details here
$conn = mysqli_connect("localhost", "root", "", "blog_eg");
$sqlStatement = "SELECT * FROM animals";
$result = $conn->query($sqlStatement);
$conn->close();
if ($result->num_rows > 0) {
    while ($row = $result->fetch_assoc()) {
        $tblEntries[] = $row;
    }
}

foreach ($tblEntries as $record) {
    ?>
Animal Name: <?php echo $record["animal_name"]; ?><br />
Animal Color: <?php echo $record["animal_color"]; ?><br />
<br />
<?php
}
?>
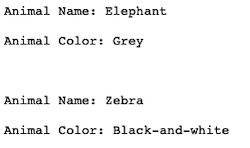
This code will display the result in the browser as like as below.
We can read filtered data by using the WHERE clause. The following code executes the SELECT query with a prepared statement. It reads the animals in ‘grey’ color from the database.
<?php
$sqlStatement = "SELECT * FROM animals WHERE animal_color=?";
$sqlStatement->bind_param("s", 'Grey');
$result = $conn->query($sqlStatement);
$conn->close();
?>
Update Table Row
The UPDATE query is used to change the value of the column by setting a new value. It uses the WHERE clause to apply the condition for updating the row data.
The following code is used to change the animal_name as ‘Rat‘ for the rows which has the value Grey in the animal_color.
<?php
// Configure your database details here
$conn = mysqli_connect("localhost", "root", "", "blog_eg");

$animalName = 'Elephant';
$newColor = 'Dark-Grey';
$sqlStatement = $conn->prepare("UPDATE animals SET animal_color=? WHERE animal_name=?");
$sqlStatement->bind_param("ss", $newColor, $animalName);
if ($sqlStatement->execute()) {
    $message = "Edited Successfully.";
} else {
    $message = "Problem in Edit.";
}
$sqlStatement->close();
$conn->close();
print $message;
?>
Deleting the selected row
The DELETE query shown below is to delete all the rows containing animal_color as ‘grey’
<?php
// Configure your database details here
$conn = mysqli_connect("localhost", "root", "", "blog_eg");

$animalColor = 'Dark-Grey';
$sqlStatement = $conn->prepare("DELETE FROM animals WHERE animal_color = ?");
$sqlStatement->bind_param("s", $animalColor);
if ($sqlStatement->execute()) {
    $message = "Delete Successfully.";
} else {
    $message = "Problem in Delete.";
}
$sqlStatement->close();
$conn->close();
print $message;
?>


Thank you for the script and learning for me.
Soren. DK.
Welcome Soren.
what is the scrift for reset password
Check this https://phppot.com/php/php-forgot-password-recover-code/
Vincy I simply like you. Hopefully everyone of us will do more for you. You deserve great things in life…
Always wish you the best of best blessings. I don’t know much about you, all I know is that you’re great person and that’s enough for me.
Hi Zviko,
Thank you so much for the nice words. It help me keep going. Thank you.