An avatar is a graphical representation of a user’s identity by using icons or profile thumbnail images. In this article, I will walk you through to create PHP code that will generate an avatar image using the initial from username dynamically.
Images are an integral part of the web pages. It helps to convey a meaning, context easily. Depending on the scenario, the images are created dynamically for rendering graphical elements like charts, graphs and more.
User initial avatar generator is a feature to personalize the profile page by displaying an image even if the profile image is not added. It can be achieved by dynamic image generation with PHP using Graphic Draw (GD) libraries.
In this article, I have developed a custom code to generate an initial avatar with just core PHP and jQuery.
What is inside?
- Advantages of generating dynamic avatar from the username.
- About this example code.
- Existing libraries to generate initial avatar from the username.
- PHP GD Library
- jQueryUI modal window
- Landing HTML with login register options.
- PHP code to create avatar image using GD functions
- Invoke function to generate initial avatar
- Code to show dashboard page with avatar
- File structure.
- Database script
- Dashboard with user initial avatar output
Advantages of generating dynamic avatar from username
Adding the feature to generate an initial avatar has the following advantages.
- It gives a good user experience by generating avatars automatically instead of forcing them to choose a profile photo.
- Application-specific default avatars may make the user’s profile page with the position of anonymity. This will be prevented by generating an initial avatar from names.
- Initials are the most probably used icons for the person’s identity in real-time. So this concept aptly suits for this scenario.
- The best and simple solution to personalize the user’s profile page.
- Reduces users time and effort by simplifying the process of entering the registration and profile update form.
About this example code
As we have already seen in the introductory part, this example is created with plain PHP and without using any library or frameworks.
In this example, the registration action will invoke the code to generate an initial avatar from the username. For that, an image layer is dynamically generated using PHP GD functions. Then, the user name’s initial letter is passed to render the image binary to the target layer.
The same method has been followed while creating PHP captcha with a random code. The generated avatar will be saved in a target folder and the path will be updated in the user database.
When the user logged in to the system with the valid credentials, then the dashboard will display the dynamically generated initial avatar.
As it is related to the user’s profile generation, I have used the same code that is for creating Ajax based login registration system with jQuery modal windows.
Existing libraries to generate initial avatar from the username
There are code packages/libraries available online for free to generate initial avatar. Following are two best libraries available online,
These two are having cool features and worth considering.
PHP GD Library
PHP GD libraries help to create types of PNG, JPG and GIF image files dynamically. Also, it supports image manipulation with built-in core functions.
The built-in GD functions are used to manipulate images by resizing, cropping, compressing and more. Without these core functions, these processes are time-consuming and tedious.
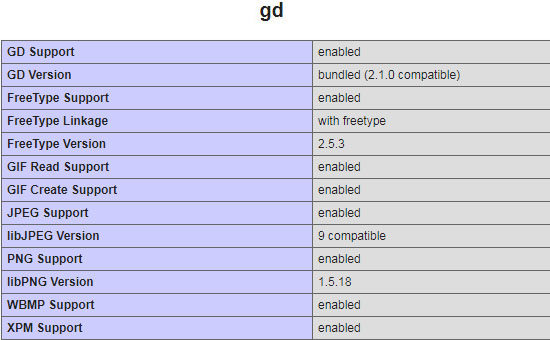
Generally, the GD library comes along with the PHP core code and it will be enabled by default. Check your PHP configuration and ensure that the GD is enabled. To verify if you have GD enabled, it can be seen as below by printing phpinfo().
jQueryUI modal window
In a previous tutorial, we have created a login registration system with jQuery UI dialog window. It popped up the login or registration form to get the user input.
With the jQuery-like vastly-used library, it is preferable to use dialog boxes in necessitated places. It has the options to customize the Okay, Cancel and Close action handlers using callbacks.
By entering data and submitting popped up form, the process is done asynchronously at the backend. Then the success or failure response will be updated in the UI without page refresh.
The following code shows the jQueryUI library call to display the login or registration popup.
<script>
$(function () {
   var login_window = $("#login-dialog").dialog({autoOpen: false,
   height: 280,
   width: 520,
   modal: true,
   closeText: '',
   close: function () {
   register_window.dialog("close");
}
});
$("#login-div").button().on("click", function () {
   login_window.dialog("open");
});
var register_window = $("#register-dialog").dialog({
   autoOpen: false,
   height: 530,
   width: 520,
   modal: true,
   closeText: '',
   close: function () {
      register_window.dialog("close");
   }
});

$("#register-div").button().on("click", function () {
   register_window.dialog("open");
});
});
</script>
Landing HTML with login register options
The page will contain the Login Register buttons. These button’s click event is mapped with the jQuery callback to popup the login, registration modal window.
By submitting the registration form the user’s name email and more details are sent to the PHP via AJAX. In PHP, side the user avatar is generated from the user name and saved.
While login, the saved user initial avatar, and other details are retrieved and displayed in a dashboard.
<div class="container">
<div class="inner-container">
<div id="button-container">
<div class="login-box">
<input type="button" class="btn-submit" value="Login" id="login-div">
</div>
<div class="register-box">
<input type="button" class="btn-submit" value="Register" id="register-div">
</div>
</div>
<div class="thank-you-registration">
</div>
<div class="form-container">
<div id="login-dialog" title="Login Dialog Form" style="display:none;">
<form id="login-form" action="" method="post" role="form" >
<div class="input-row">
<span id="email-info"></span>
<input type="email" name="login-email-id" id="login-email-id" class="input-field" placeholder="Email ID">
</div>
<div class="input-row">
<span id="password-info"></span>
<input type="password" name="login-password" id="login-password" class="input-field" placeholder="Password">
</div>
<div class="submit-button">
<input type="button" class="btn-submit" value="Log In" onclick="ajaxLogin()">
</div>
</form>

<div class="success-message" id="login-success-message" style="display:none"></div>
<div class="error-message" id="login-error-message" style="display:none"></div>
<div id="ajaxloader" style="display:none">
<img src="LoaderIcon.gif" id="loaderId" />
</div>
</div>
<div id="register-dialog" class="register-class" title="Registration Dialog Form" style="display:none;">
<form id="register-form" action="" method="post" role="form">
<div class="input-row">
<span id="first-name-info"></span>
<input type="text" name="first-name" id="first-name" class="input-field" placeholder="First Name" value="">
</div>
<div class="input-row">
<span id="last-name-info"></span>
<input type="text" name="last-name" id="last-name" class="input-field" placeholder="Last Name" value="">
</div>
<div class="input-row">
<span id="register-email-info"></span>
<input type="email" name="register-email-id" id="register-email-id" class="input-field" placeholder="Email ID" value="">
</div>
<div class="input-row">
<span id="contact-no-info"></span>
<input type="text" name="contact-number" id="contact-number" maxlength="10" class="input-field" placeholder="Contact Number">
</div>
<div class="input-row">
<span id="register-passwd-info"></span>
<input type="password" name="register-password" id="register-password" class="input-field" placeholder="Password">
</div>
<div class="input-row">
<span id="confirm-passwd-info"></span>
<input type="password" name="confirm-password" id="confirm-password" class="input-field" placeholder="Confirm Password">
</div>
<div class="submit-button">
<input type="button" class="btn-submit" value="Register" onclick="ajaxRegistration()">
</div>

</form>

<div class="success-message" id="register-success-message" style="display:none"></div>
<div class="error-message" id="register-error-message" style="display:none"></div>
</div><!-- End register dialog form -->
</div> <!-- form container -->
</div> <!-- inner container -->
</div> <!-- container -->
PHP code to create avatar image using GD functions
I have created a PHP function to generate initial avatar from the name. The following code shows createAvatarImage() function which is used to generate avatar and store it in a specified target.
After ensuring that your PHP environment is configured with GD then you can run this example.
First, the initial image layer will be created by using imagecreatetruecolor() function. This PHP function accepts the image layer dimension as its parameter.
Then the image layer background and the avatar text color is allocated by the imagecolorallocate() and imagefill() functions.
After that, the user initial and font is loaded to the PHP imagestring() function to prepare the image resource object. Using this resource object, the imagepng() function is used to generate initial avatar png image and moved to the specified target.
Then the target path will be returned by the createAvatarImage function to save it to the database.
function createAvatarImage($string)
{
    $imageFilePath = "images/".$string . ".png";

    //base avatar image that we use to center our text string on top of it.
    $avatar = imagecreatetruecolor(60,60);
    $bg_color = imagecolorallocate($avatar, 211, 211, 211);
    imagefill($avatar,0,0,$bg_color);
    $avatar_text_color = imagecolorallocate($avatar, 0, 0, 0);
	// Load the gd font and write
    $font = imageloadfont('gd-files/gd-font.gdf');
    imagestring($avatar, $font, 10, 10, $string, $avatar_text_color);
    imagepng($avatar, $imageFilePath);
    imagedestroy($avatar);

    return $imageFilePath;
}
Invoke function to generate initial avatar
In this section, we will see the code for invoking the function to generate initial avatar on successful registration. Also, we will see, how the generated avatar is read and displayed on the dashboard after login.
User Registration and Avatar Generation
In the below PHP code, the create-avatar.php is imported which contains the function to generate initial avatar from the name.
Once the registration form is submitted the user’s first name is processed from the POST request to get its initial letter. Then the createAvatarImage() function is called by passing the user’s initial.
Once this function creates the avatar image and returns the path, the user data with this path will be stored into the database.
This code contains the MySQL insert query used to store the user profile data and initial avatar path to the database.
<?php
error_reporting(E_ALL);
ini_set('display_errors', 1);
session_start();
require_once ('db.php');
require_once ('create-avatar.php');

// function for form validation
function validateData($data)
{
    $resultData = htmlspecialchars(stripslashes(trim($data)));
    return $resultData;
}

if (isset($_POST['action']) && $_POST['action'] == 'registration') {
    $first_name = validateData($_POST['firstName']);
    $last_name = validateData($_POST['lastName']);
    $email_id = validateData($_POST['emailId']);
    $contact_number = validateData($_POST['contactNumber']);
    $password = validateData($_POST['password']);
    $confirm_password = validateData($_POST['confirmPassword']);

    $nameFirstChar = $first_name[0];
    $target_path = createAvatarImage($nameFirstChar);

    $error_message = '';
    $checkEmailQuery = $conn->prepare("select * from tbl_registration where email_id = ?");
    $checkEmailQuery->bind_param("s", $email_id);
    $checkEmailQuery->execute();

    $result = $checkEmailQuery->get_result();
    if ($result->num_rows > 0) {

        $error_message = "Email ID already exists !";
        echo $error_message;
    }    // Insert data into MySQL db
    else {
        $insertQuery = $conn->prepare("insert into tbl_registration(first_name,last_name,email_id,contact_number,password,avatar_path) values(?,?,?,?,?,?)");
        $password = md5($password);
        $insertQuery->bind_param("ssssss", $first_name, $last_name, $email_id, $contact_number, $password, $target_path);

        if ($insertQuery->execute()) {
            $success_message = "Thankyou for registering with us.You can login.";
            echo $success_message;
            exit();
        } else {
            $error_message = "Problem in Inserting New Record!";
        }
        $insertQuery->close();
        $conn->close();

        echo $error_message;
    }
}

// login procees
if (isset($_POST['action']) && $_POST['action'] == 'login') {
    $emailId = validateData($_POST['emailId']);
    $password = validateData($_POST['password']);
    $password = md5($password);
    $error_message = '';

    $selectQuery = $conn->prepare("select * from tbl_registration where email_id = ? and password = ?");
    $selectQuery->bind_param("ss", $emailId, $password);
    $selectQuery->execute();

    $result = $selectQuery->get_result();

    if ($result->num_rows > 0) {
        while ($row = $result->fetch_assoc()) {
            $_SESSION['userId'] = $row['id'];
            $success_message = "success";
            echo $success_message;
        } // endwhile
    } // endif
else {
        $error_message = "Invalid email Id or password !";
    } // endElse
    $conn->close();

    echo $error_message;
}

// logout
if (isset($_POST['action']) && $_POST['action'] == 'logout') {
    unset($_SESSION['email_id']);
    session_destroy();
    echo "success";
}

?>
Show dashboard with user initial avatar after login
This code shows the login authentication code for validating the credentials submitted by the user via the login form.
Once the user is validated then the page will be redirected to the dashboard. In the dashboard, the name, email and also the user initial avatar is displayed with a logout button.
<?php
//login procees if (isset($_POST['action']) && $_POST['action'] ==
'login') {
    $emailId = validateData($_POST['emailId']);
    $password = validateData($_POST['password']);
    $password = md5($password);
    $error_message = '';
    $selectQuery = $conn->prepare("select * from
tbl_registration where email_id = ? and password = ?");
    $selectQuery->bind_param("ss", $emailId, $password);
    $selectQuery->execute();
    $result = $selectQuery->get_result();
    if ($result->num_rows > 0) {
        while ($row = $result->fetch_assoc()) {
            $_SESSION['firstname'] = $row['first_name'];
            $_SESSION['lastname'] = $row['last_name'];
            $_SESSION['username'] = $row['email_id'];
            $_SESSION['avatarpath'] = $row['avatar_path'];
            $success_message = "success";
            echo $success_message;
        } // endwhile }//endif else {
        $error_message = "Invalid email Id or password !";
    } // endElse
    $conn->close();
    echo $error_message;
} //logout if
(isset($_POST['action']) && $_POST['action'] == 'logout') {
unset($_SESSION['email_id']);
session_destroy();
echo "success"; } ?>
?>
Ajax code for Login and Registration
This jQuery AJAX script process registration and login and get the response from the PHP. Based on the response type the user will be updated with appropriate acknowledgment.
Once the user is successfully logged in then this script will redirect the user to the dashboard via JavaScript Window.Location.
function ajaxRegistration()
{
	$(".error").text("");
	$('#first-name-info').removeClass("error");
	$('#last-name-info').removeClass("error");
	$('#register-email-info').removeClass("error");
	$('#contact-no-info').removeClass("error");
	$('#register-passwd-info').removeClass("error");
	$('#confirm-passwd-info').removeClass("error");

	var firstName = $('#first-name').val();
	var lastName = $('#last-name').val();
	var emailId = $('#register-email-id').val();
	var contactNumber = $('#contact-number').val();
	var password = $('#register-password').val();
	var confirmPassword = $('#confirm-password').val();
	var actionString = 'registration';
	...
	...
	else
	{
		$('#loaderId').show();
		$.ajax({
		url: 'user-add.php',
		type: 'POST',
		data: {
		firstName: firstName,
		lastName: lastName,
		emailId: emailId,
		contactNumber: contactNumber,
		password: password,
		confirmPassword: confirmPassword,
		action: actionString
	},
	success: function (response)
	{
		if (response.trim() == 'error') {
			$('#register-success-message').hide();
			$('#ajaxloader').hide();
			$('#register-error-message').html("Invalid Attempt. Try Again.");
			$('#register-error-message').show();
		} else {
			$(".thank-you-registration").show();
			$(".thank-you-registration").text(response);
			$("#register-dialog").dialog("close");
		}
		}
		});
		this.close();
		}
	}

	// Function for user login
	function ajaxLogin()
	{
		$(".error").text("");
		$('#email-info').removeClass("error");
		$('#password-info').removeClass("error");
		var emailId = $('#login-email-id').val();
		var password = $('#login-password').val();
		var actionString = 'login';
		if (emailId == "") {
			$('#email-info').addClass("error"); $(".error").text("required");
		}
		else if (!validateEmailId(emailId))
		{
			$('#email-info').addClass("error");
			$('.error').text("Invalid Credentials.");
		}
		else if (password == "") {
			$('#password-info').addClass("error");$(".error").text("required");
		}
		else
		{
			// show loader
			$('#loaderId').show();
			$.ajax({
			url: 'user-add.php',
			type: 'POST',
			data: {
			emailId: emailId,
			password: password,
			action: actionString
			},
			success: function (response) {
		if (response.trim() == 'success') {
			$('#login-error-message').hide();
			$('#ajaxloader').hide();
			$('#login-success-message').html('Login successfull.');
			$('#login-success-message').show();
			$('#login-dialog').slideUp();
			window.location.href = 'dashboard.php';
		} else {
			$('#login-success-message').hide();
			$('#ajaxloader').hide();
			$('#login-error-message').html(response);
			$('#login-error-message').show();
		}
		}
		});
		this.close();
	}
}
Code to show dashboard with avatar
This code is for showing the user dashboard after login. In this PHP file, the user data is retrieved from the database by using the logged-in session id.
The user resultant array will contain the first name, name, and user initial avatar path from the database. These array elements are parsed and used to display on the dashboard with logout button control.
<?php
session_start();
require_once ('db.php');
$checkEmailQuery = $conn->prepare("select * from tbl_registration where id = ?");
$checkEmailQuery->bind_param("i", $_SESSION['userId']);
$checkEmailQuery->execute();
$result = $checkEmailQuery->get_result();
$row = $result->fetch_assoc();
?>

<!DOCTYPE html>
<html>
<head>
<script src="vendor/jquery/jquery-3.2.1.min.js"></script>
<script src="login-registration.js"></script>
<script src="script.js"></script>

<link rel="stylesheet" href="style.css">

<link rel="stylesheet"
    href="//code.jquery.com/ui/1.11.4/themes/smoothness/jquery-ui.css">
<script src="https://code.jquery.com/ui/1.12.1/jquery-ui.js"></script>


<script>
            $(function () {
                $("#logout-div").button().on("click", function () {
                    ajaxLogout();
                });
            });
        </script>
<style>
.image-source {
    border-radius: 50%;
}
</style>
</head>

<body>
    <h2>Welcome To Homepage</h2>

    <div class="dashboard">

        <div style="height: 10px"></div>
        <div>

            <img src="<?php echo $row['avatar_path']; ?>"
                class="image-source"> <b>
                        <?php
                        echo " <br/> " . " <br/> " . " " . " " . $row['first_name'] . "  " . $row['last_name'];
                        ?>
                    </b>
                    <?php
                    echo " " . " " . " <br/> " . $row['email_id'];
                    ?>

                </div>
        <div style="height: 10px"></div>
        <div>
            <input type="button" class="btn-logout" value="Logout"
                id="logout-div">
        </div>
    </div>
</body>
</html>
File structure
The following screenshot shows the file structure of this working example to generate initial avatar.
![]()
Database script
This is the database script containing tbl_registration table’s create statement. By importing this database table, you can run this example and make it work on your environment to test registration and generate initial avatar.
CREATE TABLE IF NOT EXISTS `tbl_registration` (
`id` int(11) NOT NULL,
  `first_name` varchar(100) COLLATE utf8mb4_unicode_ci NOT NULL,
  `last_name` varchar(100) COLLATE utf8mb4_unicode_ci NOT NULL,
  `email_id` varchar(100) COLLATE utf8mb4_unicode_ci NOT NULL,
  `contact_number` varchar(12) COLLATE utf8mb4_unicode_ci NOT NULL,
  `password` varchar(100) COLLATE utf8mb4_unicode_ci NOT NULL,
  `avatar_path` varchar(100) COLLATE utf8mb4_unicode_ci NOT NULL,
  `update_date` timestamp NOT NULL DEFAULT CURRENT_TIMESTAMP ON UPDATE CURRENT_TIMESTAMP
)
Dashboard with user initial avatar output
The following screenshot shows the dashboard with the user initial avatar. We can see from the screenshot that the user initial avatar is generated from the user’s first name.
![]()
Conclusion
Profile avatar which is one of the catchy graphical and iconic representation of users identity. These avatar images are used to personify the application to the user while showing profile pages, user’s portfolio, activity and more.
Generally, the profile avatar is used in the site header, profile view or edit and in more places based on the web application. We can see this in many popularly renowned websites like Facebook, Google and more. Also, in eCommerce application, the reputed sellers use their profile avatar as a brand icon for promotion.
Some people may hesitate to share their photo at the time of registering with an application. In such cases, we can generate initial avatar from the name will help to show the user’s identity with a pleasant graphical look. It will be great looking instead of showing an application-specific default avatar.


Thank you so much, Vincy for this excellent tutorial. As always, you are rocking. Every bit of the information you present is valuable.
Welcome Richie. Keep reading and sharing.
How to add delete and edit operation in WordPress can you please update that article.
Sure Kalyani. I will soon write a separate tutorial for CRUD in WordPress.
Thankfully teacher for good tutorials
Welcome Clement.
Hello good day Vincy!
Improvements in each tutorial that you make. Thank you very much for your help.
Thank you Oceano.