Google’s material design is a great hit that comes packed with design principles, aesthetics, and innovations. If you want to launch your content online on your own medium, designing a page is the first step.
Designing a website from scratch will take more effort to group elements together in a thematic way. It can be easily done by following the existing design principles and definition.
Material Design is a flexible design platform with classic principles to bring UI elements under a unified theme or pattern. You can enhance the UI visuals by applying your own innovations on top of this basic platform.
The specialty with the Google’s material design is that it is inspired by the real world metrics, motion and light effects. So, it will give good looking for your web page with material design.
It is easy to follow material design principles to create a modern trendy web design. Also, there are frameworks like Materialize, Material Design Lite, available on the market implementing material design principles.
I used Materialize library to create a Login form template with material design. The login form fields and the elements are materialized with the beautiful effects with toggling visibility, floating placeholders labels and more. Added to the material design integration, this example will also handle login authentication using PHP session in the server side script on form submission.
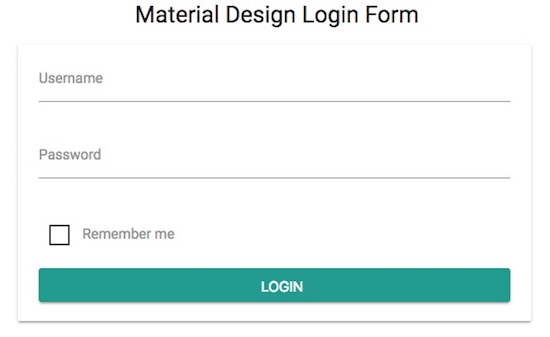
Material Design Login Form
In the material design login form template, the Materialize library’s CDN version is used for importing the required script and the CSS. In this form, the username and the password fields are used for authentication. These fields are displayed with placeholder which will not lose the visibility even on focusing the fields. This is implemented by applying the material design floating labels. Also, the login form will contain a dummy Remember me fields with toggling custom checkbox element. You can download the login code with remember me if you are looking for such an example.
<html>
<head>
<title>Creating Material Design Login Form with PHP and jQuery</title>
<script src="https://code.jquery.com/jquery-3.2.1.js"></script>

<link rel="stylesheet" href="https://cdnjs.cloudflare.com/ajax/libs/materialize/0.100.2/css/materialize.css">
<script src="https://cdnjs.cloudflare.com/ajax/libs/materialize/0.100.2/js/materialize.min.js"></script>
<link rel="stylesheet" href="style.css" />
</head>
<body>
<div class="container">
    <h5>Material Design Login Form</h5>
    <div id="user-login" class="row">
        <div class="col s12 z-depth-6 card-panel">
            <form class="login-form" name="login-form" method="POST"
                action="">
                <div class="row margin">
                    <div class="input-field col s12">
                        <i class="mdi-social-person-outline prefix"></i>
                        <input class="validate" id="username"
                            name="username" type="text" required>
                        <div class=usererr><?php if (! empty($username_error)) { echo $username_error; } ?></div>
                        <label for="username" data-error="wrong"
                            data-success="right" class="center-align">Username</label>
                    </div>
                </div>

                <div class="row margin">
                    <div class="input-field col s12">
                        <i class="mdi-action-lock-outline prefix"></i> <input
                            id="user_pass" name="user_pass"
                            type="password" required>
                        <div class=pwderr><?php if (! empty($password_error)) { echo $password_error; } ?></div>
                        <label for="password">Password</label>
                    </div>
                </div>
                <div class="row">
                    <div class="input-field col s12 m12 l12  login-text">
                        <input type="checkbox" id="remember-me"> <label
                            for="remember-me">Remember me</label>
                    </div>
                </div>
                <div class="row">
                    <div class="input-field col s12">

                        <input type="submit"
                            class="btn waves-effect waves-light col s12"
                            id="btnsubmit" name="submit" value="Login" />
                    </div>
                </div>

            </form>

        </div>
    </div>
</div>
</body>
</html>
HTML5 Form Validation and Display Errors
The client-side form field validations are done with the default HTML5 form validation. On submitting an empty form, the HTML5 validation will take care of showing the validation messages with the tooltip. Once we enter the wrong username or the password, then it will be validated in the PHP code after form submission. After comparing the login credentials with the database, the validation messages will be displayed in the material design login template. Once the match found then the user will be redirected to the dashboard.
<?php
include 'Authentication.php';
if (isset($_POST['submit'])) {
    $authentication = new Authentication();
    $memberResult = $authentication->isMemberExists($_POST["username"]);
    if (empty($memberResult)) {
        $username_error = 'Incorrect Username';
    }
    else {
        if(!password_verify($_POST['user_pass'], $memberResult[0]["member_password"])) {
            $password_error = 'Incorrect Password';
        }
        if(empty($username_error) && empty($password_error)) {
            $_SESSION['username'] = $memberResult[0]["member_name"];
            header('location:dashboard.php');
        }
    }
}
?>
PHP Script to Show Dashboard with Logout
In the dashboard.php file, the PHP session is initiated and the logged in member name is addressed on the welcome message. This page will contain the logout link followed by the welcome message. By clicking the logout link, the current logged in session will be destroyed and the user will be redirected to the material design login template.
<?php
session_start();
?>
<style>
.member-dashboard {
    padding: 40px;
    background: #D2EDD5;
    color: #555;
    border-radius: 4px;
    display: inline-block;
}

.member-dashboard a {
    color: #09F;
    text-decoration: none;
}
</style>
<div class="member-dashboard">
    Hi <?php echo $_SESSION['username']; ?>, You have Successfully logged in!. <a href="logout.php">Logout</a>
</div>
And the PHP script to logout from the current session is,
<?php
     session_start();
     session_destroy();
     header('location: index.php');
?>
Authentication and DBController PHP Class Files
The Authentication PHP class file contains isMemberExists() function to check the database if there is a match found for the specified member name. It creates a SELECT statement and sends it to the DBController function with the query parameters. In the DBController class, the Query statement is prepared and the parameters are bound for the statement using PHP call_user_func_array() function. Based on the result returned by the isMemberExists() function the PHP login flow will be progressed.
Authentication.php
<?php
require "DBController.php";
class Authentication {
    function isMemberExists($userName) {
        $db_handle = new DBController();
        $query = "SELECT * FROM members WHERE member_name = ?";
        $result = $db_handle->runQuery($query, 's', array($userName));
        return $result;
    }
}
?>
DBController.php
<?php
class DBController {
	private $host = "localhost";
	private $user = "root";
	private $password = "test";
	private $database = "db_auth";
	private $conn;

    function __construct() {
        $this->conn = $this->connectDB();
	}

	function connectDB() {
		$conn = mysqli_connect($this->host,$this->user,$this->password,$this->database);
		return $conn;
	}

    function runBaseQuery($query) {
        $result = $this->conn->query($query);
        if ($result->num_rows > 0) {
            while($row = $result->fetch_assoc()) {
                $resultset[] = $row;
            }
        }
        return $resultset;
    }


    function runQuery($query, $param_type, $param_value_array) {
        $sql = $this->conn->prepare($query);
        $this->bindQueryParams($sql, $param_type, $param_value_array);
        $sql->execute();
        $result = $sql->get_result();

        if ($result->num_rows > 0) {
            while($row = $result->fetch_assoc()) {
                $resultset[] = $row;
            }
        }

        if(!empty($resultset)) {
            return $resultset;
        }
    }

    function bindQueryParams($sql, $param_type, $param_value_array) {
        $param_value_reference[] = & $param_type;
        for($i=0; $i<count($param_value_array); $i++) {
            $param_value_reference[] = & $param_value_array[$i];
        }
        call_user_func_array(array(
            $sql,
            'bind_param'
        ), $param_value_reference);
    }

    function insert($query, $param_type, $param_value_array) {
        $sql = $this->conn->prepare($query);
        $this->bindQueryParams($sql, $param_type, $param_value_array);
        $sql->execute();
    }

    function update($query, $param_type, $param_value_array) {
        $sql = $this->conn->prepare($query);
        $this->bindQueryParams($sql, $param_type, $param_value_array);
        $sql->execute();
    }
}
?>