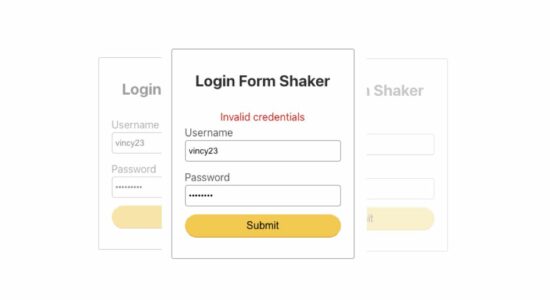
jQuery shake effect is applied to shake an HTML element in either a vertical or horizontal direction. On some websites, we can see this shaking effect on invalid login attempts. For implementing this effect we have to use the jQuery UI library.
In this tutorial, we are going to see how to apply the jQuery shake effect on a login form to represent invalid attempts. This effect is created by using the jQuery effect() function.
In this example, we are sending a login request via AJAX. It seeks the match between the given login credentials and the database. If a match is found then it redirects to the user dashboard. Otherwise, jQuery effect() is applied to a login form to represent invalid login.
Database script with user table with login data
Import this script to have the user table and the login data to test the login form shaking effect dynamically.
Note: The test login details are,
Username: matt
Password: admin
structure.sql
CREATE TABLE `users` (
  `userId` int(8) NOT NULL,
  `userName` varchar(55) NOT NULL,
  `password` varchar(255) NOT NULL,
  `firstName` varchar(55) NOT NULL,
  `lastName` varchar(55) NOT NULL
);

--
-- Dumping data for table `users`
--

INSERT INTO `users` (`userId`, `userName`, `password`, `firstName`, `lastName`) VALUES
(1, 'matt', '$2a$10$0FHEQ5/cplO3eEKillHvh.y009Wsf4WCKvQHsZntLamTUToIBe.fG', 'Matthew Benedict', 'Matthew Benedict'),
(2, 'mike', '$2a$10$0FHEQ5/cplO3eEKillHvh.y009Wsf4WCKvQHsZntLamTUToIBe.fG', 'mike', 'anto');

--
-- Indexes for dumped tables
--

--
-- Indexes for table `users`
--
ALTER TABLE `users`
  ADD PRIMARY KEY (`userId`);

--
-- AUTO_INCREMENT for dumped tables
--

--
-- AUTO_INCREMENT for table `users`
--
ALTER TABLE `users`
  MODIFY `userId` int(8) NOT NULL AUTO_INCREMENT, AUTO_INCREMENT=3;
jQuery Shake Effect
In the above example, the jQuery effect() function is used with some default settings. There are various options to override the default shake effect. These are,
| Options | Description |
|---|---|
| direction | To specify the direction of the shake effect (vertical or horizontal). Possible values are, left(default), right, up, down. |
| distance | To specify shaking distance. The default is 20. |
| times | The number of shakes. The default is 3. |
jQuery Shake Effect with Options
The code to control the shake effect with the above options is,
var options = {
	distance: '40',
	direction: 'top',
	times: '2'
}
$("#login-form").effect("shake", options, 800);
Login form UI with required library includes
This HTML is used to show the login form to the browser. It includes the jQuery and jQuery UI library via CDN URL.
index.php
<html>

<head>
<title>User Login</title>
<link rel="stylesheet" type="text/css" href="css/style.css" />
<link rel="stylesheet" type="text/css" href="css/form.css" />
<script src="https://code.jquery.com/jquery-3.6.1.min.js"
    integrity="sha256-o88AwQnZB+VDvE9tvIXrMQaPlFFSUTR+nldQm1LuPXQ="
    crossorigin="anonymous"></script>
<script src="https://code.jquery.com/ui/1.13.2/jquery-ui.min.js"
    integrity="sha256-lSjKY0/srUM9BE3dPm+c4fBo1dky2v27Gdjm2uoZaL0="
    crossorigin="anonymous"></script>
<style>
#loader-icon {
    display: none;
}
</style>
</head>
<body>
    <div class="phppot-container tile-container" id="login-form">

        <form name="frmUser" method="post" action="">
            <h2 class="text-center">Login Form Shaker</h2>
            <div class="row">
                <div id="error" class="validation-message text-center"></div>
                <label class="inline-block">Username</label> <input
                    type="text" name="username" id="username"
                    class="full-width">

            </div>
            <div class="row">
                <label class="inline-block">Password</label> <input
                    type="password" name="password" id="password"
                    class="full-width">

            </div>
            <div class="row text-center">
                <input type="button" name="submit" value="Submit"
                    onClick="login();" id="btn-login-submit"
                    class="full-width">
                <div id="loader-icon">
                    <img src="loader.gif" />
                </div>
            </div>

        </form>
    </div>
</body>
</html>
jQuery AJAX request to test login details with server
This tutorial not only provides just the client-side static shaking effect for the login form.
It made it dynamic to check the login details in the server side with database.
This AJAX call sends the posted login details to the PHP. On its callback, it checks the server response on the validity of the login details.
If the login details are not valid, then the callback executes the jQuery UI script to show the login form shaking effect.
function login() {
	$("#loader-icon").show();
	$("#btn-login-submit").hide();
	$.ajax({
		url: "ajax-endpoint/login-action.php",
		type: "POST",
		data: { username: $("#username").val(), password: $("#password").val() },
		success: function(data) {
			if (data == true) {
				window.location.href = "dashboard.php"
			} else {
				$("#loader-icon").hide();
				$("#btn-login-submit").show();
				$("#error").html(data);
				var options = {
					distance: '40',
					direction: 'left',
					times: '2'
				}
				$("#login-form").effect("shake", options, 800);
			}
		},
		error: function() {
			$("#loader-icon").hide();
		}
	});
}
PHP login action endpoint code
This is the endpoint PHP file that connects the database and validates the login.
ajax-endpoint/login-action.php
<?php
session_start();

$conn = mysqli_connect("localhost", "root", "", "db_login");

if(empty($conn)) {
    die("Unable to connect to the database");
}
$userName = filter_var ( $_POST['username'], FILTER_SANITIZE_STRING);
$password = filter_var ( $_POST["password"], FILTER_SANITIZE_STRING);

if($userName == "" || $password == "") {
    echo "Enter your login details";
    exit;
}

$sql = "SELECT * FROM users WHERE userName= ?";

$stmt = $conn->prepare($sql);

$stmt->bind_param("s", $userName);

$stmt->execute();
$result = $stmt->get_result();

$row = $result->fetch_assoc();
$loginStatus = false;

if (! empty($row)) {
    $hashedPassword = $row["password"];
    if (password_verify($password, $hashedPassword)) {
        $_SESSION["userid"] = $row["userId"];
        $_SESSION["username"] = $row["userName"];
        $loginStatus = true;
        print $loginStatus;
        exit;
    }
}
if(!$loginStatus) {
    echo "Invalid credentials";
    exit;
}
?>
Other redirects related to the login process
Once the user is authenticated, the code will redirect to the dashboard. The dashboard will show a welcome message to address the logged-in user.
It also contains a logout link to quit the current login session.
dashboard.php
<?php
session_start();
if (empty($_SESSION["username"])) {
    header("Location:index.php");
}
?>
<html>
<head>
<title>Dashboard</title>
<link rel="stylesheet" type="text/css" href="css/style.css" />
</head>
<body>
    <div class="phppot-container ">

        <div class="text-center">
			<b>Welcome <?php echo ucwords($_SESSION["username"]); ?>! Click here to <a
                class="logout" href="logout.php" tite="Logout">Logout</a></b>
        </div>

    </div>
</body>
</html>
The logout destroys the session by unsetting the user login id and name. We have seen code to do automatic logout by destroying the session after some configured time.
logout.php
<?php
session_start();
unset($_SESSION["userid"]);
unset($_SESSION["username"]);
header("Location:index.php");
?>