OAuth is an open standard for to provide authentication and authorization based on a token to applications. By integrating LinkedIn OAuth with our web or mobile application, we can allow our users to access LinkedIn data with valid credentials and authenticate themselves into our application.
In this article, we are going to add the option to Login with LinkedIn in our PHP web application. Previously, we have seen example code for the Google OAuth Login using PHP.
When we saw about PHP Facebook open authentication there were some steps to access API to get data resources. Similarly, in this Login with LinkedIn example, we need to follow few steps. These are,
- Creating and configuring LinkedIn application
- Requesting authorization code
- Obtaining access token
- Creating an authenticated request to access resources
Step 1. Creating and Configuring LinkedIn Application
In previous examples, we have seen how to create application project to access API resource. For example, we have created API project to extract video Data by accessing YouTube Data API library.
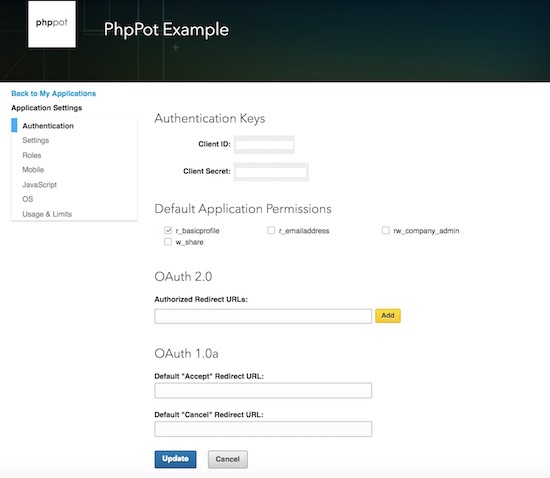
Similarly, we are going to create a new application in the LinkedIn developer console. By creating the application, we can get the authentication keys Client ID and Client Secret. These authentication keys will be used in the next step to get the authorization code.
This is the config.php code to set the authentication keys and other parameters as PHP constants to be used while sending API requests
<?php
define("CLIENT_ID", "CLIENT_ID");
define("CLIENT_SECRET", "CLIENT_SECRET");
define("REDIRECT_URI", "http://localhost/PhpPot-Examples/simple-php-linkedin-oauth-login-integration/index.php");
define("SCOPE", 'r_basicprofile r_emailaddress' );
?>
Step 2. Requesting Authorization Code
After completing configuration with the authentication keys, the next step is to get the authorization code. This code is the intermediate token which is created by approving the access from our web or mobile application. This token will be used to create the access token at a next level to get the resource data.
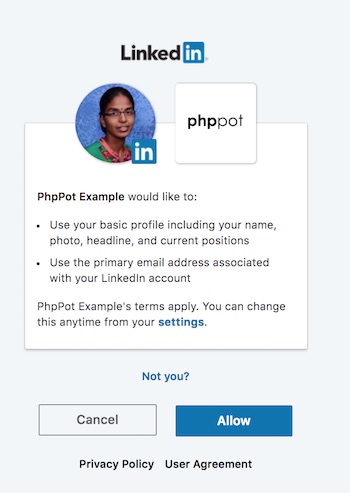
When the user tries to login with LinkedIn via an application, an authorization box will be shown. This box will have the Allow and Cancel options based on which the access grant will be provided.
From the next time, this step will be skipped and the user will be redirected to the callback URI after authenticating with the user login credentials.
Step 3. Obtaining Access Token
The authorization code returned by the API request in the intermediate level will be used to get the access token. This is the final step in the LinkedIn authorization and authentication process to provide access to get the LinkedIn resources via API.
We need to send the bunch of parameters like grant_type, code, client_id, client_secret, redirect_uri with access token URL to request the access token. This API request will return a JSON response with the access token(access_token) and the expiration time(expires_in).
Step 4. Requesting Authenticated Access to Resources
I sent the API request to get the Linkedin resource like profile data by sending the access_token, request methods and many params with the API call. This authenticated API request will result in the JSON response of the requested resource data.
In this example, I have requested the profile data like username and avatar by login with LinkedIn via API. I have used oauth_client.php and http.php class library to handle these OAuth API requests. These classes are included in the source code download.
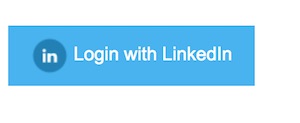
I have shown a button control to trigger the API request to login with LinkedIn. By clicking this button the API requests are sent and process login with LinkedIn by sorting out application authorization and user authentication.
The final response will result in the profile data JSON. The JSON will be parsed and displayed to the browser.
<?php
if (! session_id()) {
    session_start();
}
if (empty($_GET["action"])) {
    require_once 'config.php';
    require ('oauth/http.php');
    require ('oauth/oauth_client.php');

    if ($_GET["oauth_problem"] != "") {
        $error1 = $_GET["oauth_problem"];
    }

    $client = new oauth_client_class();

    $client->debug = false;
    $client->debug_http = true;
    $client->redirect_uri = REDIRECT_URI;
    $client->server = "LinkedIn";
    $client->client_id = CLIENT_ID;
    $client->client_secret = CLIENT_SECRET;
    $client->scope = SCOPE;

    if (($success = $client->Initialize())) {
        if (($success = $client->Process())) {
            if (strlen($client->authorization_error)) {
                $client->error = $client->authorization_error;
                $success = false;
            } elseif (strlen($client->access_token)) {
                $success = $client->CallAPI('http://api.linkedin.com/v1/people/~:(id,email-address,first-name,last-name,picture-url,public-profile-url,formatted-name)', 'GET', array(
                    'format' => 'json'
                ), array(
                    'FailOnAccessError' => true
                ), $user);
            }
        }
        $success = $client->Finalize($success);
        $_SESSION["member_id"] = $user->id;
    }
    if ($client->exit) {
        exit();
    }
    if ($success) {
        // Do your code with the Linkedin Data
    } else {
        $error = $client->error;
    }
} else {
    $_SESSION = array();
    unset($_SESSION);
    session_destroy();
}
?>
<html>
<head>
<title>Simple PHP LinkedIn OAuth Login Integration</title>
<style>
body {
    width: 550px;
    font-family: Arial;
}

#profile-outer {
    background: #79ccc4;
    padding: 40px;
    color: #505050;
    text-align: center;
}

.profile-info {
    font-weight: bold;
}

.profile-image {
    width: 100px;
    height: 100px;
    border-radius: 50%;
    margin-bottom: 10px;
}

.success {
    padding: 10px;
    background: #5b948f;
    border: #51847f 1px solid;
    color: #c4e0de;
}

.error {
    padding: 10px;
    background: #ffc6d1;
    border: #efbac4 1px solid;
    color: #b34f59;
}

.link {
    background: #41b2f1;
    padding: 10px 20px 10px 20px;
    text-decoration: none;
    color: #FFF;
    margin-top: 20px;
    display: inline-block;
}

.link img {
    vertical-align: middle;
}
</style>
</head>
<body>
    <div class="container">
        <div class="margin10"></div>
        <div class="col-sm-3 col-sm-offset-4 padding20">
            <?php if (!$success && !$_SESSION["member_id"]) { ?>
            <?php if(!empty($error)) { ?>
            <div class="error">
                <?php echo $error; ?>
                </a>
            </div>
            <?php } ?>
            <a class="link login" href="index.php"> <img
                src="linkedin-icon.png" /> Login with LinkedIn
            </a>
            <?php } else { ?>
            <div id="profile-outer">
                <div>
                    <img src="<?php echo $user->pictureUrl; ?>"
                        class="profile-image" />
                </div>
                <div class="profile-row">
                    <span class="profile-info">
                        <?php echo $user->firstName; ?>
                    </span>
                </div>
            </div>
            <div class="success">
                You have Successfully Logged in. Click here to <a
                    href="index.php?action=logout"> Logout </a>
            </div>
            <?php } ?>
        </div>
    </div>
</body>
</html>
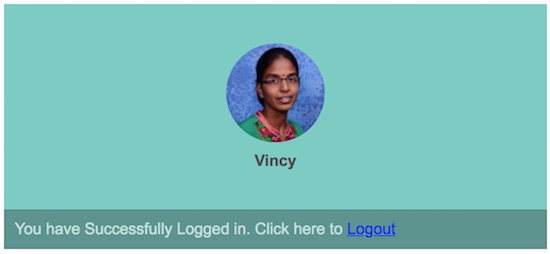
PHP Login with LinkedIn OAuth Output
This is the Login with LinkedIn button control which will be shown initially before starting OAuth API requests.
After successful OAuth authentication via API, the LinkedIn profile data like name and the avatar will be displayed with the Logout option as like as below.