Tailwind is a frontend framework like Bootstrap to design websites quickly. There are many frontend frameworks available in the market. These frameworks give templates, themes, CSS libraries to ease the website building process.
Tailwind CSS is one of the popular frameworks that gives CSS classes to standardize design. It is capable to scale up with any modern to legacy UI templates.
This is easy to customize and learn Tailwind framework. The semantically named CSS classes give a wide range of color choices, spacing, typography and box-shadows. It allows to achieve an upside-down flip on the UI look and feel with the same HTML.
What is inside?
- Alternative Front end frameworks
- About Example: Building contact form with Tailwind CSS
- How to integrate Tailwind CSS framework?
- Stick with HTML; need not write CSS
- More on form submit validation and backend routine
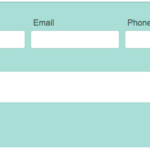
- Tailwind CSS output in contact form design
Alternative Front end frameworks
There are more UI frameworks available for designing the application front end. These frameworks reduce efforts to customize UI styles for building websites from the scratch.
Bootstrap is an unbeatable leading framework that occupies a majority of the space.
Apart from that, there are many like the Foundation framework, Semantic UI, UIkit. Each of these frameworks has its unique strength in the aspect of ease, simplicity, reliability, responsiveness and more.
About Example: Building contact form with Tailwind CSS
I used the Tailwind CSS framework to create a contact form template. I have created no CSS, rather than using the tailwind.css created by running the npm command.
We have seen numerous contact form example with a simple form template having the basic contact details. I replicate the same template with the use of the Tailwind CSS framework.
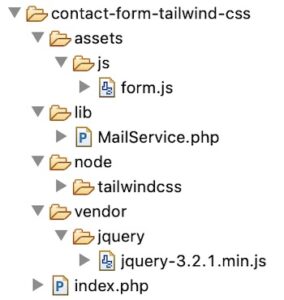
The below image shows the file structure of this example. The JavaScript, PHP files has something common to handle validation and mail sending process.
The node modules has the Tailwind CSS library files that forms the UI design.
How to integrate Tailwind CSS framework
Tailwind’s official site provides numerous guides in the different platforms to install this framework.
If the provided guides are not suitable for your application, it gives the installation steps.
There are various ways to install the Tailwind framework for an application front end.
- Installing as a PostCSS plugin
- Installing without PostCSS
The best way to integrate this framework for a full-fledged application is to install it as a postCSS plugin which is the first option.
I have used the second option to make the setup simple for this basic example.
It requires Node.js 12.13.0 or higher version. The following CLI command is used to create the dependencies into the target directory.
npx tailwindcss-cli@latest build -o tailwind.css
Tailwind CSS library is available with a CDN URL also. It contains the latest build which can be included for simple integration.
<link href="https://unpkg.com/tailwindcss@^2/dist/tailwind.min.css" rel="stylesheet">
Stick with HTML; need not write CSS
This contact form has a minimal design template. It has no CSS except the one from the Tailwind library.
It uses Tailwind framework classes with the HTML to achieve this UI design. The class name and element name describes its purpose which helps to get used to this library quickly and easily.
In this contact form HTML, it uses the Tailwind CSS classes just for creating a basic form UI. But, it is capable of achieving a high-end enriched design also.
index.php
<html>
<head>
<title>Contact Us Form</title>
<meta charset="UTF-8" />
<meta name="viewport" content="width=device-width, initial-scale=1.0" />
<link href="node/tailwindcss/dist/tailwind.css" rel="stylesheet">
<script src="vendor/jquery/jquery-3.2.1.min.js"></script>
</head>
<body>
	<div
		class="w-full mx-auto max-w-3xl bg-white px-4 pt-1 pb-6 text-gray-700">
		<div class="block w-full text-grey-darkest mb-5 text-3xl">PHP contact
			form with tailwind css</div>
		<form name="frmContact"
			class="mb-4 px-5 py-5 border border-gray-200 md:justify-between rounded"
			frmContact"" method="post" action="" enctype="multipart/form-data"
			onsubmit="return validateContactForm()">

			<div>
				<div class="label flex flex-col">
					<label class="text-grey-darkest md:ml-2" for="last_name"> Name <span
						id="userName-info" class=""></span>
					</label>
				</div>
				<input type="text"
					class="border border-gray-400 rounded mb-5 py-1 px-3 text-grey-darkest md:ml-2"
					name="userName" id="userName"
					value="<?php if(!empty($_POST['userName'])&& $type == 'error'){ echo $_POST['userName'];}?>" />
			</div>
			<div>
				<div class="label flex flex-col">
					<label class="text-base text-grey-darkest md:ml-2" for="last_name">
						Email <span id="userEmail-info" class="validation-message"></span>
					</label>
				</div>
				<input type="text"
					class="border border-gray-400 rounded mb-5 py-1 px-3 text-grey-darkest md:ml-2"
					name="userEmail" id="userEmail"
					value="<?php if(!empty($_POST['userEmail'])&& $type == 'error'){ echo $_POST['userEmail'];}?>" />
			</div>
			<div>
				<div class="label flex flex-col">
					<label class="text-base text-grey-darkest md:ml-2" for="last_name">
						Subject <span id="subject-info" class="validation-message"></span>
					</label>
				</div>
				<input type="text"
					class="border rounded border-gray-400 mb-5 py-1 px-3 text-grey-darkest md:ml-2"
					name="subject" id="subject"
					value="<?php if(!empty($_POST['subject'])&& $type == 'error'){ echo $_POST['subject'];}?>" />
			</div>
			<div>
				<div class="label flex flex-col">
					<label class="text-base text-grey-darkest md:ml-2" for="last_name">
						Message <span id="userMessage-info" class="validation-message"></span>
					</label>
				</div>
				<textarea name="content" id="content"
					class="resize-x border border-gray-400 rounded md:ml-2  mb-4"
					cols="35" rows="5"><?php if(!empty($_POST['content'])&& $type == 'error'){ echo $_POST['content'];}?></textarea>
			</div>

			<div>
				<input type="submit" name="send"
					class="bg-green-400 rounded text-white font-bold py-1 px-16 md:ml-2"
					value="Send" />
			</div>

		</form>
		<?php if(!empty($message)) { ?>
		<div id="phppot-message" class="<?php  echo $type; ?>"><?php if(isset($message)){ ?>
				    <?php echo $message; }}?>

                    </div>
	</div>
	<script src="assets/js/form.js"></script>
</body>
</html>
More on form submit validation and backend routine
This section contains the code snippets created for a contact form back end logic. This is very common in many of the contact form examples we have seen before. Example: Floating contact form, Sticky contact form, and more examples.
The form validation that checks to ensure the data and its format. There are various ways to implement form validation.
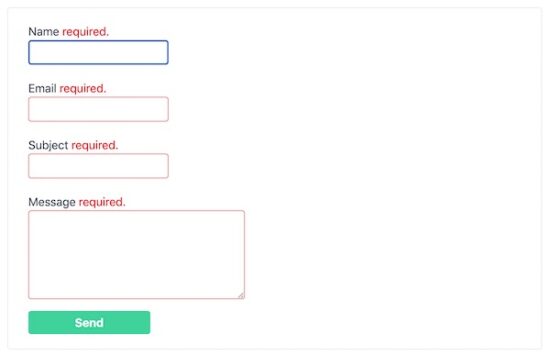
Here, it shows a simple client-side validation script using JavaScript. All the form fields are mandatory. It validates the email format with regex.
It displays the validation error message next to the field and returns boolean false.
Client-side Form Validation
assets/js/form.js
function validateContactForm() {
	var valid = true;
	$("#userName").removeClass("error-field");
	$("#userEmail").removeClass("error-field");
	$("#subject").removeClass("error-field");
	$("#content").removeClass("error-field");

	$("#userName-info").html("").hide();
	$("#userEmail-info").html("").hide();
	$("#subject-info").html("").hide();
	$("#content-info").html("").hide();

	$(".validation-message").html("");
	$(".phppot-input").css('border', '#e0dfdf 1px solid');

	var userName = $("#userName").val();
	var userEmail = $("#userEmail").val();
	var subject = $("#subject").val();
	var content = $("#content").val();

	if (userName.trim() == "") {
		$("#userName-info").html("required.").css("color", "#ee0000").show();
		$("#userName").css('border', '#e66262 1px solid');
		$("#userName").addClass("error-field");

		valid = false;
	}
	if (userEmail.trim() == "") {
		$("#userEmail-info").html("required.").css("color", "#ee0000").show();
		$("#userEmail").css('border', '#e66262 1px solid');
		$("#userEmail").addClass("error-field");

		valid = false;
	}
	if (!userEmail.match(/^([\w-\.]+@([\w-]+\.)+[\w-]{2,4})?$/)) {
		$("#userEmail-info").html("invalid email address.").css("color",
				"#ee0000").show();

		$("#userEmail").css('border', '#e66262 1px solid');
		$("#userEmail").addClass("error-field");

		valid = false;
	}

	if (subject == "") {
		$("#subject-info").html("required.").css("color", "#ee0000").show();
		$("#subject").css('border', '#e66262 1px solid');
		$("#subject").addClass("error-field");

		valid = false;
	}
	if (content == "") {
		$("#userMessage-info").html("required.").css("color", "#ee0000").show();
		$("#content").css('border', '#e66262 1px solid');
		$("#content").addClass("error-field");

		valid = false;
	}
	if (valid == false) {
		$('.error-field').first().focus();
		valid = false;
	}
	return valid;
}
Mail sending script in PHP
Above the contact form HTML, the landing page has this PHP script. The form-submit action executes this script and calls the mail service created for this example.
It gets the response from the mail service and set the response type either success or failure.
index.php (PHP code to call mail service to send email)
<?php
namespace Phppot;

require_once ("lib/MailService.php");
$mailService = new MailService();
if (! empty($_POST['send'])) {
    $response = $mailService->sendContactMail($_POST);
    if (! empty($response)) {
        $message = "Hi, we have received your message. Thank you.";
        $type = "success";
    } else {
        $type = "error";
    }
}
?>
PHP mail service class
This class has the sendContactMail() function and receives the form data. It prepares the mail header and params to call PHP mail function.
Replace mail() function with PHPMailer to get a better mail implementation. In a previous tutorial, we have seen how to send email using PHPMailer via Gmail SMTP.
lib\MailService.php
<?php
namespace Phppot;

class MailService
{

    function sendContactMail($postValues)
    {
        $name = $postValues["userName"];
        $email = $postValues["userEmail"];
        $subject = $postValues["subject"];
        $content = $postValues["content"];

        $toEmail = "ADMIN_EMAIL";
        $mailHeaders = "From: " . $name . "<" . $email . ">\r\n";
        $response = mail($toEmail, $subject, $content, $mailHeaders);
        return $response;
    }
}
Tailwind CSS output in contact form design
The following screenshot shows the contact form UI designed with the use of Tailwind CSS.
The error message next to the form label is from the client-side JavaScript validation.
Conclusion
We have learned how to design a UI template with the Tailwind CSS framework.
Also, we have followed the Tailwind integration guide to install this framework for a simple contact form example.
It covers not only the UI part but also the client-side validation and the server-side mail sending. So, you can use this example if you want a contact form with Tailwind CSS.
In the future, let us see more examples with Tailwind CSS by integrating this framework as a PostCSS plugin.