Wizard forms collects user input in multiple steps. Each step will show a sub form to get good attention from the user.
It processes step by step validation and let the user proceed forward. It reduces the difficulty of resolving the form errors altogether with a single page form.
In this tutorial, we have seen how to create a wizard form with a previous next navigation. It can be used for a PHP application to have a sequential flow of data collection. Example, 1) question and answer sequence, 2) Profile wizard and more.
Steps to create a wizard form with PHP
- Design HTML for wizard sub-forms.
- Add previous-next navigation to move back and forth.
- Validate sub-form and restrict navigation.
- Keep the submitted data along the wizard.
- Store wizard form data to a database in PHP.
1. Design HTML for wizard sub-forms
This is the HTML part of the landing page. It contains the sub-form HTML of the wizard.
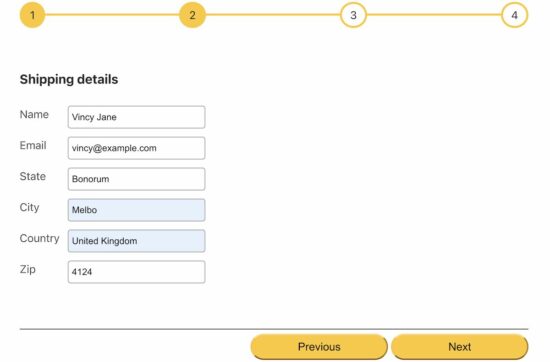
It has 4 sections to show split forms of a purchase order flow.
- Billing details.
- Shipping details.
- Applying discount code.
- Enter remarks on an order.
It has a flow graph to represent users’ state along the wizard. It contains circled nodes that are highlighted on completion.
index.php (wizard form HTML)
<!DOCTYPE html>
<html>

<head>
    <title>How to create a multi-step wizard form in PHP</title>
    <link rel="stylesheet" type="text/css" href="css/style.css" />
    <link rel="stylesheet" type="text/css" href="css/form.css" />
    <link rel="stylesheet" type="text/css" href="css/wizard.css" />
</head>

<body>
    <div class="phppot-container">
        <h1>How to create a multi-step wizard form in PHP</h1>

        <form method="POST" id="checkout-form" onSubmit="return validateCheckout()">
            <div class="wizard-flow-chart">
                <span class="fill">1</span>
                <span>2</span>
                <span>3</span>
                <span>4</span>
            </div>
            <?php if (isset($message)) { ?>
                <div class="message <?php echo $type; ?>"><?php echo $message; ?></div>
            <?php } ?>
            <!-- Wizard section 1 -->
            <section id="billing-section">
                <h3>Billing details</h3>
                <div class="row">
                    <label class="float-left label-width">Name</label>
                    <input name="customer_billing_name" type="text">
                </div>
                <div class="row">
                    <label class="float-left label-width">Email</label>
                    <input name="billing_email" type="text">
                </div>
                <div class="row">
                    <label class="float-left label-width">State</label>
                    <input name="billing_state" type="text">
                </div>
                <div class="row">
                    <label class="float-left label-width">City</label>
                    <input name="billing_city" type="text">
                </div>
                <div class="row">
                    <label class="float-left label-width">Country</label>
                    <input name="billing_country" type="text">
                </div>
                <div class="row">
                    <label class="float-left label-width">Zip</label>
                    <input name="billing_zipcode" type="text">
                </div>
                <div class="row button-row">
                    <button type="button" onClick="validate(this)">Next</button>
                </div>
            </section>

            <!-- Wizard section 2 -->
            <section id="shipping-section" class="display-none">
                <h3>Shipping details</h3>
                <div class="row">
                    <label class="float-left label-width">Name</label>
                    <input name="customer_shipping_name" type="text">
                </div>
                <div class="row">
                    <label class="float-left label-width">Email</label>
                    <input name="shipping_email" type="text">
                </div>
                <div class="row">
                    <label class="float-left label-width">State</label>
                    <input name="shipping_state" type="text">
                </div>
                <div class="row">
                    <label class="float-left label-width">City</label>
                    <input name="shipping_city" type="text">
                </div>
                <div class="row">
                    <label class="float-left label-width">Country</label>
                    <input name="shipping_country" type="text">
                </div>
                <div class="row">
                    <label class="float-left label-width">Zip</label>
                    <input name="shipping_zipcode" type="text">
                </div>
                <div class="row button-row">
                    <button type="button" onClick="showPrevious(this)">Previous</button>
                    <button type="button" onClick="validate(this)">Next</button>
                </div>
            </section>


            <!-- Wizard section 3 -->
            <section id="discount-section" class="display-none">
                <h3>Apply discount:</h3>
                <div class="row"><label>Coupon code</label>
                    <input name="discount_coupon" type="text" onClick="validate(this)">
                </div>
                <div class="row button-row">
                    <button type="button" onClick="showPrevious(this)">Previous</button>
                    <button type="button" onClick="validate(this)">Next</button>
                </div>
            </section>

            <!-- Wizard section 4 -->
            <section id="others-section" class="display-none">
                <h3>Others:</h3>
                <div class="row">
                    <label>Notes</label>
                    <textarea name="notes" rows="4" cols="50" id="notes"></textarea>
                </div>
                <div class="row button-row">
                    <button type="button" onClick="showPrevious(this)">Previous</button>
                    <button type="submit">Checkout</button>
                </div>
            </section>
        </form>
    </div>
    <script src="https://code.jquery.com/jquery-3.7.1.min.js" integrity="sha256-/JqT3SQfawRcv/BIHPThkBvs0OEvtFFmqPF/lYI/Cxo=" crossorigin="anonymous"></script>
    <script src="js/wizard.js"></script>
</body>

</html>
2. Add previous-next navigation to move back and forth
The showPrevious and showNextWizardSection JS functions are created to handle the wizard navigation.
Move to the previous form from any step is unconditional. But, moving to the next form is restricted by a validation process.
3. Validate sub-form and restrict navigation
On clicking the “next” button, the form validation script is called. It iterates the current subform fields to validate.
Presently, the validation script only checks if the form field is empty. Since the billing and shipping sub-forms contain email fields, we can add email field validation to this JS.
If the validation step returns a boolean true, then it allows the user to move next.
js/wizard.js
function validate(button) {
    var wizardSection = $(button).closest("section");
    var valid = true;
    $(this).css("border", "1px solid #9a9a9a");
    $(wizardSection).find("input").each(function () {
        if ($(this).val() == "") {
            valid = false;
            $(this).css("border", "red 1px solid");
        }
    });
    if (valid == true) {
        showNextWizardSection(wizardSection);
    }
}

function showNextWizardSection(wizardSection) {
    $("section").addClass("display-none");
    $(wizardSection).next("section").removeClass("display-none");
    $(".wizard-flow-chart span.fill").next("span").addClass("fill");
}

function showPrevious(button) {
    var wizardSection = $(button).closest("section");
    $("section").addClass("display-none");
    $(wizardSection).prev("section").removeClass("display-none");
    $(".wizard-flow-chart span.fill").last().removeClass("fill");
}

function validateCheckout() {
    if ($("#notes").val() == "") {
        $("#notes").css("border", "red 1px solid");
        return false;
    }
}
4. Keep the submitted data along the wizard
There are many ways to keep the submitted data persistent. Posting the submitted data via the $_POST method will keep the form data in this global array.
This example has a split up of a single-form entity. The previous and next buttons are not submitting the form. Rather, it shows and hides the wizard forms based on the progress.
Once reaching the final step it allows posting the form on checkout the order.
It can also be enhanced to store the entered data in a session or a database. It will make the wizard persistent even more after the page refresh.
5. Store wizard form data to a database in PHP
This section makes this example usable in an application dynamically. It gives the PHP code to store the order details in a database.
Once the wizard form is posted after checkout, this PHP script prepares the below INSERT query to build the order details parameters to be saved.
index.php (Wizard form data insert)
<?php
if (!empty($_POST)) {
    require_once __DIR__ . "/lib/DataSource.php";
    $database = new DataSource();

    // Store wizard form data to post
    $query = "INSERT INTO tbl_order (billing_name, billing_email, billing_state, billing_city, billing_country, billing_zip, shipping_name, shipping_email, shipping_state, shipping_city, shipping_country, shipping_zip, discount_code, notes) VALUES (?, ?, ?, ?, ?, ?, ?, ?, ?, ?, ?, ?, ?, ?)";
    $paramType = 'ssssssssssssss';
    $paramValue = array(
        $_POST["customer_billing_name"],
        $_POST["billing_email"],
        $_POST["billing_state"],
        $_POST["billing_city"],
        $_POST["billing_country"],
        $_POST["billing_zipcode"],
        $_POST["customer_shipping_name"],
        $_POST["shipping_email"],
        $_POST["shipping_state"],
        $_POST["shipping_city"],
        $_POST["shipping_country"],
        $_POST["shipping_zipcode"],
        $_POST["discount_coupon"],
        $_POST["notes"],
    );
    $insertId = $database->insert($query, $paramType, $paramValue);
    if (!empty($insertId)) {
        $message = "Thank you for your order!";
        $type = "success";
        unset($_POST);
    } else {
        $message = "Problem in insertion. Try Again!";
        $type = "error";
    }
}
?>
Database script
sql/structure.sql
CREATE TABLE `tbl_order` (
  `id` int(11) NOT NULL,
  `billing_name` varchar(255) DEFAULT NULL,
  `billing_email` varchar(255) DEFAULT NULL,
  `billing_state` varchar(255) DEFAULT NULL,
  `billing_city` varchar(255) DEFAULT NULL,
  `billing_country` varchar(255) DEFAULT NULL,
  `billing_zip` varchar(255) DEFAULT NULL,
  `shipping_name` varchar(255) DEFAULT NULL,
  `shipping_email` varchar(255) DEFAULT NULL,
  `shipping_state` varchar(255) DEFAULT NULL,
  `shipping_city` varchar(255) DEFAULT NULL,
  `shipping_country` varchar(255) DEFAULT NULL,
  `shipping_zip` varchar(255) DEFAULT NULL,
  `discount_code` varchar(255) DEFAULT NULL,
  `notes` varchar(255) DEFAULT NULL,
  `created_at` timestamp NOT NULL DEFAULT current_timestamp() ON UPDATE current_timestamp()
);

--
-- Indexes for table `tbl_order`
--
ALTER TABLE `tbl_order`
  ADD PRIMARY KEY (`id`);

ALTER TABLE `tbl_order`
  MODIFY `id` int(11) NOT NULL AUTO_INCREMENT;