Introduction
PHP cURL is one of the most practical ways to send HTTP requests from a PHP application. It is commonly used to connect with REST APIs, submit form data to another service, send JSON payloads, and read the response back in your code.
In this tutorial, I will focus on one specific task: sending a POST request with PHP cURL. That is the part most developers look for when they search for a PHP cURL example.
You will build a small working project that submits form data to a local API endpoint. The request will be sent with PHP cURL, the API will validate the data, store it in MySQL using MySQLi, and return a JSON response.
This example keeps the code simple, but it also uses better practices like request headers, response handling, validation, prepared statements, and basic error logging. So it is easy to follow and still useful for real work.
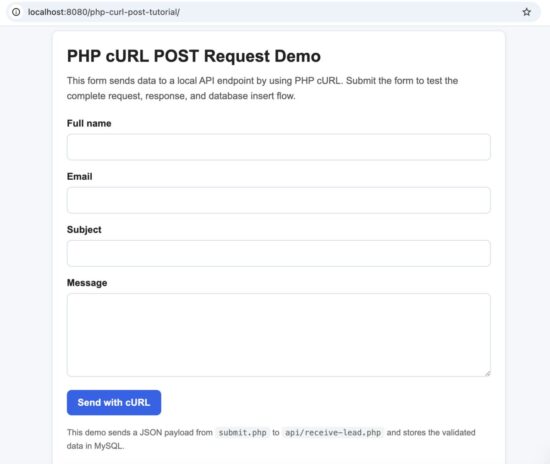
Demo form used to send a POST request with PHP cURL
Quick Answer
To send a POST request with PHP cURL, initialize cURL with the target URL, set CURLOPT_POST to true, pass the request data with CURLOPT_POSTFIELDS, and enable CURLOPT_RETURNTRANSFER so you can read the response in PHP.
For form data, you can pass an array. For JSON, encode the payload with json_encode() and send the correct Content-Type header.
If you want to send data specifically as JSON, you can also read this PHP JSON POST tutorial for a more focused example.
Here is the basic pattern for a JSON POST request:
<?php
$url = 'http://localhost/php-curl-post-tutorial/api/receive-lead.php';

$payload = [
    'full_name' => 'John Doe',
    'email' => 'john@example.com',
    'subject_line' => 'Demo Request',
    'message_text' => 'This is a sample POST request.',
    'source_label' => 'website-form'
];

$ch = curl_init($url);

curl_setopt_array($ch, [
    CURLOPT_POST => true,
    CURLOPT_POSTFIELDS => json_encode($payload),
    CURLOPT_HTTPHEADER => [
        'Content-Type: application/json',
        'Accept: application/json'
    ],
    CURLOPT_RETURNTRANSFER => true
]);

$response = curl_exec($ch);
$statusCode = curl_getinfo($ch, CURLINFO_HTTP_CODE);
$curlError = curl_error($ch);

curl_close($ch);
?>
This works well for API integrations, webhook calls, contact form relays, payment requests, and any case where your PHP application needs to send data to another server.
If you are new to cURL in PHP, the official PHP cURL manual is a good place to understand the available functions and overall request flow.
When to Use PHP cURL POST
A POST request is used when your PHP application needs to send data to another URL. This is common when you work with APIs, payment gateways, webhooks, CRM tools, or any external service that accepts input from your application.
PHP cURL is useful here because it gives you control over the request. You can send form fields, JSON payloads, custom headers, authentication tokens, and timeout settings. You can also inspect the response code and handle errors properly.
Typical use cases include:
- sending contact form data to an internal API
- submitting JSON to a third-party service
- triggering a webhook after a form submission
- connecting a PHP application with another application over HTTP
- posting data to a payment or notification endpoint
In this tutorial, the browser form does not write to the database directly. Instead, the form submits to a PHP file, and that file sends a cURL POST request to a local API endpoint. This makes the flow closer to a real API integration.
Project Overview
This example project shows a complete and practical PHP cURL POST flow. It is small enough to understand quickly, but it still reflects how cURL is often used in real applications.
The project has three main parts:
- index.php displays a simple HTML form
- submit.php collects the form data and sends it as a JSON POST request with PHP cURL
- api/receive-lead.php receives the request, validates it, stores it in MySQL with MySQLi, and returns a JSON response
This flow is useful because it separates the sender from the receiver. Instead of writing directly to the database from the form handler, the application communicates through an API endpoint. That is a more realistic pattern for integrations, modular applications, and service-based systems.
The project also demonstrates a few important basics that are often skipped in older examples:
- sending JSON with the correct headers
- checking the HTTP status code
- capturing cURL errors
- decoding the JSON response
- storing data securely with MySQLi prepared statements
If you want a simple PHP cURL POST example that is easy to run locally and easy to extend later, this project is a good starting point.
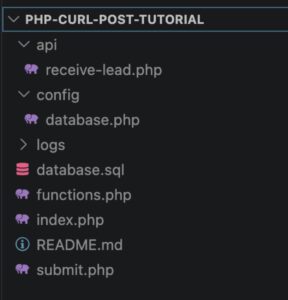
File structure of the PHP cURL POST example project
Example Output
When the form is submitted successfully, the API returns a JSON response and the sender page displays the result. You will see the HTTP status code, the API status message, and the inserted record ID.
A typical success response looks like this:
{
    "status": "success",
    "message": "Lead received and stored successfully.",
    "data": {
        "lead_id": 1
    }
}
On the result page, the raw JSON response is also shown. This makes it easy to understand what came back from the endpoint and helps during testing.
If the request fails, you may instead see a validation message, a cURL error, or an invalid API response message depending on what went wrong. That is helpful when you are debugging local integrations.
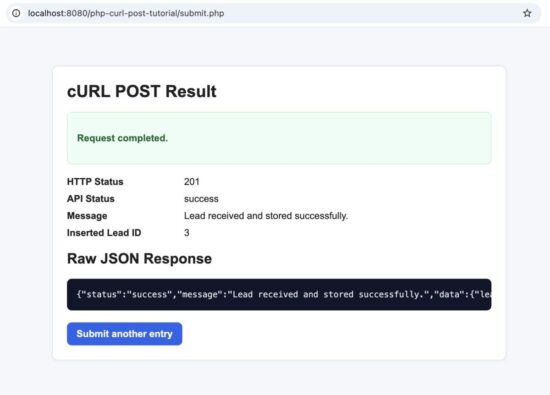
Example output of a successful PHP cURL POST request

MySQL record created from the PHP cURL POST API request
Step-by-Step Implementation
Now let us build the example step by step. The project has a simple flow, but each file has a clear role. This makes the code easier to understand and easier to reuse in your own work.
1. Create the database table
Start by creating a MySQL database and table for storing the submitted data. The table keeps the sender details, message content, source label, and created time.
CREATE DATABASE IF NOT EXISTS phppot_curl_demo CHARACTER SET utf8mb4 COLLATE utf8mb4_unicode_ci;

USE phppot_curl_demo;

CREATE TABLE IF NOT EXISTS api_leads (
    id INT UNSIGNED NOT NULL AUTO_INCREMENT,
    full_name VARCHAR(100) NOT NULL,
    email VARCHAR(190) NOT NULL,
    subject_line VARCHAR(150) NOT NULL,
    message_text TEXT NOT NULL,
    source_label VARCHAR(50) NOT NULL DEFAULT 'website-form',
    created_at DATETIME NOT NULL DEFAULT CURRENT_TIMESTAMP,
    PRIMARY KEY (id),
    KEY idx_email (email),
    KEY idx_created_at (created_at)
) ENGINE=InnoDB DEFAULT CHARSET=utf8mb4 COLLATE=utf8mb4_unicode_ci;
2. Add the database connection file
The next step is to create a reusable MySQLi connection file. This keeps the database code separate and makes the API file cleaner.
<?php
declare(strict_types=1);

mysqli_report(MYSQLI_REPORT_ERROR | MYSQLI_REPORT_STRICT);

function getDatabaseConnection(): mysqli
{
    $host = '127.0.0.1';
    $database = 'phppot_curl_demo';
    $username = 'root';
    $password = '';
    $port = 3306;

    $connection = new mysqli($host, $username, $password, $database, $port);
    $connection->set_charset('utf8mb4');

    return $connection;
}
3. Create the input form
The form collects the values that will later be sent through PHP cURL. This page does not call the API directly. It submits to submit.php, and that file handles the cURL request.
<?php
declare(strict_types=1);
require_once __DIR__ . '/functions.php';
?>
<!DOCTYPE html>
<html lang="en">
<head>
    <meta charset="UTF-8">
    <meta name="viewport" content="width=device-width, initial-scale=1.0">
    <title>PHP cURL POST Request Demo</title>
</head>
<body>
    <h1>PHP cURL POST Request Demo</h1>
    <p>This form sends data to a local API endpoint by using PHP cURL.</p>

    <form method="post" action="submit.php">
        <div>
            <label for="full_name">Full name</label><br>
            <input type="text" id="full_name" name="full_name" required maxlength="100">
        </div>
        <br>

        <div>
            <label for="email">Email</label><br>
            <input type="email" id="email" name="email" required maxlength="190">
        </div>
        <br>

        <div>
            <label for="subject_line">Subject</label><br>
            <input type="text" id="subject_line" name="subject_line" required maxlength="150">
        </div>
        <br>

        <div>
            <label for="message_text">Message</label><br>
            <textarea id="message_text" name="message_text" rows="6" cols="50" required></textarea>
        </div>
        <br>

        <button type="submit">Send with cURL</button>
    </form>
</body>
</html>
4. Add reusable helper functions
This file contains a few small helpers for escaping output, validating emails, and writing cURL-related errors into a log file.
For stricter input checking, especially on contact-style forms, this guide on PHP email validation is also useful.
<?php
declare(strict_types=1);

function escape(mixed $value): string
{
    return htmlspecialchars((string) $value, ENT_QUOTES, 'UTF-8');
}

function isValidEmail(string $email): bool
{
    return filter_var($email, FILTER_VALIDATE_EMAIL) !== false;
}

function writeCurlErrorLog(string $message): void
{
    $logDirectory = __DIR__ . '/logs';
    $logFile = $logDirectory . '/curl-error.log';

    if (!is_dir($logDirectory)) {
        mkdir($logDirectory, 0775, true);
    }

    $timestamp = date('Y-m-d H:i:s');
    file_put_contents($logFile, '[' . $timestamp . '] ' . $message . PHP_EOL, FILE_APPEND);
}
Send Form Data with PHP cURL
If you want to send a normal form-style POST request, you can pass an array directly to CURLOPT_POSTFIELDS. PHP cURL will encode the fields for you.
This is useful when the receiving endpoint expects standard form data instead of JSON.
<?php
$url = 'https://example.com/api/form-handler.php';

$formData = [
    'name' => 'John Doe',
    'email' => 'john@example.com',
    'message' => 'Hello from PHP cURL'
];

$ch = curl_init($url);

curl_setopt_array($ch, [
    CURLOPT_POST => true,
    CURLOPT_POSTFIELDS => $formData,
    CURLOPT_RETURNTRANSFER => true,
    CURLOPT_TIMEOUT => 10,
    CURLOPT_CONNECTTIMEOUT => 5
]);

$response = curl_exec($ch);
$statusCode = curl_getinfo($ch, CURLINFO_HTTP_CODE);
$curlError = curl_error($ch);

curl_close($ch);
In this case, PHP sends the request in a form-encoded style. That is fine for many simple integrations, especially older endpoints or internal tools that accept regular POST fields.
When you work with multiple cURL options, the PHP curl_setopt() reference is useful for checking supported settings and their behavior.
However, modern APIs often expect JSON. That is why the main project in this tutorial uses a JSON request instead of plain form data.
Still, it is useful to know both formats because you may need to work with different APIs in different projects.
What happens in this request
curl_init($url)starts a new cURL session for the target URLCURLOPT_POSTtells cURL to send a POST requestCURLOPT_POSTFIELDSsends the form fields to the endpointCURLOPT_RETURNTRANSFERreturns the response as a string instead of printing it directlyCURLINFO_HTTP_CODElets you inspect the HTTP response status
Send JSON with PHP cURL
Many modern APIs expect JSON instead of regular form fields. In that case, you should convert the payload to JSON and send the correct request headers.
This is the most common pattern when PHP communicates with another application over HTTP.
<?php
$apiUrl = 'http://localhost/php-curl-post-tutorial/api/receive-lead.php';

$payload = [
    'full_name' => 'John Doe',
    'email' => 'john@example.com',
    'subject_line' => 'Demo Request',
    'message_text' => 'This is a sample POST request.',
    'source_label' => 'website-form'
];

$curlHandle = curl_init($apiUrl);

curl_setopt_array($curlHandle, [
    CURLOPT_POST => true,
    CURLOPT_POSTFIELDS => json_encode($payload, JSON_THROW_ON_ERROR),
    CURLOPT_HTTPHEADER => [
        'Content-Type: application/json',
        'Accept: application/json'
    ],
    CURLOPT_RETURNTRANSFER => true,
    CURLOPT_TIMEOUT => 10,
    CURLOPT_CONNECTTIMEOUT => 5
]);

$responseBody = curl_exec($curlHandle);
$httpStatusCode = (int) curl_getinfo($curlHandle, CURLINFO_HTTP_CODE);
$curlError = curl_error($curlHandle);

curl_close($curlHandle);
This example sends a JSON body to the API endpoint. The Content-Type: application/json header tells the receiver how to interpret the request body. The Accept: application/json header tells the server that the client expects a JSON response.
Without the correct headers, many APIs will reject the request or parse it incorrectly.
Why this format is important
- JSON is widely used by REST APIs
- nested data is easier to represent in JSON
- request and response structures are usually more consistent
- it works well with JavaScript, mobile apps, and backend services
How the example project uses JSON
In this tutorial project, submit.php receives the browser form data and then sends it as JSON to api/receive-lead.php. The API reads the raw input, decodes the JSON payload, validates the fields, inserts the row into MySQL, and returns a JSON success message.
This is a more realistic example than sending data directly from the form handler into the database, because many real applications need to talk to APIs and not just local PHP files.
Handle Response and Errors
Sending the request is only one part of the job. A good PHP cURL example should also show how to handle the response properly and how to detect errors when something goes wrong.
After calling curl_exec(), you should check three things:
- whether cURL itself failed
- what HTTP status code the server returned
- whether the response body can be decoded correctly
Here is the response-handling part from the project:
<?php
$responseBody = curl_exec($curlHandle);
$curlError = curl_error($curlHandle);
$httpStatusCode = (int) curl_getinfo($curlHandle, CURLINFO_HTTP_CODE);
curl_close($curlHandle);

if ($responseBody === false) {
    writeCurlErrorLog('cURL failed: ' . $curlError);

    http_response_code(500);
    exit('The request could not be completed.');
}

$decodedResponse = json_decode($responseBody, true);

if (!is_array($decodedResponse)) {
    writeCurlErrorLog('Invalid JSON response: ' . $responseBody);

    http_response_code(500);
    exit('The API returned an invalid response.');
}
What each check does
- cURL error check helps you detect connection problems, DNS errors, timeout issues, or SSL problems
- HTTP status code check tells you whether the server accepted the request or returned an error like 400, 404, 422, or 500
- JSON decode check confirms that the API really returned valid JSON
In the example project, failed requests are also written to a simple log file. That gives you a basic way to debug problems during development.
Why this matters
Older cURL examples often stop at curl_exec() and print the result. That is not enough for real work. If an API is slow, unreachable, or returns invalid data, you need to know what failed and why.
Even in a small local project, response handling makes the code more reliable and much easier to debug.
Security Considerations
This example is kept simple for learning, but a real PHP cURL integration should still follow a few security basics.
- Validate all input data. Do not trust form fields or API payloads just because they come from your own application. Always validate required fields and data format on the receiving side.
- Use prepared statements for database writes. This helps prevent SQL injection and is the safer way to insert request data into MySQL.
- Use HTTPS for real API requests. In production, send cURL requests only over HTTPS so request data is encrypted in transit.
- Do not expose sensitive information in responses. Avoid printing internal errors, database details, access tokens, or server paths in the browser.
- Set timeouts and handle failures properly. A remote endpoint may be slow or unavailable. Reasonable timeout values and error logging make the integration safer and easier to debug.
- Add authentication when needed. Real APIs often require an API key, bearer token, or another authentication method. Do not leave write endpoints openly accessible in production.
For this tutorial, the example focuses on the core POST request flow. In a production project, you would usually add stronger validation, authentication, rate limiting, and more careful logging.
Store API Data in MySQL with MySQLi
Once the API receives the JSON request, the next step is to validate the fields and store the data safely in MySQL. In this example, the API uses MySQLi prepared statements, which is the right way to insert user input into the database.
The API endpoint reads the raw request body, decodes the JSON payload, validates the required fields, and then inserts the record into the api_leads table.
Since this example stores API data in MySQL, you may also want to read about PHP MySQL prepared statements for safer database inserts.
<?php
declare(strict_types=1);

require_once __DIR__ . '/../config/database.php';
require_once __DIR__ . '/../functions.php';

header('Content-Type: application/json');

if ($_SERVER['REQUEST_METHOD'] !== 'POST') {
    http_response_code(405);
    echo json_encode([
        'status' => 'error',
        'message' => 'Only POST requests are allowed.'
    ]);
    exit;
}

$contentType = $_SERVER['CONTENT_TYPE'] ?? '';
if (stripos($contentType, 'application/json') === false) {
    http_response_code(415);
    echo json_encode([
        'status' => 'error',
        'message' => 'Content-Type must be application/json.'
    ]);
    exit;
}

$requestBody = file_get_contents('php://input');
$payload = json_decode($requestBody, true);

if (!is_array($payload)) {
    http_response_code(400);
    echo json_encode([
        'status' => 'error',
        'message' => 'Invalid JSON payload.'
    ]);
    exit;
}

$fullName = trim((string) ($payload['full_name'] ?? ''));
$email = trim((string) ($payload['email'] ?? ''));
$subjectLine = trim((string) ($payload['subject_line'] ?? ''));
$messageText = trim((string) ($payload['message_text'] ?? ''));
$sourceLabel = trim((string) ($payload['source_label'] ?? 'website-form'));

$errors = [];

if ($fullName === '') {
    $errors['full_name'] = 'Full name is required.';
}

if (!filter_var($email, FILTER_VALIDATE_EMAIL)) {
    $errors['email'] = 'A valid email is required.';
}

if ($subjectLine === '') {
    $errors['subject_line'] = 'Subject is required.';
}

if ($messageText === '') {
    $errors['message_text'] = 'Message is required.';
}

if ($errors !== []) {
    http_response_code(422);
    echo json_encode([
        'status' => 'error',
        'message' => 'Validation failed.',
        'errors' => $errors
    ]);
    exit;
}

$connection = getDatabaseConnection();

$statement = $connection->prepare(
    'INSERT INTO api_leads (full_name, email, subject_line, message_text, source_label)
     VALUES (?, ?, ?, ?, ?)'
);

$statement->bind_param('sssss', $fullName, $email, $subjectLine, $messageText, $sourceLabel);
$statement->execute();

$leadId = $statement->insert_id;

$statement->close();
$connection->close();

http_response_code(201);
echo json_encode([
    'status' => 'success',
    'message' => 'Lead received and stored successfully.',
    'data' => [
        'lead_id' => $leadId
    ]
]);
Why MySQLi prepared statements matter
- they help prevent SQL injection
- they separate SQL structure from input values
- they make inserts cleaner and safer
- they are a good default choice for plain PHP projects
This database step completes the full request flow. The browser sends data to submit.php, submit.php sends a cURL POST request to the API, and the API stores the validated payload in MySQL before returning JSON.
Common Errors and Fixes
PHP cURL is simple to start with, but a few common mistakes can break the request quickly. Most problems come from the wrong URL, missing headers, invalid JSON, or local environment issues.
1. cURL is not enabled in PHP
If you see an error like Call to undefined function curl_init(), the cURL extension is not enabled in your PHP setup.
Fix: Enable the cURL extension in your PHP configuration and restart your local server.
2. Wrong API URL
If the request fails or times out, the target URL may be incorrect. This is common in local testing when the folder name or local domain does not match the URL used in submit.php.
Fix: Check the $apiUrl value carefully.
$apiUrl = 'http://localhost/php-curl-post-tutorial/api/receive-lead.php';If your project folder name is different, update this URL to match your real local path.
3. Missing JSON headers
If the receiving API expects JSON and you do not send the correct header, the request may be rejected or parsed incorrectly.
Fix: Add the correct headers when sending JSON.
CURLOPT_HTTPHEADER => [
    'Content-Type: application/json',
    'Accept: application/json'
]
4. Invalid JSON payload
If the payload cannot be encoded or the API cannot decode the body, the request will fail.
Fix: Use json_encode() correctly and make sure the receiving API uses json_decode() on php://input.
5. Empty or invalid input values
If required fields are missing, the API may return a validation error such as HTTP 422.
Fix: Validate input before sending the request and also validate again inside the API.
6. Database connection failure
If the API receives the request but cannot save the data, your database credentials may be wrong.
Fix: Check config/database.php and confirm the database name, username, password, and port.
7. Invalid JSON response
If the API prints warnings, HTML, or unexpected output before the JSON response, json_decode() may fail in the sender script.
Fix: Make sure the API returns clean JSON only and avoid extra output before json_encode().
8. Timeout or connection issues
If the target server is slow or unreachable, cURL may fail before getting a response.
Fix: Set reasonable timeout values and log the cURL error for debugging.
CURLOPT_TIMEOUT => 10,
CURLOPT_CONNECTTIMEOUT => 5
These checks solve most issues you will see while building or testing a PHP cURL POST example locally.
Developer FAQ
Is PHP cURL enabled by default?
Not always. Many local server packages include it, but some PHP setups keep it disabled. If curl_init() is undefined, you need to enable the cURL extension in your PHP configuration.
Should I send form data or JSON?
That depends on the endpoint you are calling. If the endpoint expects regular form fields, send an array in CURLOPT_POSTFIELDS. If it expects JSON, encode the payload with json_encode() and send the Content-Type: application/json header.
Can I use PHP cURL for GET requests too?
Yes. PHP cURL can send GET, POST, PUT, DELETE, and other HTTP requests. This article focuses on POST because that is the most common use case when sending data to an API.
Why use CURLOPT_RETURNTRANSFER?
Without it, the response may be printed directly to the output. With CURLOPT_RETURNTRANSFER enabled, you can capture the response as a string and inspect it in your PHP code.
Why check the HTTP status code?
The response body alone is not enough. The HTTP status code tells you whether the request succeeded or failed. For example, 200 or 201 usually means success, while 400, 422, or 500 indicates a problem.
Can I upload files with PHP cURL POST?
Yes, but file upload is a separate use case and needs a different request format. For file uploads, you would typically use CURLFile. Since that has its own setup and edge cases, it is better covered in a separate tutorial.
Is cURL better than file_get_contents() for API requests?
For simple remote reads, file_get_contents() may work. But for real API work, cURL is usually better because it gives you control over headers, methods, timeouts, authentication, and response details.
Can I use this example in production?
Yes, as a starting point. The project already includes validation, JSON headers, response handling, error logging, and MySQLi prepared statements. In production, you may also add authentication, stricter validation, retry logic, and better logging.
Do I need MySQL for a PHP cURL POST request?
No. cURL is only used to send the HTTP request. MySQL is included in this tutorial to make the project more practical by showing what the receiving API can do with the request data.
Conclusion
PHP cURL is a reliable way to send POST requests from a PHP application. Once you understand the basic pattern, you can use it for API integrations, webhook calls, form relays, payment requests, and many other real-world tasks.
In this tutorial, you built a complete example that goes beyond a minimal snippet. The project sends a JSON POST request with PHP cURL, handles the response, validates input, logs request errors, and stores the data in MySQL with MySQLi prepared statements.
This makes the example simple enough to learn from and practical enough to extend in your own work.
If you are new to API work in PHP, start with this project locally, test the request flow carefully, and then adapt the same pattern when you connect to external services.
You can now download the full source code and use it as a base for your own cURL POST integrations.
Download Source Code
Download the complete PHP cURL POST example project

Thanks! The PHP CURL post and receive JSON data section helped me a lot! Great example!
Welcome Izak.
Hi Vincy,
security risk file must be included along with such sensitive data php files. Xss script attach is common among web applications, so add include or require_once into it. Also for mutiple payment request, I prefer curl_multi_init() & curl_multi_exec with add handler with curl_getinfo and curl_info_effective_url. These things will make more effective when included in above coded ones. Always remember security is of highest priority when dealing with php files. Even post and get method do get exposed as datas can be redirected or lost in transit of data to url.
Hi Suresh,
Thank you for this thoughtful comment.
I agree that security is very important when working with PHP applications and data exchange. In this tutorial, I kept the example simple on purpose so readers can first understand the basic cURL POST flow clearly. Your suggestions about stronger security handling and `curl_multi_*` functions are very useful, especially for more advanced or production-level use cases.
Thanks again for adding this valuable point.
Really nice!
Thanks a lot!
Welcome Jadriano.