Database data export is a familiar operation for many of us. phpMyAdmin is the go-to choice for a database client in PHP. It provides database administration tools and also allows the exporting of data. As selected, the exported data can be in various formats like SQL and CSV.
When you need a PHP script that can export database data (records) to an excel file, then this article will help you. It has a detailed description with an example code. It is compact and lightweight code that can be integrated into your PHP web applications.
We have already seen several example codes for implementing database export using PHP.
Database import and export with PHP and MySQL will give you basic knowledge about the export operation.
This export operation is for taking database backups. We can use this backup later for various purposes. For example, this will help to reuse backups for restoring the database in the future.
If you want to study how to split the excel export into multiple files, read the linked article. It contains a perfect example and a downloadable source code for free.
We can also perform this export action via programming. In PHP, the code implementation of creating a database export tool is simple.

In this example, we will create PHP code for taking a backup by exporting a database.
This article will help you to create a PHP code to build your database export system.
What is inside?
- About this PHP MySQL database data export example
- Popular database clients with an export tool
- File structure
- Database structure
- HTML code to display database results with export control
- Libraries to render tabular data with an export option
- How to perform database export with PHP and MySQL
- Output screenshot with export action response
About this PHP MySQL database data export example
This tutorial will help you to understand how the database is exported to an Excel file. I used PHP and MySQL to perform this export option via programming.
We have seen an example before of writing the exported data into a target CSV file using the PHP fputcsv() function. PHP provides powerful built-in functions for handling file operations.
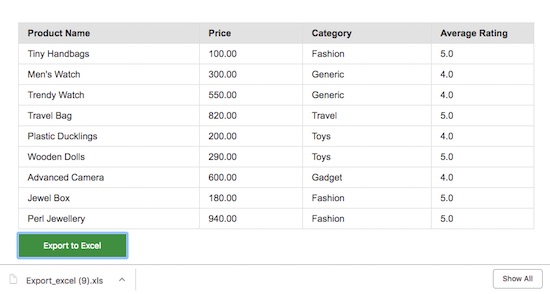
I have created a product database table for this example. The landing page will display this dynamic product data with an export option. The export control is a submit button that triggers the form propose action.
In PHP, it handles the form submission to process export. First, we retrieve the product results by accessing the database. Then, we pass the resultant product array as an argument to the export function.
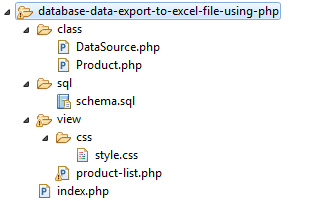
There are two PHP classes in this example. Those are Product and DataSource. The Product class contains two functions. One is to get product results from the database and the other is to export database results.
The DataSource class is for creating a database connection and handling queries.
Popular database clients with an export tool
There are various database clients available with advanced tools to execute database operations.
In this section, let us see how to export from the database clients phpMyAdmin and SQLyog. It also describes the available customization provided with the client interface.
Database export using phpMyAdmin
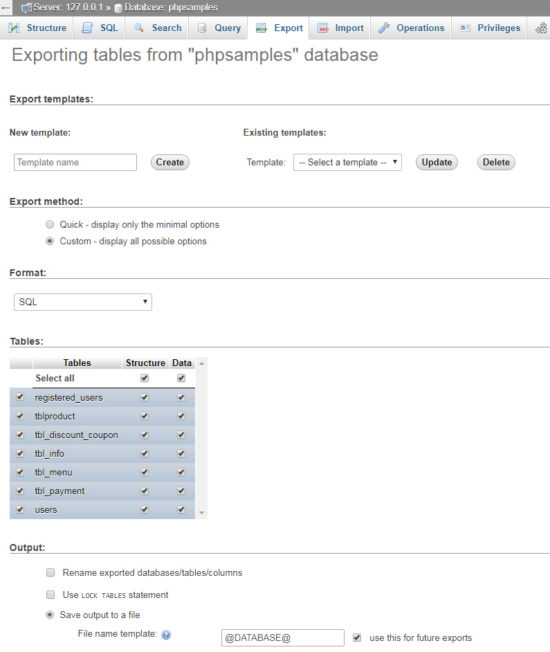
This client supports selecting data/structure of the database, specifying format and more. The following figure shows the possible customization with the export tool in phpMyAdmin.
Export via SQLyog
In SQLyog, we must choose Backup/Export by right-clicking the Object browser. Then a dialogue will show options to select format, escape sequences, SQL options and more.
File structure
Database Structure
This section shows the product database table and its data dump. Run the SQL script to execute this example in your development environment.
This database script is added to the downloadable source code as schema.sql.
--
-- Table structure for table `tbl_products`
--

CREATE TABLE `tbl_products` (
  `id` int(8) NOT NULL,
  `name` varchar(255) NOT NULL,
  `price` double(10,2) NOT NULL,
  `category` varchar(255) NOT NULL,
  `product_image` text NOT NULL,
  `average_rating` float(3,1) NOT NULL
) ENGINE=InnoDB DEFAULT CHARSET=latin1;

--
-- Dumping data for table `tbl_products`
--

INSERT INTO `tbl_products` (`id`, `name`, `price`, `category`, `product_image`, `average_rating`) VALUES
(1, 'Tiny Handbags', 100.00, 'Fashion', 'gallery/handbag.jpeg', 5.0),
(2, 'Men\'s Watch', 300.00, 'Generic', 'gallery/watch.jpeg', 4.0),
(3, 'Trendy Watch', 550.00, 'Generic', 'gallery/trendy-watch.jpeg', 4.0),
(4, 'Travel Bag', 820.00, 'Travel', 'gallery/travel-bag.jpeg', 5.0),
(5, 'Plastic Ducklings', 200.00, 'Toys', 'gallery/ducklings.jpeg', 4.0),
(6, 'Wooden Dolls', 290.00, 'Toys', 'gallery/wooden-dolls.jpeg', 5.0),
(7, 'Advanced Camera', 600.00, 'Gadget', 'gallery/camera.jpeg', 4.0),
(8, 'Jewel Box', 180.00, 'Fashion', 'gallery/jewel-box.jpeg', 5.0),
(9, 'Perl Jewellery', 940.00, 'Fashion', 'gallery/perls.jpeg', 5.0);

--
-- Indexes for dumped tables
--

--
-- Indexes for table `tbl_products`
--
ALTER TABLE `tbl_products`
  ADD PRIMARY KEY (`id`);

--
-- AUTO_INCREMENT for dumped tables
--

--
-- AUTO_INCREMENT for table `tbl_products`
--
ALTER TABLE `tbl_products`
  MODIFY `id` int(8) NOT NULL AUTO_INCREMENT, AUTO_INCREMENT=10;
COMMIT;
HTML code to display database results with export control
The below code shows the HTML with the tabular product result and an export button. The product data is dynamic from the database.
I retrieve the database results on the landing page and store them in a variable. A PHP array variable holds the product database results.
For forming this product list HTML, I embedded PHP code to iterate the product result array. The appropriate row data forms the product record in the HTML view on each iteration.
This page also contains an HTML button below the product list view to export the data. This is a submit button enclosed in an HTML form container. A PHP endpoint will handle the form post action by clicking this button.
<?php
namespace Phppot;

use \Phppot\Product;
require_once __DIR__ . '/class/Product.php';

$product = new Product();
$productResult = $product->getAllProduct();

if (isset($_POST["export"])) {
    $product->exportProductDatabase($productResult);
}

require_once __DIR__ . "/view/product-list.php";
?>
product-list.php
<html>
<head>
<meta name="viewport" content="width=device-width, initial-scale=1">
<link href="./view/css/style.css" type="text/css" rel="stylesheet" />
</head>
<body>
    <div id="table-container">
    <?php
    if (! empty($productResult)) {
        ?>
        <table id="tab">
            <thead>
                <tr>
                    <th width="35%">Product Name</th>
                    <th width="20%">Price</th>
                    <th width="25%">Category</th>
                    <th width="20%">Average Rating</th>
                </tr>
            </thead>
            <tbody>
            <?php
        foreach ($productResult as $key => $value) {
            ?>
                <tr>
                    <td><?php echo $productResult[$key]["name"]; ?></td>
                    <td><?php echo $productResult[$key]["price"]; ?></td>
                    <td><?php echo $productResult[$key]["category"]; ?></td>
                    <td><?php echo $productResult[$key]["average_rating"]; ?></td>
                </tr>
            <?php
        }
        ?>
            </tbody>
        </table>

        <div class="btn">
            <form action="" method="post">
                <button type="submit" id="btnExport" name='export'
                    value="Export to Excel" class="btn btn-info">Export
                    to Excel</button>
            </form>
        </div>
    <?php
    }
    else
    {
    ?>
    <div class="empty-table">
    <div class="svg-icon">
    <svg xmlns="http://www.w3.org/2000/svg" width="48" height="48" viewBox="0 0 24 24"><circle cx="12" cy="19" r="2"/><path d="M10 3h4v12h-4z"/><path fill="none" d="M0 0h24v24H0z"/></svg>
    </div>
    No records found</div>
    <?php
    }
    ?>
    </div>
</body>
</html>
Below is the list of styles created for this example. These are some basic CSS styles which are to make the output view presentable to your users.
body {
    font-size: 0.95em;
    font-family: arial;
    color: #212121;
}

th {
    background: #E6E6E6;
    border-bottom: 1px solid #000000;
}

#table-container {
    max-width: 850px;
    margin: 50px auto;
}

table#tab {
    border-collapse: collapse;
    width: 100%;
}

table#tab th, table#tab td {
    border: 1px solid #E0E0E0;
    padding: 8px 15px;
    text-align: left;
    font-size: 0.95em;
}

.btn {
    padding: 8px 4px 8px 1px;
}

#btnExport {
    padding: 10px 40px;
    background: #499a49;
    border: #499249 1px solid;
    color: #ffffff;
    font-size: 0.9em;
    cursor: pointer;
}

.empty-table {
    border: #e4e4e4 1px solid;
    padding: 20px;
    background: #F0F0F0;
    text-align: center;
    font-size: 1.5em;
    color: #CCC;
}

.svg-icon {
    fill: #CCC;
    margin-bottom: 20px;
}

.svg-icon svg {
    background: #e2e2e2;
    border-radius: 50%;
    padding: 10px;
}
Libraries to render tabular data with an export option
This is an example of building a custom code to create data with an export option. Popular libraries support data handling with import, export, and CRUD action controls.
For example, Datatables is one of the most popular libraries that supports advanced data handling. In a previous example, we have seen how to render Datatables and enable export on the interface. Data tables provide to choose the export format among CSV, Excel, and PDF formats also.
How to perform database export with PHP and MySQL
This is the PHP code that handles the export after form submission. This PHP code applies conditions on the form post data to check whether it is clicked.
The PHP code will invoke the export function if the condition returns true.
<?php
namespace Phppot;

use \Phppot\Product;
require_once __DIR__ . '/class/Product.php';

$product = new Product();
$productResult = $product->getAllProduct();

if (isset($_POST["export"])) {
    $product->exportProductDatabase($productResult);
}
?>
The exportProductDatabase() is in the Product class. It receives the array of product results as its parameter.
This export code iterates the product array to output the file with the data.
The product array keys contain the column names. For the first time, the code implodes the column name array to print the Excel header.
After writing the header, it prints the row data on each iteration. Before printing, I apply a PHP array implode with the comma(,).
This code uses the PHP echo statement to write the header and the row data. Before that, we have to set the title with Content-Type and Content-Disposition
I used the PHP header function to set these attributes to download the output excel file.
Product.php
The following code shows the Product.php class. It contains the getAllProduct() function to retrieve the database results.
In the class constructor, the DataSource instantiation returns the connection. This object is to invoke query handlers defined in the DataSource.
<?php
namespace Phppot;

use \Phppot\DataSource;

class Product
{
    private $ds;

    function __construct()
    {
        require_once __DIR__ . '/DataSource.php';
        $this->ds = new DataSource();
    }

    public function getAllProduct() {
        $query = "select * from tbl_products";
        $result = $this->ds->select($query);
        return $result;
    }

    public function exportProductDatabase($productResult) {
        $timestamp = time();
        $filename = 'Export_excel_' . $timestamp . '.xls';

        header("Content-Type: application/vnd.ms-excel");
        header("Content-Disposition: attachment; filename=\"$filename\"");

        $isPrintHeader = false;
        foreach ($productResult as $row) {
            if (! $isPrintHeader) {
                echo implode("\t", array_keys($row)) . "\n";
                $isPrintHeader = true;
            }
            echo implode("\t", array_values($row)) . "\n";
        }
        exit();
    }
}
?>
DataSource.php
This PHP class is used to handle the database connection and execute queries. The select() method fetches the data from the database and returns results as a PHP array.
It also contains many functions to perform inserts and to get record counts. We have created this standard class for many PHP MySQL examples.
<?php
namespace Phppot;

/**
 * Generic datasource class for handling DB operations.
 * Uses MySqli and PreparedStatements.
 *
 * @version 2.3
 */
class DataSource
{

    // PHP 7.1.0 visibility modifiers are allowed for class constants.
    // when using above 7.1.0, declare the below constants as private
    const HOST = 'localhost';

    const USERNAME = 'root';

    const PASSWORD = '';

    const DATABASENAME = 'phpsamples';

    private $conn;

    /**
     * PHP implicitly takes care of cleanup for default connection types.
     * So no need to worry about closing the connection.
     *
     * Singletons not required in PHP as there is no
     * concept of shared memory.
     * Every object lives only for a request.
     *
     * Keeping things simple and that works!
     */
    function __construct()
    {
        $this->conn = $this->getConnection();
    }

    /**
     * If connection object is needed use this method and get access to it.
     * Otherwise, use the below methods for insert / update / etc.
     *
     * @return \mysqli
     */
    public function getConnection()
    {
        $conn = new \mysqli(self::HOST, self::USERNAME, self::PASSWORD, self::DATABASENAME);

        if (mysqli_connect_errno()) {
            trigger_error("Problem with connecting to database.");
        }

        $conn->set_charset("utf8");
        return $conn;
    }

    /**
     * To get database results
     * @param string $query
     * @param string $paramType
     * @param array $paramArray
     * @return array
     */
    public function select($query, $paramType="", $paramArray=array())
    {
        $stmt = $this->conn->prepare($query);

        if(!empty($paramType) && !empty($paramArray)) {
            $this->bindQueryParams($sql, $paramType, $paramArray);
        }

        $stmt->execute();
        $result = $stmt->get_result();

        if ($result->num_rows > 0) {
            while ($row = $result->fetch_assoc()) {
                $resultset[] = $row;
            }
        }

        if (! empty($resultset)) {
            return $resultset;
        }
    }

    /**
     * To insert
     * @param string $query
     * @param string $paramType
     * @param array $paramArray
     * @return int
     */
    public function insert($query, $paramType, $paramArray)
    {
        print $query;
        $stmt = $this->conn->prepare($query);
        $this->bindQueryParams($stmt, $paramType, $paramArray);
        $stmt->execute();
        $insertId = $stmt->insert_id;
        return $insertId;
    }

    /**
     * To execute query
     * @param string $query
     * @param string $paramType
     * @param array $paramArray
     */
    public function execute($query, $paramType="", $paramArray=array())
    {
        $stmt = $this->conn->prepare($query);

        if(!empty($paramType) && !empty($paramArray)) {
            $this->bindQueryParams($stmt, $paramType="", $paramArray=array());
        }
        $stmt->execute();
    }

    /**
     * 1. Prepares parameter binding
     * 2. Bind prameters to the sql statement
     * @param string $stmt
     * @param string $paramType
     * @param array $paramArray
     */
    public function bindQueryParams($stmt, $paramType, $paramArray=array())
    {
        $paramValueReference[] = & $paramType;
        for ($i = 0; $i < count($paramArray); $i ++) {
            $paramValueReference[] = & $paramArray[$i];
        }
        call_user_func_array(array(
            $stmt,
            'bind_param'
        ), $paramValueReference);
    }

    /**
     * To get database results
     * @param string $query
     * @param string $paramType
     * @param array $paramArray
     * @return array
     */
    public function numRows($query, $paramType="", $paramArray=array())
    {
        $stmt = $this->conn->prepare($query);

        if(!empty($paramType) && !empty($paramArray)) {
            $this->bindQueryParams($stmt, $paramType, $paramArray);
        }

        $stmt->execute();
        $stmt->store_result();
        $recordCount = $stmt->num_rows;
        return $recordCount;
    }
}
?>


How can we export links to excel?
Do you want to export the complete page content of a link?
I am unable to generate the complete spreadsheet. The spreadsheet only comes with the column labels. Opening the spreadsheet with notepad saw that the php function converts everything inside the html page but leaves the rest blank from a php tag.
Hi Bruno,
Can you give specific details about the error you are getting? Then it will be easier for me to help you fix it. Show me the error or exception message you get.
Hello, thanks for the article it was very useful, I have a question instead downloading directly how can transform the file as an attachment and send it to email.
I will be grateful it can get any help.
Thanks in advance.
Hi Malik,
Welcome. You need to combine another tutorial https://phppot.com/php/send-email-with-multiple-attachments-using-php/ with this code. The linked tutorial has code to send an email with attachments. All you need to do is just copy and integrate that code here.
Can i export two table in one single sheet?
Yes Soe, it is possible. You need to custom code the logic.