Set Featured Image for WordPress Post or Page
In this article, we shall learn how to set featured image for a WordPress post or page for branding. The featured images are used to reflect the summary or categorization of the post or page. Mainly, the usage of the featured images is varied based on the theme and the blog content.
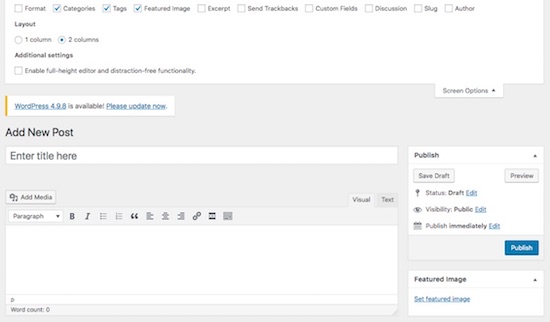
Featured images can be used as the banner or in the WordPress gallery tiles and in more views based on the template. If your WordPress featured image screen option is enabled, then the tile to set featured image will be shown on the right side of the post/page add or edit panel.
Enable and Set Feature Image in WordPress Admin
In this section, we are going to see the steps required to set a featured image for a post/page.

- Login to WordPress and add new WordPress post or page.
- Click Screen Options sliding menu to view settings
- Check the box next to the Featured Image option under Boxes
- Ensure that Featured Image tile is displayed on the right side
- Click Set featured image link and upload new or select existing one among the media images.
WordPress allows only one featured image per post/page. While adding feature images the thumbnail will be created in the default dimensions. We can also customize to create additional thumbnails by specifying the dimensions.
How to Get and Use the Featured Image in WordPress Theme
In WordPress, it is easy to get the featured image set for the post or page. In this article, I have added the code for getting the featured image by sending the post id or page id as reference.
There are various built-in functions in WordPress for getting the featured image. These functions are defined in the post-thumbnail-template.php file which is located in the wp-includes. Some of those functions are,
- the_post_thumbnail – To display the featured image as the post thumbnail. It will get the current post or page thumbnail without sending the id parameter.
- get_the_post_thumbnail – To return the featured image HTML by sending the post id. The id parameter is null by default. When it is null, it will get the current post thumbnail
- the_post_thumbnail_url – to echo the featured image URL
- get_the_post_thumbnail_url – to return the featured image URL
Note: Before using these functions, ensure that your theme supports post thumbnails. For that, check your themes functions.php file if contains the below line. If not, add this line into it to make your theme ready for supporting post thumbnails.
add_theme_support( 'post-thumbnails' );
Below code shows how to display the featured image in full size in a single post page. Open your theme’s single.php file and paste this below code above the the_content() block. After updating the single.php file, the post single page will display the featured image below the post title.
<?php
if ( has_post_thumbnail() ) { // It will return true if the post has a post thumbnail
the_post_thumbnail( 'full' );
}
?>
