Widgets are used to add content to a WordPress page programmatically without disturbing theme templates. The sidebar is the default area to add widget content.
Also, we can register our own widget area and add widgets to it. WordPress contains some default widgets Search, Category, Tags and more.
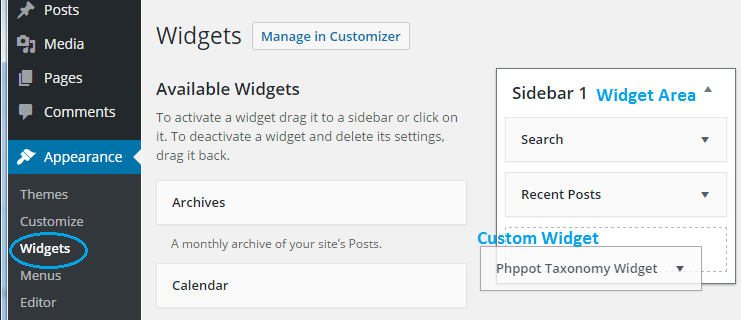
In WordPress admin, we can see Widgets under the Appearance menu. We need to customize our theme to support widget which is called widgetizing. After adding a widget to the widget area, it can be displayed by using dynamic_sidebar() function.
In this tutorial, we are going to create and add a custom widget and display its content in a WordPress page. The steps are,
- Create a widget plugin
- Widgetizing theme
- Add widget to the widget area
- Display widget in User End
Create and Install Widget Plugin
We create a plugin for adding our own widget to the WordPress theme. In this plugin, we create a widget class by extending WP_widgets.
This widget plugin is for displaying custom taxonomy in a hierarchical order. In a previous tutorial, we have seen about how to create a custom taxonomy in WordPress.
The class constructor is used to initialize the widget plugin by specifying the widget id, name, and the description. We override the widget() function to create HTML to display custom taxonomy terms in user end. The plugin code is,
<?php
/*
Plugin Name: PhpPot Custom Taxonomy Widget
Plugin URI: https://phppot.com
Description: Sidebar widget to list Custom taxonomy
Author: Vincy
Author URI: https://phppot.com
Version: 1.0.0
*/
class Phppot_Taxonomy_Widget extends WP_Widget {
function __construct() {
parent::__construct(
'Taxonomy_Widget',
'Phppot Taxonomy Widget',
array( 'description' => 'Sidebar widget to list Custom taxonomy', )
);
}
function widget( $args, $instance ) {
$title = apply_filters( 'widget_title', $instance['title'] );
echo $args['before_widget'];
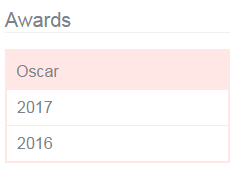
echo $args['before_title'] . "Awards" . $args['after_title'];
echo "<ul class='award-term category'>" . wp_list_categories(array(
'hide_empty'=>0,
'post_type'=>'post',
'orderby' => 'term_order',
'hierarchical' => 1,
'taxonomy' => 'awards',
'echo'=>0,
'title_li' => '')) . "</ul>";
echo $args['after_widget'];
}
}
function register_taxonomy_widget() {
register_widget( 'Phppot_Taxonomy_Widget' );
}
add_action( 'widgets_init', 'register_taxonomy_widget' );
?>
In the above code, we add a hook to register our widget. This will make the widget to display in the admin area to drag and drop into the widget area.We can add this code in our theme’s functions.php also. But, the widget will be theme specific.
Widgetizing Theme
Widgetizing is the process to make our theme to support to access widget menu in WordPress admin area. For widgetizing our theme, we have to register the widget area by using register_sidebar(). We have to add the following code in our theme’s functions.php
if ( function_exists('register_sidebar') ) {
    register_sidebar();
}
Since we are using the default widget area to add our widget, the above code is enough. If we want to use custom widget area then we need to specify its name or id as an argument of the register_sidebar() function.
Add Widget to Widget Area
In WordPress admin, we have to navigate via Appearance->Widgets menu. It shows all the widget component and the widget drop area. We can drag and drop the required widget into the widget area. Figure show the widget page used to drag and drop our widget.
Display Widget in User End
To display widget component in end user page, we need to invoke the dynamic_sidebar() function. dynamic_sidebar() displays the components added to the default widget area.
If we want to display some specific widget area, then we need to specify its name as the parameter of this function. After adding the widget successfully in a widget area, it will be shown to the user as like as below.