This is a guide to move a WordPress site from HTTP to HTTPS. This is a detailed step by step comprehensive guide and this is based on my experience moving my site phppot.com and also by providing consulting for a couple of high volume traffic blogs.
I have made sure that, I have not even missed any smaller tasks that will sound obvious when moving HTTP to HTTPS.
This is a critical check list and you need to follow this religiously. At most care should be taken while migrating to HTTPS, since all your search engine rankings is at stake and this is a serious task.
Why HTTPS?
Before going into the steps to move from HTTP to HTTPS, I wish to highlight a summary on the importance of going HTTPS.
- HTTPS prevents tampering of data on the communication line in-between your website and recipient user.
- Guarantees data integrity.
- Protects the privacy of the user.
- Enables trust on your website.
- Opens up advanced capabilities that is available only for HTTPS sites.

Refer what Google says on HTTPS.
Usage of HTTPS gained momentum when sometime back Matt Cutts tweeted, “HTTPS as a ranking signal”.
Reading “HTTPS as a ranking signal”: http://t.co/nEjcGhm8bJ
— Matt Cutts (@mattcutts) August 7, 2014
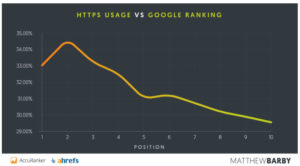
A detailed research study is in line with the assumption that, Google gives importance to HTTPS sites in ranking.

Having said all these, let us see the steps to move a WordPress site from HTTP to HTTPS. These steps can be used for non-WordPress sites also, by omitting the WordPress specific steps.
A) Preparation to Move to HTTPS
1) BACKUP BACKUP BACKUP
I cannot scream enough on this. Apart from your periodic backup, take an exclusive backup before starting http to https migration.
B) Steps to Move to HTTPS from HTTP
2) Purchase SSL certificate and setup
This depends on the type of SSL certificate you choose to buy, or you may go with a free certificate. The configuration depends on your hosting and tech stack. If you are on a shared hosting, mostly the configuration will be done by you are hosting provider.
3) Force logins/sessions over SSL
Let us start with a small step which can be easily reverted if there are any issues. Let us migrate only the WordPress Admin and verify if things are good.
The reason to start with Admin is that, it is not indexed in search engines and we can test our SSL certificate configuration.
To enable (and enforce) WordPress administration over SSL, the constant FORCE_SSL_ADMIN should be set to true in wp-config.php. This will force all logins and all admin sessions to happen over SSL.
define('FORCE_SSL_ADMIN', true);
Now check the login page, if things are cool proceed forward or stop here and analyze what is wrong with your SSL certificate and configuration. If everything is good, you will get a green “Secure” symbol in the address bar.
4) WordPress site address change
The WordPress install URL should be changed. Go to Settings > General and change WordPress Address (URL) and Site Address (URL) to HTTPS.
5) Update permalink
Now we have already changed the WordPress site URL to HTTPS and it should reflect in the the WordPress permalink structure. Navigate to Settings >> Permalinks and hit the “save” changes button to update the permalink structure code in .htaccess file.
Just a button click only and it will update the latest URL structure with HTTPS.
6) Redirect all requests from HTTP URL to https with 301 Redirect.
This is the most important step in migrating HTTP to HTTPS. We should have a 301 permanent redirect to notify that the URL is permanently changed.
There will be hits to the old URL with HTTP and our htaccess will redirect it to HTTPS URL with permanent 301 redirect.
RewriteEngine On
# This will enable the Rewrite capabilities

RewriteCond %{HTTPS} !=on
# This checks to make sure the connection is not already HTTPS

RewriteRule ^/?(.*) https://%{SERVER_NAME}/$1 [R=301,L]
# This rule will permanently redirect users from their original location to the same location but using HTTPS.
# i.e.  http://www.example.com/foo/ to https://www.example.com/foo/
# The leading slash is made optional so that this will work either in httpd.conf
# or .htaccess context
7) Update already defined URL level redirects
If you already have any hardcoded URL redirects in the htaccess file, then ensure those point to HTTPS instead of HTTP.
8) Replace hardcoded HTTP links in content
In the site, there will be internal links in content and comments. All those should be changed to HTTPS. Scan the complete site for hardcoded HTTP links and replace it with HTTPS.
In step 1, you are instructed to take backup. If you have not taken a backup, go back and take backup now. Then continue with this step.
Use the WordPress plugin “Better Search Replace Plugin” and replace all http to https. In the ‘search for’ you should give http://example.com and in “Replace with” you should give https://example.com, then select all the tables. First, do a dry run then do the actual execution.
9) Replace hardcoded HTTP links in theme files for your website
In the theme files, search for hardcoded HTTP link to your website and replace it with HTTPS.
10) Replace included HTTP links in theme files of external libraries.
Search the theme for custom scripts and external libraries that are included via HTTP.
Change those to the HTTPS version of those included files. For example, if you have linked to a CDN of jQuery with HTTP, then it should be changed to respective HTTPS.
11) Resave plugin settings
Certain plugins write to htaccess with HTTP prefix for URLs. For example, WPSuperCache.
Go to those plugin’s settings and save it again. Just click save. This should update the htaccess configuration related to URLs.
12) Custom Folders and Applications
You might have custom folders like “demo” folder that works outside the realm of WordPress but at the same time in sync with the website. In those pages and data if you have any URLs pointing to the HTTP version, then update them to HTTPS version.
13) Generate new sitemap
Now, its time to generate a new sitemap with the HTTPS urls. Just go to your sitemap plugin and generate a new sitemap.
14) Refresh Cache
If you are using site-level cache, remember to refresh it.
C) External Updates
15) Google Search Console
Add the HTTPS site to Google search console with https version of the URL. You need to add the new HTTPS as a new property and you will not be editing the old http site.
So you will have four variations of you site in Google search console name http://example.com, http://www.example.com, https://example.com and https://www.example.com
16) Sitemap Update
Resubmit the newly generated sitemap to Google Search Console. Resubmit the newly generated sitemap to Bing Webmaster Tools. Adding the new sitemap should be sufficient.
17) Google analytics update
You can edit your current settings and update to HTTPS. You will have to do it in two (Property Settings and View Settings) pages.
Similarly, if you use any other tracking plugins, update all those URLs in their dashboard.
18) Subscription Management | Feedburner
If you have a subscription system, feed urls, then ensure to update the HTTPS URL in the dashboard.
Google Feedburner does not support HTTPS and you may use the following bypass and allow HTTP only for that agent.
RewriteCond %{HTTP_USER_AGENT} !FeedBurner    [NC]
RewriteCond %{HTTP_USER_AGENT} !FeedValidator [NC]
Add the above conditions before the 301 URL redirect in you .htaccess file
19) Social media pages
Update on Facebook, Twitter and Google Plus Pages. You need to take special steps to preserve the like counts.
You might have links pointing to the site from LinkedIn profile and similar places. Update them.
D) Verification
20) Check SSL status
Check your SSL website status using Qualys SSL Labs
21) robots.txt
Make sure to check that your robots.txt is accessible and working.
22) sitemap
Check if the new sitemap has https.
23) Mixed content warnings
Check Your Website For Mixed Content Warnings using the following tools:
24) Prev, next and canonical links
Prev, next link, canonical tags might be declared via the post meta.
On search-replace of content, these should have been updated to https version. Verify if they are done correctly.
