The React Contact Us page component provides mountable UI using the JSX. This article guides building a react contact form page with simple steps. This simple assignment helps beginners learn coding in React.
In a previous article, we have seen PHP contact form with plain JavaScript validation and mail sending. Many of my readers used to download the simple contact form code for their application. I came to know this by their positive comments and testimonials.
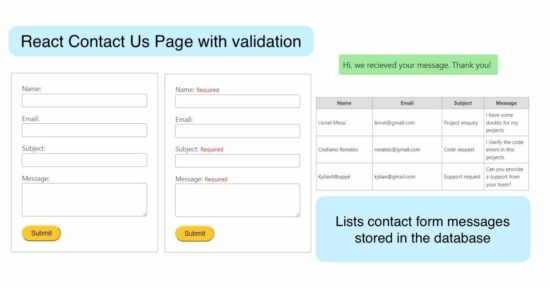
The purpose of the Contact form component is not just to collect information from the end user. It is more of connecting with your customers. It is a beautiful interactive UI board to know your customers’ thoughts.
React contact form page component
The ContactForm React component returns the following JSX code. The form onSubmit() and onChange() events are mapped with the event handlers {handleSubmit} and {handleInputChange} respectively.
This component repopulates the fields by setting the entered value from the formData object.
It has a toggling acknowledgment board to respond to users with validation error messages and success notes on successful submission.
The error messages are managed with the useState variables created to track the error state.
index.html (contact form JSX)
<form onSubmit={handleSubmit}>
  <div className="success display-none">Hi, we received your message. Thank you!</div>
  <div className="row">
    <label htmlFor="name">
      Name:{" "}
      {errors.name && (
      <span className="validation-message">{errors.name}</span>
      )}
    </label>
    <input type="text" id="name" className="full-width" name="name" value={formData.name}
      onChange={handleInputChange} />
  </div>
  <div className="row">
    <label htmlFor="email">Email:</label>
    <input type="email" id="email" className="full-width" name="email" value={formData.email}
      onChange={handleInputChange} />
  </div>
  <div className="row">
    <label htmlFor="sub">
      Subject:
      {errors.subject && (
      <span className="validation-message">{errors.subject}</span>
      )}
    </label>
    <input type="text" id="sub" className="full-width" name="subject" value={formData.subject}
      onChange={handleInputChange} />
  </div>
  <div className="row">
    <label htmlFor="message">
      Message:
      {errors.message && (
      <span className="validation-message">{errors.message}</span>
      )}
    </label>
    <textarea id="message" name="message" rows="4" cols="50" className="full-width" value={formData.message}
      onChange={handleInputChange}></textarea>
  </div>
  <button type="submit" disabled={isLoading}>
    {isLoading ? (
    <div className="loader-html">
      <img alt="Loader" src="image/spinner.svg" className="loader-img" />
    </div>
    ) : (
    "Submit"
    )}
  </button>
</form>
);
HTML target to render the component
The below code is for having the HTML root where the React component has to be rendered.
It includes and imports React, ReactDom, and useState into the page to use React UI rendering.
This code uses CDN to have the React dependencies. Previously, in the React file upload article, we used the Vite tool to have a modular structure with a node_modules directory.
The useState hook is used to initialize formData properties. The form fields key:value pairs are set as the properties of the formData object.
index.html (React, ReactDOM library import and component rendering)
<!DOCTYPE html>
<html lang="en">

<head>
  <meta charset="UTF-8" />
  <meta name="viewport" content="width=device-width, initial-scale=1.0" />
  <link rel="stylesheet" href="css/style.css" />
  <link rel="stylesheet" href="css/form.css" />
  <title>React contact form page with PHP mail sending script</title>
</head>

<body>
  <h1 class="text-center">React contact form page with PHP mail sending script</h1>

  <div id="root" class="phppot-container tile-container"></div>

  <script src="https://unpkg.com/react@17/umd/react.development.js"></script>
  <script src="https://unpkg.com/react-dom@17/umd/react-dom.development.js"></script>
  <script src="https://cdn.jsdelivr.net/npm/axios/dist/axios.min.js"></script>
  <script src="https://unpkg.com/@babel/standalone/babel.min.js"></script>
  <script type="text/babel">
    const { useState } = React;

    function ContactForm({ onSubmit }) {
      const [formData, setFormData] = useState({
        name: "",
        email: "",
        subject: "",
        message: "",
      });
      const [errors, setErrors] = useState({});
      const [isLoading, setIsLoading] = useState(false);
    }

    ReactDOM.render(<ContactForm />, document.getElementById("root"));
  </script>
</body>

</html>
Contact form validation handler and formData setter
Validating a form against the user-entered data is vital. It is a minimal filtering process instead of handling the user data directly.
The handleInputChange handler is called on each form field data change event in this example. It sets the formData with the pair of form field:value units.
On submitting the form, the handleSubmit handler takes each formData property for validation. It checks if the entered data is not empty and passes an error message based on the validation response.
The validation method returns an error and stops further execution of the client-side processing with the submission of the React contact form. In a previous tutorial, we learned how to validate first and last names in a React component.
If the validation passes, the script will proceed with an Axios call to the backend to process the sending of contact mail.
index.html (JavaScript event handlers)
const handleInputChange = (e) => {
    const { name, value } = e.target;
    setFormData({ ...formData, [name]: value });
    setErrors({ ...errors, [name]: "" });
};

const handleSubmit = (e) => {
    e.preventDefault();
    const validationErrors = {};

    if (formData.name.trim() === "") {
        validationErrors.name = "Required";
    }

    if (formData.subject.trim() === "") {
        validationErrors.subject = "Required";
    }

    if (formData.message.trim() === "") {
        validationErrors.message = "Required";
    }

    if (Object.keys(validationErrors).length > 0) {
        setErrors(validationErrors);
    } else {
        setIsLoading(true);
      ......................
    }
  };
Axios request to PHP mail sending
This code uses the Axios library to request an HTTP POST to the contact-form-action.php file.
In its callback, the repopulated form fields are emptied by resetting the formData.
It handles the error case on the Axios calls catch block in case of any problem when submitting the form to the PHP.
index.html (AJAX to post contact form)
axios
    .post("./api/contact-form-action.php", formData)
    .then((response) => {
        document.querySelector(".success").style.cssText = "display: block; text-align: center;";
        setFormData({
            name: "",
            email: "",
            subject: "",
            message: "",
        });
        setErrors({});
        setIsLoading(false);
    })
    .catch((error) => {
        console.error("Error submitting form:", error);
        setIsLoading(false);
    });
PHP mail sending
This code is for sending a mail from PHP with the contact form data posted by the user. The PHP mail() function is used to send the email.
It uses the Content-Type: text/html to send a simple HTML mail using PHP mail().
Replace the mailto and the header properties to configure the settings for your application.
contact-form-action.php (Contact form email sending)
$to = "recipient@example.com";
$subject = "Thank you for your message";
$headers = "From: test@example.com\r\n";
$headers.= "Content-Type: text/html; charset=UTF-8\r\n";

$emailBody = "
    < p > We received your message.Thank you!</p >
        <div> Name : $name </div>
        <div> Email : $email </div>
        <div> Subject : $sub </div>
        <div> Message : $message </div>
";
if (mail($to, $subject, $emailBody, $headers)) {
        echo 'Email sent successfully';
} else {
        echo 'Email could not be sent.';
}
Add contact details to the database
Added to the mail-sending process, this example gives more to store the contact form data in the database.
By storing the customer’s message in a database, the probability of persistancy is increased. It will help if you miss any of your customer’s emails and want to recollect them quickly without struggling to recover them. An earlier article uses the same concept to create a persistent shopping cart using databases.
If it is, it reads the JSON data from the input stream. The database insert uses MySQLi prepared statement to insert the React contact form data into the database safely.
contact-form-action.php (database insert)
<?php
$servername = "localhost";
$username = "root";
$password = "";
$dbname = "contacts_form";

$conn = new mysqli($servername, $username, $password, $dbname);

if ($conn->connect_error) {
    die("Connection failed: " . $conn->connect_error);
}

if ($_SERVER['REQUEST_METHOD'] === 'POST') {
    $data = json_decode(file_get_contents('php://input'), true);

    $name = mysqli_real_escape_string($conn, $data['name']);
    $email = mysqli_real_escape_string($conn, $data['email']);
    $sub = mysqli_real_escape_string($conn, $data['subject']);
    $message = mysqli_real_escape_string($conn, $data['message']);

    $stmt = $conn->prepare("INSERT INTO tbl_form (name, email, subject, message) VALUES (?, ?, ?, ?)");
    $stmt->bind_param("ssss", $name, $email, $sub, $message);

    if ($stmt->execute()) {
        echo "Record inserted successfully!";
    } else {
        echo "Error: " . $stmt->error;
    }

    $stmt->close();
}

$conn->close();
?>


Thanks mam, it’s more helpful. The way of code awesome
Thank you, Karthiban.