Uploading files is one of the essential functionalities of dynamic websites. So far, we have seen a lot of different approaches for the file upload process with or without AJAX.
This tutorial introduces React to create an AJAX-powered file upload component. Earlier, we used jQuery AJAX to achieve uploading to the server. Let us see how React works for developing a component to let the user choose files to upload.
Steps to upload files using React
- Create JSX to return the UI component.
- Create JS to render the file upload input to the UI.
- Bind the AJAX handler to the “Upload” button.
Optional steps coded to enrich this react file upload example
- Display an error message when an unsupported file type is uploaded.
- Show a preview of the uploaded file.
Note: This code includes the server-side PHP script for the developers to experience completeness.
In a previous tutorial, we saw how to do server-side validation with an uploaded file.
How to add react to your existing application page
This section is for those who are getting started with React. These are the steps to add React to a current webpage.
- Ensure that the Node exists already. If not, install Node.
- Set up a react environment to work with JavaScript modules using the Vite tool.
npm init vite@latest react-file-upload-project - After scaffolding the react project, follow the guidelines to run the dev server.
cd react-file-upload-projectnpm run dev
Visit React documentation to learn more about creating a new React project.
Create JSX to return the UI component.
This JSX file builds the UI component and registers event handlers for the ‘file input on change’ and ‘on form submit’ events.
The handleFileChange function invokes the functions to set the uploaded file binary and its properties on the file input change.
The setFileProperties is called for changing the file type and name variables. These variables are used later to prepare the AJAX request and show a file preview.
On submitting the form, the handleUpload function calls AJAX upload and shows the preview.
src/FileUploadApp.jsx
import { useState } from 'react'
import reactLogo from './assets/image/react.svg'
import './assets/js/file-upload.js'

function FileUploadApp() {
  const [fileProperties, setFileProperties] = useState({
    file: null,
    fileType: null,
    fileName: null,
  });
  const [isUploadAction, setUploadAction] = useState(false);

  const setFileProperty = (file, fileType, fileName) => {
    setFileProperties({ file, fileType, fileName });
  };

  const clearFileProperty = () => {
    setFileProperties({ file: null, fileType: null, fileName: null });
  };

  const handleFileChange = (event) => {
    const selectedFile = event.target.files[0];
    if (selectedFile) {
      setFileProperty(selectedFile, selectedFile.type, selectedFile.name);
    } else {
      clearFileProperty();
    }
  };

  const handleUpload = (event) => {
    event.preventDefault();
    setUploadAction(true);
    displayFilePreview(fileProperties.fileType, fileProperties.file, fileProperties.fileName);
    uploadFile(fileProperties.file);
  };

  return (
    <>
    <div><img src={reactLogo} className="logo" /></div>
      <form onSubmit={handleUpload}>
            <div id="error-message"></div>
            <input
              type="file"
              accept=".png, .jpg, .jpeg, .gif, .pdf, .docx"
              onChange={handleFileChange}
              required
            />
            <button type="submit">Upload</button>
          </form>

          {isUploadAction && fileProperties.fileType && (
            <div className="file-details">
              <h3>Preview :</h3>
              {fileProperties.fileName && <p>File Name: {fileProperties.fileName}</p>}
            </div>
          )}
          <div id="file-preview"></div>
    </>
  )
}

export default FileUploadApp
Create JS to render the file upload input to the UI
This is a main JS module included in the webpage HTML. The main script creates the DOM root using React to render the file upload component.
It imports React components and FileUploadApp JSX with required CSS assets.
Then, it uses the ReactDOM client, which refers to an HTML document object, to render the FileUploadApp component.
src/main.jsx
import React from 'react'
import ReactDOM from 'react-dom/client'
import FileUploadApp from './FileUploadApp.jsx'
import './assets/css/form.css'
import './assets/css/style.css'
import './App.css'

ReactDOM.createRoot(document.getElementById('file-upload-component')).render(
  <React.StrictMode>
    <FileUploadApp />
  </React.StrictMode>,
)
Bind the AJAX handler to the “Upload” button
This section shows the JS file containing the file upload AJAX handler that binds the form upload button’s click event.
It prepares the AJAX request param with the file properties set on change. It hits the PHP API endpoint to process the uploaded file to store in a directory.
This JavaScript file shows a preview of the uploaded file. It also handles the response type from the server to inform the user about the result of the file upload process.
src/assets/js/file-upload.js
/* Request API endpoint to process the file upload */
function uploadFile(file) {
  const apiUrl = './../../../api/file-upload-ep.php';

  const formData = new FormData();
  formData.append('file', file);

  fetch(apiUrl, {
    method: 'POST',
    body: formData,
  })
    .then(response => response.text())
    .then(data => {
      // handle the API response here asynchronously
    })
    .catch(error => {
      console.error('Error:', error);
    });
}

/* Showing file preview based on the file extension */
function displayFilePreview(fileType, file, fileName) {
  const errorMessage = document.getElementById('error-message');
  if (fileType.startsWith("image/")) {
    // Display the image
    loadImagePreview(file, fileName);
  } else if (fileType === "application/pdf" || fileType === "application/vnd.openxmlformats-officedocument.wordprocessingml.document") {
    // Display the PDF or DOC icon as a link for download
    loadDocumentPreview(fileType, file, fileName);
  } else {
    // Error occurred if the file extension is not among the allowed file types
    errorMessage.textContent = "Unsupported file type: " + fileName;
  }
}

/* Creates image preview element dynamically and loads the file data url */
function loadImagePreview(file, fileName) {
  // Display the image
  const imageElement = document.createElement('img');
  imageElement.src = URL.createObjectURL(file);
  imageElement.style.width = '300px';
  linkFile(file, fileName, imageElement);
}

/* Creates doc/pdf preview dynamically and links to download the file */
function loadDocumentPreview(fileType, file, fileName) {
  const docCounter = document.createElement('p');
  reloadPreview(docCounter);
  const docPreviewIcon = new Image();
  if (fileType === "application/pdf") {
    docPreviewIcon.src = '/src/assets/image/pdf.png';
  } else {
    docPreviewIcon.src = '/src/assets/image/doc.png';
  }
  docPreviewIcon.style.maxWidth = '150px';
  linkFile(file, fileName, docPreviewIcon);
}

function linkFile(file, fileName, fileElement) {
  const fileLink = document.createElement('a');
  fileLink.href = URL.createObjectURL(file);
  fileLink.download = fileName;
  fileLink.appendChild(fileElement);
  reloadPreview(fileLink);
}

/* replaces the existing preview content with the latest */
function reloadPreview(previewElement) {
  const documentContainer = document.getElementById('file-preview');
  documentContainer.innerHTML = '';
  documentContainer.appendChild(previewElement);
}
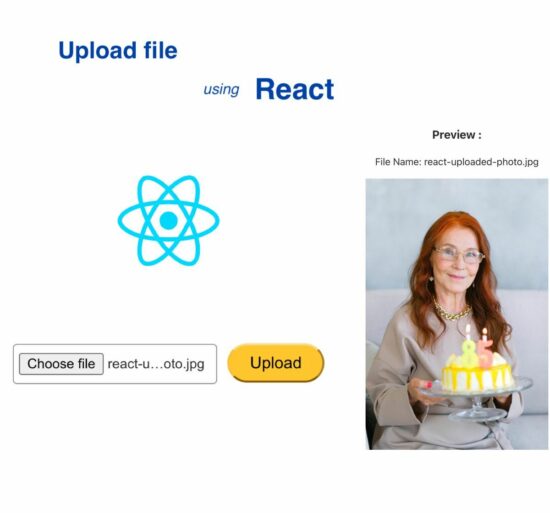
Showing file preview
In this React example, the UI allows three types of files to be uploaded. Those are .docx, .pdf, and images(.jpg, .png, gif).
The preview differs based on the type of uploaded files. If the file is an image, the preview will show the image thumbnail. Or, if it is of the type .doc or .pdf, the preview will show a downloadable link.
The above file-upload.js file checks the file type to differentiate the preview.
The webpage HTML to add React
This landing HTML imports the primary JS to embed the React. It aims to create a DOM root for the file upload control.
This file includes the Custom JS file as part of the main JSX to bind the React components with the handlers.
<!doctype html>
<html lang="en">

<head>
  <meta charset="UTF-8" />
  <link rel="icon" type="image/svg+xml" href="/vite.svg" />
  <meta name="viewport" content="width=device-width, initial-scale=1.0" />
  <title>How to upload a file using React Component</title>
</head>

<body>
  <div class="phppot-container">
    <h1>How to upload a file using React Component</h1>
    <div id="file-upload-component"></div>
  </div>
  <script src="/src/assets/js/file-upload.js"></script>
  <script type="module" src="/src/main.jsx"></script>
</body>

</html>
PHP API endpoint that handles the file upload
This is a usual PHP file upload script that needs no explanation. But for beginners, the following steps give the details.
- Ensure the request method if it is a POST request.
- It processes the PHP $_FILES global to access the file as a temporary source.
- Set target directory.
- Confirm if no such file already exists on the server.
- Call PHP
move_uploaded_fileto store the file from the source to the target.
api/file-upload-ep.php
<?php
if ($_SERVER['REQUEST_METHOD'] === 'POST') {
    // Check if a file was uploaded without errors
    if (isset($_FILES['file']) && $_FILES['file']['error'] === UPLOAD_ERR_OK) {
        $targetDir = __DIR__ . '/image/'; // Specify the target directory
        $fileName = basename($_FILES['file']['name']);
        $targetFilePath = $targetDir . $fileName;

        // Check if the file already exists
        if (file_exists($targetFilePath)) {
            echo "File already exists.";
        } else {
            // Move the uploaded file to the target directory
            if (move_uploaded_file($_FILES['file']['tmp_name'], $targetFilePath)) {
                echo "File uploaded successfully.";
            } else {
                echo "Error uploading file.";
            }
        }
    } else {
        echo "File upload error.";
    }
} else {
    echo "Invalid request method.";
}
?>