This tutorial handles the JavaScript name validation in different methods. In those methods, it validates the name fields of a form on its submit event. The list below shows the methods used in this article.
- JavaScript Validation – A basic method that uses built-in JavaScript without third-party libraries.
- jQuery Validation with Regular Expressions – A regex pattern is used to perform validation using the jQuery test().
- jQuery Validation without Regular Expressions – An alternate jQuery name validation method without regex.
- React Component for Name Validation – It has the validation handler as part of the React component created.
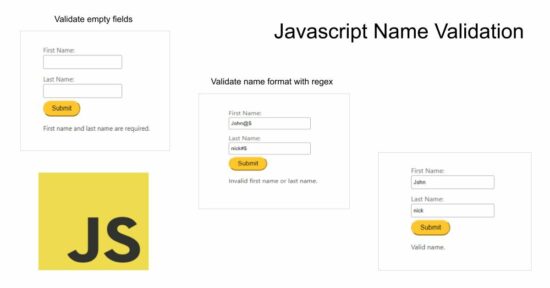
1. Quick example – JavaScript validation
This quick example is not using any libraries. It simply defines the validateName(firstName, lastName) function. It receives the submitted first and last names from the form.
It creates a Regex pattern that only allows alphabets, spaces, or hyphens for the names. On submitting the form, the first and last names are tested to check if the pattern matches.
If the validation passes, it returns the success message as “Valid name” to the UI. Otherwise, it returns name validation error messages.
The submitForm() function calls this validateName to display the message based on the boolean return by the JavaScript pattern matching process.
<!DOCTYPE html>
<html>

<head>
    <title>Name Validation using JavaScript</title>
    <link rel='stylesheet' href='style.css' type='text/css' />
    <link rel='stylesheet' href='form.css' type='text/css' />
    <script>
        // Validate First Name and Last Name
        function validateName(firstName, lastName) {
            var namePattern = /^[a-zA-Z\s-]+$/;

            if (!firstName || !lastName) {
                return "First name and last name are required.";
            }

            if (!namePattern.test(firstName) || !namePattern.test(lastName)) {
                return "Invalid first name or last name.";
            }

            return "Valid name.";
        }

        // Handle form submission
        function submitForm() {
            var firstName = document.getElementById("firstName").value;
            var lastName = document.getElementById("lastName").value;

            var validationMessage = validateName(firstName, lastName);

            document.getElementById("result").textContent = validationMessage;
        }
    </script>
</head>

<body>
    <div class="phppot-container">
        <h1>Name Validation</h1>

        <form>
            <div class="row">
                <label for="firstName">First Name:</label>
                <input type="text" id="firstName" required>
            </div>
            <div class="row">
                <label for="lastName">Last Name:</label>
                <input type="text" id="lastName" required>
            </div>
            <button type="button" onclick="submitForm()">Submit</button>
        </form>

        <p id="result"></p>
    </div>
</body>

</html>
2. jQuery Validation with Regular Expressions
Please get the latest jQuery to the local directory and specify its path. This example uses jQuery CDN URL to have this library.
The HTML form submit event listener is created in the jQuery $(document).ready() callback.
It reads the name field value using their id-selector $('#firstName') and $('#lastName').
From there, it calls the validateName to check and confirm that the name field values are not empty and are in the right format.
It ensures that both the first and last names contain only alphabets (allows both uppercase and lowercase letters).
jquery.html
<!DOCTYPE html>
<html>

<head>
    <title>Name Validation</title>
    <link rel='stylesheet' href='style.css' type='text/css' />
    <link rel='stylesheet' href='form.css' type='text/css' />
    <script src="https://code.jquery.com/jquery-3.6.0.min.js"></script>
    <script>
        $(document).ready(function () {
            // Handle form submission
            $('form').submit(function (event) {
                event.preventDefault();

                var firstName = $('#firstName').val();
                var lastName = $('#lastName').val();

                var validationMessage = validateName(firstName, lastName);

                $('#result').text(validationMessage);
            });

            // Validate First Name and Last Name
            function validateName(firstName, lastName) {
                // Check if first name and last name are empty
                if (!firstName || !lastName) {
                    return "First name and last name are required.";
                }

                // Check if first name contains only alphabets
                if (!/^[a-zA-Z]+$/.test(firstName)) {
                    return "Invalid first name.";
                }

                // Check if last name contains only alphabets
                if (!/^[a-zA-Z]+$/.test(lastName)) {
                    return "Invalid last name.";
                }

                // Validation passed
                return "Valid name.";
            }
        });
    </script>
</head>

<body>
    <div class="phppot-container">
        <h1>Name Validation</h1>

        <form>
            <div class="row">
                <label for="firstName">First Name:</label>
                <input type="text" id="firstName" required>
            </div>
            <div class="row">

                <label for="lastName">Last Name:</label>
                <input type="text" id="lastName" required>
            </div>

            <button type="submit">Submit</button>
        </form>

        <p id="result"></p>
    </div>
</body>

</html>
3. jQuery name validation without regex
This method also uses jQuery. It checks each character in the entered first name or last name. It has two functions as described below.
validateName(firstName, lastName)
Checks if both the first and last names are empty. If so, it returns an error message: “Both names are required.”
isAlphabetic(value)
This function iterates through each character in the string.
It uses the JavaScript charCodeAt() method to obtain the Unicode value of each character.
The name validation occurs by checking whether each character falls within the Unicode range. The Unicode boundary taken for this validation represents the alphabetic characters.
It accepts both uppercase and lowercase letters. (uppercase letters Unicode range: 65-90, uppercase letters Unicode range: 97-122).
no-regex.html
<script>
    // This is an example to validate name without Regex.
    // I have written a function isAlphabetic to validate
    // the string using char level checks
    // if you do not have any issues with regex, that is the way to go
    // Validate First Name and Last Name
    function validateName(firstName, lastName) {
        // Check if first name and last name are empty
        if (!firstName || !lastName) {
            return "First name and last name are required.";
        }

        // Check if first name contains only alphabets
        if (!isAlphabetic(firstName)) {
            return "Invalid first name.";
        }

        // Check if last name contains only alphabets
        if (!isAlphabetic(lastName)) {
            return "Invalid last name.";
        }

        // Validation passed
        return "Valid name.";
    }

    // Function to check if a string contains only alphabets
    function isAlphabetic(value) {
        for (var i = 0; i < value.length; i++) {
            var charCode = value.charCodeAt(i);
            if (!(charCode > 64 && charCode < 91) && !(charCode > 96 && charCode < 123)) {
                return false;
            }
        }
        return true;
    }

    // Example validation usage
    var firstName = "John";
    var lastName = "Doe";
    var validationMessage = validateName(firstName, lastName);
    console.log(validationMessage);
</script>
4. React component to have name fields with validation
The NameValidation component is created as a functional component in React. State variables firstName, lastName, and validationMessage are declared using the useState hook.
The handleSubmit() function prevents default form submission behavior.
The state variables control the input values, and the onChange event handlers update the state variables as the user types.
Use this NameValidation component in your React application by importing and rendering it within a parent component.
Make sure you have React and ReactDOM libraries installed in your project. If not, you can install them by running npm react react-dom them in your project directory.
Import React and the necessary hooks (useState) at the top of the file. Export the NameValidation component as the default export at the end of the file.
Use this component in another file by importing it and rendering it within a parent component.
Note that you’ll need to use a build tool like Webpack or Babel to bundle and transpile your React code before running it in a web browser.
NameValidation.jsx
import React, { useState } from 'react';

function NameValidation() {
    const [firstName, setFirstName] = useState('');
    const [lastName, setLastName] = useState('');
    const [validationMessage, setValidationMessage] = useState('');

    // Handle form submission
    const handleSubmit = (event) => {
        event.preventDefault();

        const message = validateName(firstName, lastName);
        setValidationMessage(message);
    };

    // Validate First Name and Last Name
    const validateName = (firstName, lastName) => {
        // Check if first name and last name are empty
        if (!firstName || !lastName) {
            return "First name and last name are required.";
        }

        // Check if first name contains only alphabets
        if (!/^[a-zA-Z]+$/.test(firstName)) {
            return "Invalid first name.";
        }

        // Check if last name contains only alphabets
        if (!/^[a-zA-Z]+$/.test(lastName)) {
            return "Invalid last name.";
        }

        // Validation passed
        return "Valid name.";
    };

    return (
        <div>
            <h1>Name Validation</h1>

            <form onSubmit={handleSubmit}>
                <label htmlFor="firstName">First Name:</label>
                <input type="text" id="firstName" value={firstName} onChange={(e) => setFirstName(e.target.value)} required />

                <br />

                <label htmlFor="lastName">Last Name:</label>
                <input type="text" id="lastName" value={lastName} onChange={(e) => setLastName(e.target.value)} required />

                <br />

                <button type="submit">Submit</button>
            </form>

            <p>{validationMessage}</p>
        </div>
    );
}

export default NameValidation;
The below file is the main JS that exists when the create-react-app command is executed. Previously, we saw how to create a React app for beginners.
This code replaces the default JSX to import and render the NameValidation React component.
react.jsx
import React from 'react';
import ReactDOM from 'react-dom';
import NameValidation from './NameValidation';
// NameValidation is custom React component that intended to be displayed within the App component
function App() {
    return (
        <div>
            <h1>React Example App</h1>
            <NameValidation />
        </div>
    );
}

ReactDOM.render(<App />, document.getElementById('root'));