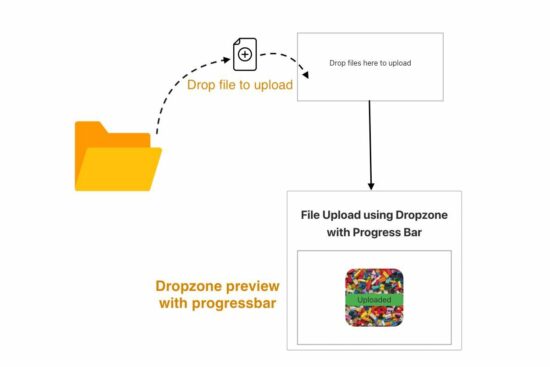
File Upload using Dropzone with Progress Bar
Most of the applications have the requirement to upload files to the server. In previous articles, we have seen a variety of file upload methods with valuable features.
For example, we learned how to upload files with or without AJAX, validate the uploaded files, and more features.
This tutorial will show how to code for file uploading with a progress bar by Dropzone.
If the file size is significant, it will take a few nanoseconds to complete. Showing a progress bar during the file upload is a user-friendly approach.
To the extreme, websites start showing the progressing percentage of the upload. It is the best representation of showing that the upload request is in progress.

About Dropzone
The Dropzone is a JavaScript library popularly known for file uploading and related features. It has a vast market share compared to other such libraries.
It provides a massive list of features. Some of the attractive features are listed below.
- It supports multi-file upload.
- It represents progressing state and percentage.
- It allows browser image resizing. It’s a valuable feature that supports inline editing of images.
- Image previews in the form of thumbnails.
- It supports configuring the uploaded file’s type and size limit.
How to integrate dropzone.js to upload with the progress bar
Integrating Dropzone into an application is simple. It is all about keeping these two points during the integration.
- Mapping the UI element with the Dropzone initiation.
- Handling the upload event callbacks effectively.
Mapping the UI element with the Dropzone initiation
The below code has the HTML view to show the Dropzone file upload to the UI. It includes the Dropzone JS and the CSS via a CDN URL.
<!DOCTYPE html>
<html>

<head>
    <title>File Upload using Dropzone with Progress Bar</title>
    <link rel="stylesheet" type="text/css"
        href="https://cdnjs.cloudflare.com/ajax/libs/dropzone/5.9.2/dropzone.min.css">
    <style>
        .progress {
            width: 300px;
            border: 1px solid #ddd;
            padding: 5px;
        }

        .progress-bar {
            width: 0%;
            height: 20px;
            background-color: #4CAF50;
        }
    </style>
    <link rel="stylesheet" type="text/css" href="style.css" />
    <link rel="stylesheet" type="text/css" href="form.css" />
</head>

<body>
    <div class="phppot-container tile-container text-center">
        <h2>File Upload using Dropzone with Progress Bar</h2>
        <form action="upload.php" class="dropzone" id="myDropzone"></form>
    </div>
    <script src="https://cdnjs.cloudflare.com/ajax/libs/dropzone/5.9.2/min/dropzone.min.js"></script>
</body>

</html>
The file upload form element is mapped to the DropzoneJS while initiating the library.
The form action targets the PHP endpoint to handle the file upload.
Dropzone.options.myDropzone = {
   //Set upload properties

    init: function () {
        // Handle upload event callback functions
   };
};
Handling the upload event callbacks
This section has the Dropzone library script to include in the view. This script sets the file properties and limits to the upload process. Some of the properties are,
- maxFilesize – Maximum size allowed for the file to upload.
- paramName – File input name to access like
$_FILE['paramName here']. - maxFiles – File count allowed.
- acceptedFiles – File types or extensions allowed.
The init property of this script allows handling the upload event. The event names are listed below.
- uploadprogress – To track the percentage of uploads to update the progress bar.
- success – When the file upload request is completed. This is as similar to a jQuery AJAX script‘s success or error callbacks.
Dropzone options have the upload form reference to listen to the file drop event. The callback function receives the upload status to update the UI.
The dropzone calls the endpoint action when dropping the file into the drop area.
The drop area will show thumbnails or a file preview with the progress bar.
Dropzone.options.myDropzone = {
            paramName: "file", // filename handle to upload
            maxFilesize: 2, // MB
            maxFiles: 1, // number of files allowed to upload
            acceptedFiles: ".png, .jpg, .jpeg, .gif", // file types allowed to upload

            init: function () {
                this.on("uploadprogress", function (file, progress) {
                    var progressBar = file.previewElement.querySelector(".progress-bar");
                    progressBar.style.width = progress + "%";
                    progressBar.innerHTML = progress + "%";
                });

                this.on("success", function (file, response) {
                    var progressBar = file.previewElement.querySelector(".progress-bar");
                    progressBar.classList.add("bg-success");
                    progressBar.innerHTML = "Uploaded";
                });

                this.on("error", function (file, errorMessage) {
                    var progressBar = file.previewElement.querySelector(".progress-bar");
                    progressBar.classList.add("bg-danger");
                    progressBar.innerHTML = errorMessage;
                });
            }
        };
PHP file upload script
This a typical PHP file upload script suite for any single file upload request. But, the dependent changes are,
- File handle name (
$_FILES['File handle name']). - Target directory path for
$uploadDirvariable.
<?php

if ($_SERVER['REQUEST_METHOD'] === 'POST' && isset($_FILES['file'])) {
    $file = $_FILES['file'];

    // file to be uploaded to this directory
    // should have sufficient file permissions
    $uploadDir = 'uploads/';

    // unique file name generated for the uploaded file
    $fileName = uniqid() . '_' . $file['name'];

    // moving the uploaded file from temp directory to uploads directory
    if (move_uploaded_file($file['tmp_name'], $uploadDir . $fileName)) {
        echo 'File uploaded successfully.';
    } else {
        echo 'Failed to upload file.';
    }
}
How to hide the progress bar of uploaded files
By default, the Dropzone JS callback adds a dz-complete CSS class selector to the dropzone element. It will hide the progress bar from the preview after a successful upload.
This default behavior is by changing the progress bar opacity to 0. But the markup will be there in the source. Element hide and show can be done in various ways.
If you want to remove the progress bar element from the HTML preview, use the JavaScript remove() function. This script calls it for the progress bar element on the success callback.
Dropzone.options.myDropzone = {
      ...
      ...

      init: function () {
          ...
          ...

          this.on("success", function (file, response) {
              var progressBar = file.previewElement.querySelector(".progress-bar");
              progressBar.remove();
          });

          ...
          ...
      }
};
