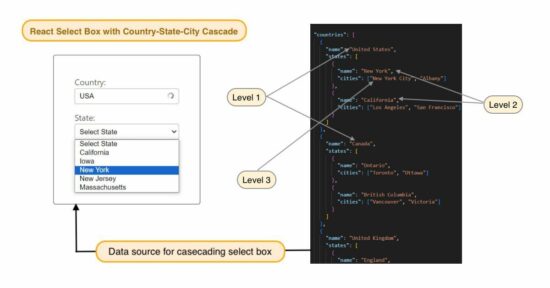
This React select box displays a custom country-state-city cascading in the UI. The dropdown options are from the database.
The database results are fetched via a remote call. It gets a JSON hierarchy in the response with three-level location data.
Previously, we created a two-level cascade with only the countries and states using jQuery.
Load Location data from a source object array
A JavaScript class LocationDropdowns is created for this example with cascading select boxes. It has properties for having select box options and selected country, state and city.
These objects are initialized with the reference of the JavaScript ‘this’ keyword in the class constructor.
The location data loaded to this React select boxes are dynamic from the database. This JavaScript code sends an API request to prepare the source object array using the fetch() method.
The API call is sent in the componentDidMount() function of the ReactJS. This API endpoint returns the location data tree with depth 2 to have country-state-city hierarchically.
Replace the YOUR_API_PATH with your api endpoint directory path to target the correct path to fetch data.
src/LocationDropdowns.js (Load location JSON)
import React from 'react';
import spinner from './Spinner.svg';

class LocationDropdowns extends React.Component {
    constructor(props) {
        super(props);
        this.state = {
            locationsData: [],
            selectedCountry: '',
            selectedState: '',
            selectedCity: '',
            loadingCountry: false,

        };
    }

    componentDidMount() {
        this.setState({ loadingCountry: true });
        fetch('YOUR_API_PATH/locations.php')
            .then(response => response.json())
            .then(data => {
                this.setState({ locationsData: data });
            })
            .catch(error => {
                console.error('Error fetching data:', error);
            })
            .finally(() => {
                this.setState({ loadingCountry: false });
            });
    }

    handleCountryChange = (event) => {
       ....
    };

    handleStateChange = (event) => {
       ....
    };
    handleCityChange = (event) => {
       ....
    };
Render Country State City Cascade using select box via React
The React state variables set in this component are listed below.
selectedCountry, selectedState andselectedCity:These are to store the chosen country, state, and city from the React select box.locationsData:This is to load the country, state, and city JSON data.loadingCountry:A flag to set for showing loader during the server fetch.
The React select box options list is prepared separately for the country state and the city. The variables countryOptions, stateOptions and cityOptions are having the appropriate JSX for loading the options.
The options’ value and the display caption are dynamic. It is from the database and loaded to the locationData state variable.
The three select boxes in the React component make use of the above state variables to load options highlighted with selected index.
This component registers the on-change event of the select boxes with the JavaScript handlers. Those are handleCountryChange, handleStateChange, and handleCityChange.
src/LocationDropdowns.js(render React select component)
class LocationDropdowns extends React.Component {
    constructor(props) {
       ....
    }

    componentDidMount() {
       ....
    }

    handleCountryChange = (event) => {
       ....
    };

    handleStateChange = (event) => {
       ....
    };
    handleCityChange = (event) => {
       ....
    };

    render() {
        const { selectedCountry, selectedState, selectedCity, locationsData, loadingCountry} = this.state;
        const countryOptions = locationsData.map(country => (
            <option key={country.name} value={country.name}>
                {country.name}
            </option>
        ));

        const selectedCountryData = locationsData.find(country => country.name === selectedCountry);
        const stateOptions = selectedCountryData
            ? selectedCountryData.states.map(state => (
                 <option key={state.name} value={state.name}>
                      {state.name}
                 </option>
              ))
            : [];

        const selectedStateData = selectedCountryData
            ? selectedCountryData.states.find(state => state.name === selectedState)
            : null;
        const cityOptions = selectedStateData
            ? selectedStateData.cities.map(city => (
                 <option key={city} value={city}>
                      {city}
                 </option>
              ))
            : [];

            const countrySpinner = loadingCountry ? <img className='spinner' src={spinner} alt="Loading..." /> : null;

            return (
                <div className='title'>
                    <div className='center-content'>
                        <div id='demo-content'>
                            <div className='form'>
                                <label htmlFor="country">Country:</label>
                                <div className="spinner-wrapper">{countrySpinner}</div>
                                <select value={selectedCountry} onChange={this.handleCountryChange}>
                                    <option value="">Select Country</option>
                                    {countryOptions}
                                </select>

                                <label htmlFor="state">State:</label>
                                <select value={selectedState} onChange={this.handleStateChange}>
                                    <option value="">Select State</option>
                                    {stateOptions}
                                </select>

                                <label htmlFor="city">City:</label>
                                <select value={selectedCity} onChange={this.handleCityChange}>
                                    <option value="">Select City</option>
                                    {cityOptions}
                                </select>
                            </div>
                        </div>
                    </div>
                </div>
            );
        }
    }

    export default LocationDropdowns;
JavaScript event handlers to call on changing the React select box
The following code has the handlers registered with the on-change event of this component’s select box. These handlers set the selected value to the corresponding select box state variable which is later used for highlighting the selected options.
The selected options are from the on-change event’s target object. The event.target.value is set to the appropriate state variable selectedCountry to make the particular option selected.
When choosing a new country the selectedState and selectedCity values are turned back to the initial value.
my-react-app/src/LocationDropdowns.js (country, state, and city on-change handler functions)
 handleCountryChange = (event) => {
        const selectedCountry = event.target.value;
        this.setState({
            selectedCountry,
            selectedState: '',
            selectedCity: '',
        });
    };

    handleStateChange = (event) => {
        const selectedState = event.target.value;
        this.setState({
            selectedState,
        });
    };
    handleCityChange = (event) => {
        const selectedCity = event.target.value;
        this.setState({
            selectedCity,
        });
    };
API code to build object tree for the cascading React select box
This API code establishes the MySQL database connection and retrieves data for the select boxes. It prepares the select option property array and encode to a JSON format.
It fetches unique country, state and city options from the database. It forms a hierarchical order of the country, state and city options to display country dependent states and state dependent cities.
locations.php
<?php
header("Access-Control-Allow-Origin: *");

$servername = "localhost";
$username = "root";
$password = "";
$dbname = "react-select-box";

$conn = new mysqli($servername, $username, $password, $dbname);

if ($conn->connect_error) {
    die("Connection failed: " . $conn->connect_error);
}

$data = array();

$sql = "SELECT DISTINCT country_name AS country FROM country";
$stmt = $conn->prepare($sql);
$stmt->execute();
$result = $stmt->get_result();

while ($row = $result->fetch_assoc()) {
    $country = $row["country"];

    $statesQuery = "SELECT DISTINCT s.name AS state
                    FROM states s
                    JOIN country c ON s.country_id = c.id
                    WHERE c.country_name = ?";

    $stmt = $conn->prepare($statesQuery);
    $stmt->bind_param("s", $country);
    $stmt->execute();
    $statesResult = $stmt->get_result();
    $states = array();

    while ($stateRow = $statesResult->fetch_assoc()) {
        $state = $stateRow["state"];

        $citiesQuery = "SELECT name AS city
                        FROM city
                        WHERE state_id = (SELECT id FROM states WHERE name=? LIMIT 1)";

        $stmt = $conn->prepare($citiesQuery);
        $stmt->bind_param("s", $state);
        $stmt->execute();
        $citiesResult = $stmt->get_result();
        $cities = array();

        while ($cityRow = $citiesResult->fetch_assoc()) {
            $cities[] = $cityRow["city"];
        }

        $states[] = array("name" => $state, "cities" => $cities);
    }

    $data[] = array("name" => $country, "states" => $states);
}

$conn->close();
echo json_encode($data);
?>
React root and App.js that loads the LocationDropdown App
This is where to plugin the React select box component via the mail App.css.
I used Create React App(CRA) to create this React project. The App.js file is in the src folder of the project created via CRA.
src/App.js
import React from 'react';
import LocationDropdown from './LocationDropdown';
import './form.css';
import './style.css';

function App() {
  return (
    <div className="App">
      <LocationDropdown />
    </div>
  );
}

export default App;
The App.js imported to the React component’s main JS to render the component to the root via ReactDOM.
src/index.js
import App from './App';

const root = ReactDOM.createRoot(document.getElementById('root'));
root.render(
  <React.StrictMode>
    <App />
  </React.StrictMode>
);
How to create a React project
If it is your first React example, follow the below steps to create a React App with a modular structure.
Note: Install Node.js before getting into the below steps.
- Run
npm install -g create-react-appto install the CRA build tool globally. - Run
npx create-react-app react-select-boxto create a new React project with default configurations and basic dependencies. - Go the newly created React project directory using
cd react-select-boxcommand. - Run
npm startto start a dev server to run the React App to the browser.
There are various alternative build tools to create a React project. Vite tool is one among them that we are used when creating a React file upload example.
If you want a quick start, then can use online editor for React development. In the React multi-file upload example, we used CDN for importing React, ReactDOM and Babel script.