We have seen more OAuth login implementations for Google, Facebook and more using PHP. Also, there are a few Laravel tutorials to enable OAuth social login. This tutorial is for learning how to integrate the Sign in with Apple feature into a PHP application.
Like other OAuth providers, Apple Login requires registration for API keys. In fact, Apple gives a long list of steps to get your final OAuth client keys. But all these steps are for making the OAuth registration more secure.
Steps to generate Apple OAuth Client ID and Secret keys
Though it is a long process, there is a clear navigation and procedure for these steps. So, it is very easy to implement Apple OAuth login.
- Enroll in the Apple Developer program
- Create App ID
- Create Service ID
- Create Key ID and Private Key
- Generate JWT-signed client secret by App ID, Service ID and key ID
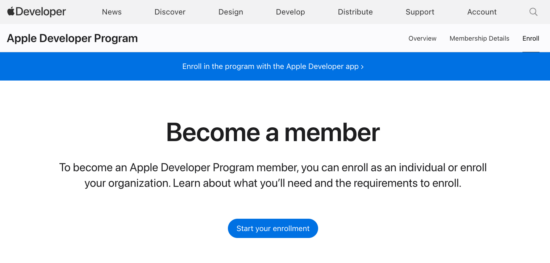
1. Enroll in the Apple Developer program
When getting started with the Apple Developer program, it will ask to log in with your Apple ID and to fill details to register with the developer program. It’s a paid program.
Then, select the entity between “Individual” and “Organisation” and click the “Start Enrolment” button.
After successful enrolment, you will see the developer interface to create the App ID, Service ID and Key ID.
The key generation process is a lengthy process compare to Google OAuth implementation. If you want to see how to integrate Google OAuth in a core PHP application, just have a look at the linked article.
Create App ID
Navigate via Certificates, IDs & Profiles -> Identifiers to see the interface to create the App ID. Give app description and bundle ID. The bundle ID should be in reverse domain name format like com.ppexample.appleapi.
Then, enable Signin with Apple API from the list under API service.
Create Service ID
This step is the same as creating an APP ID. It will ask to enter the user identifier in the reverse domain name order. Other than that, it will also require a service description and enable the Signin with Apple API.
Create Key ID and Private Key
Give the name of the key and enable “Signin with Apple” to allow users to authenticate in your application with their Apple ID. Then, click the configure button, which will show a form to select the primary app ID from the list.
By clicking the Save and Continue and Register it will display the key ID to copy. This screen will also show a “Download” link to get a .p8 file having the OAuth private key.
Generate JWT-signed client secret by App ID, Service ID and key ID
We go through the above steps to get the App ID, Service ID and the key ID to generate a JWT-signed client secret. This client-secret key is used to enable OAuth feature in an application.
The client secret should be generated by integrating an available PHP JWT library like firebase/php-jwt.
There are third-party tools that generate client-secret key with the reference of the App ID, Service ID, key ID and the .p8 file. But, it is not recommended to upload this sensitive information to a third-party tool.
Apple OAuth Integration: PHP Example
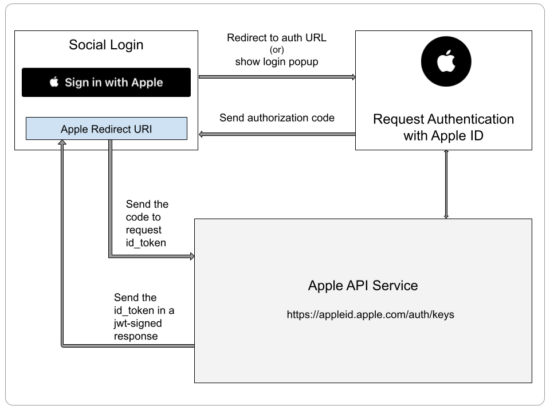
In this example, we render the “Sign in with Apple” button into the browser. It initiates the Apple Auth JavaScript library with client ID and redirect URI.
On clicking this button, it triggers the API request for the authorization code. Once the code is found in the query string, the application endpoint requests the access token.
The access token response will have enough details in an encoded format. By decoding it and verifying this response, we can get the profile information as per the scope set on the request.
Configure Apple developer App credentials
This configuration file will contain PHP constants for the registered Apple client ID, secret key and the redirect URI.
config.php
<?php
const APPLE_CLIENT_ID     = '';
const APPLE_CLIENT_SECRET     = '';
const APPLE_REDIRECT_URI  = 'your-domain-full-name/path/apple-redirect-uri.php';
?>
Render “Sign in with Apple” button
Copy the below script to your application login page before closing the body tag. It will render the “Sign in with Apple” into the “#appleid-signin” container.

Part of login HTML where the “Sign in with Apple” rendered
<button id="appleid-signin"></button>

<script type="text/javascript" src="https://appleid.cdn-apple.com/appleauth/static/jsapi/appleid/1/en_US/appleid.auth.js"></script>
<script type="text/javascript">
AppleID.auth.init({
clientId: '<?php echo APPLE_CLIENT_ID; ?>',
scope: 'name email',
redirectURI: '<?php echo APPLE_REDIRECT_URI; ?>',
state: '<?php echo $_SESSION['oauth_state']; ?>'
});
</script>
Capture Authorization code to request access token
The below PHP code contains functions to work with the Apple token and the callback response. The getAccessToken function sends a PHP cURL request to get the access token response. The decodeAppleIdToken is to apply base_64 decoding on the id_token response.
functions.php
<?php
function decodeAppleIdToken($idToken)
{
   $parts = explode('.', $idToken);
   $payload = base64_decode(strtr($parts[1], '-_', '+/'));
   return json_decode($payload, true);
}

function getAccessToken($code, $client_id, $client_secret, $redirect_uri)
{
   $url = "https://appleid.apple.com/auth/token";

   $data = [
      "grant_type"   => "authorization_code",
      "code"         => $code,
      "redirect_uri" => $redirect_uri,
      "client_id"    => $client_id,
      "client_secret"    => $client_secret,
   ];

   // Build the form-urlencoded query string
   $postFields = http_build_query($data);

   $ch = curl_init($url);

   curl_setopt_array($ch, [
      CURLOPT_POST           => true,
      CURLOPT_HTTPHEADER     => [
         "Content-Type: application/x-www-form-urlencoded",
         "Content-Length: " . strlen($postFields),
      ],
      CURLOPT_POSTFIELDS     => $postFields,
      CURLOPT_RETURNTRANSFER => true,
   ]);

   $response = curl_exec($ch);

   if (curl_errno($ch)) {
      echo "cURL Error: " . curl_error($ch);
   } else {
      $httpcode = curl_getinfo($ch, CURLINFO_HTTP_CODE);
      return $response;
   }

   curl_close($ch);
}
?>
Process Apple OAuth token response
On the PHP side, the response data is parsed to put an OAuth registration entry into the database. It will store the OAuth provider name and ID in the database. The OAuth provider ID will be in the $userData->sub object.
apple-redirect-uri.php
<?php
session_start();

if ($_REQUEST["code"]) {

   require_once __DIR__ . '/config.php';
   require_once __DIR__ . '/functions.php';
   $accessTokenData = getAccessToken($_REQUEST["code"], APPLE_CLIENT_ID, APPLE_CLIENT_SECRET, APPLE_REDIRECT_URI);

   $accessTokenArray = json_decode($accessTokenData, true);

   $userData = decodeAppleIdToken($accessTokenArray["id_token"]);
   if (!empty($userData)) {
      $appleUserId = $userData['sub'];
      $appleUserEmail = $userData['email'];

      require __DIR__ . '/AppleUserDao.php';
      $appleUserDao = new AppleUserDao();
      // 1. check if apple user already exist
      $memberResult = $appleUserDao->getUserByAppleId($appleUserId);

      // 2. insert or update user data
      if (empty($memberResult)) {
         $inserId = $appleUserDao->insertAppleUser($appleUserId, $appleUserEmail);
      }
      $memberResult = $appleUserDao->getUserByAppleId($appleUserId);

      if (!empty($memberResult)) {
         // 3. Create loggedIn session variables from memberResult
      }

      // 4. redirect to dashboard
   }
}
?>
This PHP code has function to do database operations to fetch or store the Apple user records.
AppleUserDao.php
<?php
class AppleUserDao
{


   private $conn;

   function __construct()
   {
      require_once 'DataSource.php';
      $this->conn = new DataSource();
   }

   public function getUserByAppleId($oauthId)
   {
      $query = 'SELECT * FROM tbl_member where oauth_id = ?';
      $paramType = 'si';
      $paramValue = array(
         $oauthId
      );
      $result = $this->conn->select($query, $paramType, $paramValue);
      return $result;
   }

   function insertAppleUser($oauthId, $oauth_email)
   {
      $oauth_provider = 'apple';
      $insertId = 0;
      $sql = "INSERT into tbl_member (oauth_id, oauth_provider, user_email)
                       values (?, ?, ?)";
      $paramType = "sss";
      $paramArray = array(
         $oauthId,
         $oauth_provider,
         $oauth_email
      );
      $insertId = $this->conn->insert($sql, $paramType, $paramArray);
      return $insertId;
   }
}
?>
To the Production Standard
To use the “Sign in with Apple” feature on a live site, there is a verification step to validate the id_token returned with the Apple callback response. The JWT library integrated with the application supports this verification process.
The two functions shows how to verify the id_token in the response using public keys and algorithm.
Part of functions.php
function verifyAppleToken($id_token, $client_id)
{
   $tks = explode('.', $id_token);
   $header = json_decode(base64_decode($tks[0]), true);


   $keys = json_decode(file_get_contents("https://appleid.apple.com/auth/keys"), true);

   // 1. Confirm if the public key of the id_token found in the apple keys.
   $publicKey = null;
   foreach ($keys['keys'] as $key) {
      if ($key['kid'] == $header['kid']) {
         $publicKey = $key;
         break;
      }
   }
   if (!$publicKey) {
      throw new Exception("Unable to find Apple public key");
   }

   // Public Key Object
   $publicKeyObject = buildPublicKeyFromApple($publicKey);

   // Verify signature
   $signedKey = new \Firebase\JWT\Key($publicKeyObject, $header['alg']);
   $decoded = \Firebase\JWT\JWT::decode($id_token, $signedKey);

   // Validate token issuer, audience and expiration
   if ($decoded->iss !== "https://appleid.apple.com") {
      throw new Exception("Invalid issuer");
   }
   if ($decoded->aud !== $client_id) {
      throw new Exception("Invalid audience");
   }
   if ($decoded->exp < time()) {
      throw new Exception("Token expired");
   }

   return $decoded;
}

function buildPublicKeyFromApple($publicKey)
{
   $keyComponents = [
      'kty' => $publicKey['kty'],
      'n'   => $publicKey['n'],
      'e'   => $publicKey['e'],
   ];

   $keyObject = \Firebase\JWT\JWK::parseKey($keyComponents);
   return $keyObject;
}
Conclusion:
Thus, we have seen how to render a “Sign in with Apple” button into your authentication page in a PHP application. If you want to integrate this feature into your PHP project, contact me. As we have mentioned, there are more OAuth logins we have already seen with different providers.
If you want to see how to implement OAuth login in a Laravel application, just have a look at the Laravel social login tutorial.