Are you keeping your email password in a PHP file as plain text? If your server is compromised, what will happen to your emails? This article is for you.
When people consult about email sending components, my first focus is on security. Of course, it is a classic example where application developers must cover security.
Though PHP has a built-in mail function mail(), I have looked for a better way of doing this. It’s about guaranteeing dependable security while configuring the email sending services of an application.
PHPMailer library is an unbeatable component of sending emails with advanced features. I used Google OAuth client to send email via PHPMailer in a secure way.
I have created a simple and basic example to construct the email sending script. Let us get in to learn more about sending email with PHPMailer via Gmail XOAUTH2.
What is inside?
- About this example
- Dependencies and installation commands
- Generate API keys and refresh token
- UI template and client-side validation
- PHP controller calls mail sending script
- Application configurable directives
- Mail service using PhpMailer and Gmail XOAUTH2
About this example
This example is for creating a mailing service to send email using PHPMailer via Gmail XOAUTH2.
It shows a contact form to the user to enter the details. The form submit action sends the contact email to the recipient.
The required dependencies are installed via composer and integrated into this example to send an email.
The application configurations set the keys to request token-based authentication while sending mails.
It covers not only the mail sending but also an end-to-end working contact form component.
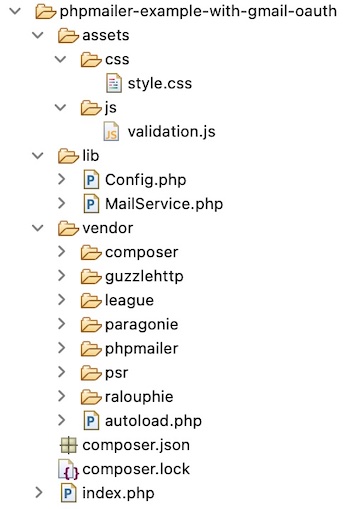
The following image shows the file structure of this example. The vendor directory is expanded to display the dependencies required for this code.
Dependencies and installation commands
As we mentioned in the introductory part, this code uses PHPMailer and the OAuth client library.
The dependent libraries required are downloaded automatically by installing these two pages via a package management tool like the composer.
Command to install the PHPMailer via composer is,
composer require phpmailer/phpmailer
To use Google OAuth, then run this command to download the dependencies shown in the file structure image.
composer require league/oauth2-google
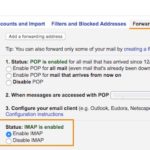
Generate API keys and refresh token
Here are the steps to create a Google API project and get the keys and the token. These keys are the parameters for the process of token-based authentication.
- Login to Google account and go to the cloud platform console.
- From the left sliding menu, navigate IAM & Admin -> Manage Resources. Click CREATE PROJECT and enter the details.
- Go to API & Services -> Library and enable Gmail API.
- Go to API & Services -> Credentials and click CREATE CREDENTIALS -> OAuth client ID.
- Choose the application type and fill in other details to generate the keys.

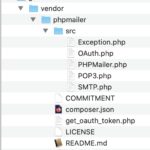
After getting the keys, configure it into the following file that comes with the PHPMailer package. It is to get the refresh token.
The following code shows where to set client-id and client-secret keys to get the refresh token.
<?php
/**
 * PHPMailer - PHP email creation and transport class.
 * PHP Version 5.5
 * @package PHPMailer
 * @see https://github.com/PHPMailer/PHPMailer/ The PHPMailer GitHub project
 * @author Marcus Bointon (Synchro/coolbru) <phpmailer@synchromedia.co.uk>
 * @author Jim Jagielski (jimjag) <jimjag@gmail.com>
 * @author Andy Prevost (codeworxtech) <codeworxtech@users.sourceforge.net>
 * @author Brent R. Matzelle (original founder)
 * @copyright 2012 - 2020 Marcus Bointon
 * @copyright 2010 - 2012 Jim Jagielski
 * @copyright 2004 - 2009 Andy Prevost
 * @license http://www.gnu.org/copyleft/lesser.html GNU Lesser General Public License
 * @note This program is distributed in the hope that it will be useful - WITHOUT
 * ANY WARRANTY; without even the implied warranty of MERCHANTABILITY or
 * FITNESS FOR A PARTICULAR PURPOSE.
 */

/**
 * Get an OAuth2 token from an OAuth2 provider.
 * Install this script on your server so that it's accessible
 * as [https/http]://<yourdomain>/<folder>/get_oauth_token.php
 * e.g.: http://localhost/phpmailer/get_oauth_token.php
 * Ensure dependencies are installed with 'composer install'
 * Set up an app in your Google/Yahoo/Microsoft account
 * Set the script address as the app's redirect URL
 * If no refresh token is obtained when running this file,
 * revoke access to your app and run the script again.
 */

namespace PHPMailer\PHPMailer;

/**
 * Aliases for League Provider Classes
 * Make sure you have added these to your composer.json and run `composer install`
 * Plenty to choose from here:
 * @see http://oauth2-client.thephpleague.com/providers/thirdparty/
 */
//@see https://github.com/thephpleague/oauth2-google
use League\OAuth2\Client\Provider\Google;
//@see https://packagist.org/packages/hayageek/oauth2-yahoo
use Hayageek\OAuth2\Client\Provider\Yahoo;
//@see https://github.com/stevenmaguire/oauth2-microsoft
use Stevenmaguire\OAuth2\Client\Provider\Microsoft;

if (!isset($_GET['code']) && !isset($_GET['provider'])) {
    ?>
<html>
<body>Select Provider:<br>
<a href='?provider=Google'>Google</a><br>
<a href='?provider=Yahoo'>Yahoo</a><br>
<a href='?provider=Microsoft'>Microsoft/Outlook/Hotmail/Live/Office365</a><br>
</body>
</html>
    <?php
    exit;
}

require 'vendor/autoload.php';

session_start();

$providerName = '';

if (array_key_exists('provider', $_GET)) {
    $providerName = $_GET['provider'];
    $_SESSION['provider'] = $providerName;
} elseif (array_key_exists('provider', $_SESSION)) {
    $providerName = $_SESSION['provider'];
}
if (!in_array($providerName, ['Google', 'Microsoft', 'Yahoo'])) {
    exit('Only Google, Microsoft and Yahoo OAuth2 providers are currently supported in this script.');
}

//These details are obtained by setting up an app in the Google developer console,
//or whichever provider you're using.
$clientId = 'RANDOMCHARS-----duv1n2.apps.googleusercontent.com';
$clientSecret = 'RANDOMCHARS-----lGyjPcRtvP';

//If this automatic URL doesn't work, set it yourself manually to the URL of this script
$redirectUri = (isset($_SERVER['HTTPS']) ? 'https://' : 'http://') . $_SERVER['HTTP_HOST'] . $_SERVER['PHP_SELF'];
//$redirectUri = 'http://localhost/PHPMailer/redirect';

$params = [
    'clientId' => $clientId,
    'clientSecret' => $clientSecret,
    'redirectUri' => $redirectUri,
    'accessType' => 'offline'
];

$options = [];
$provider = null;

switch ($providerName) {
    case 'Google':
        $provider = new Google($params);
        $options = [
            'scope' => [
                'https://mail.google.com/'
            ]
        ];
        break;
    case 'Yahoo':
        $provider = new Yahoo($params);
        break;
    case 'Microsoft':
        $provider = new Microsoft($params);
        $options = [
            'scope' => [
                'wl.imap',
                'wl.offline_access'
            ]
        ];
        break;
}

if (null === $provider) {
    exit('Provider missing');
}

if (!isset($_GET['code'])) {
    //If we don't have an authorization code then get one
    $authUrl = $provider->getAuthorizationUrl($options);
    $_SESSION['oauth2state'] = $provider->getState();
    header('Location: ' . $authUrl);
    exit;
    //Check given state against previously stored one to mitigate CSRF attack
} elseif (empty($_GET['state']) || ($_GET['state'] !== $_SESSION['oauth2state'])) {
    unset($_SESSION['oauth2state']);
    unset($_SESSION['provider']);
    exit('Invalid state');
} else {
    unset($_SESSION['provider']);
    //Try to get an access token (using the authorization code grant)
    $token = $provider->getAccessToken(
        'authorization_code',
        [
            'code' => $_GET['code']
        ]
    );
    //Use this to interact with an API on the users behalf
    //Use this to get a new access token if the old one expires
    echo 'Refresh Token: ', $token->getRefreshToken();
}
UI template and client-side validation
This is a HTML code for a simple contact form template. It triggers form validation and the back-end mail sending script on submitting the form.
It is self-explanatory with usual form fields and semantic attributes.
<html>
<head>
<title>Contact Us Form</title>
<link rel="stylesheet" type="text/css" href="assets/css/style.css" />
</head>
<body>
    <div class="form-container">
        <form name="frmContact" id="" frmContact"" method="post"
            action="" enctype="multipart/form-data"
            onsubmit="return validateContactForm()">

            <div class="input-row">
                <label style="padding-top: 20px;">Name</label> <span
                    id="userName-info" class="info"></span><br /> <input
                    type="text" class="input-field" name="userName"
                    id="userName" />
            </div>
            <div class="input-row">
                <label>Email</label> <span id="userEmail-info"
                    class="info"></span><br /> <input type="text"
                    class="input-field" name="userEmail" id="userEmail" />
            </div>
            <div class="input-row">
                <label>Subject</label> <span id="subject-info"
                    class="info"></span><br /> <input type="text"
                    class="input-field" name="subject" id="subject" />
            </div>
            <div class="input-row">
                <label>Message</label> <span id="userMessage-info"
                    class="info"></span><br />
                <textarea name="content" id="content"
                    class="input-field" cols="60" rows="6"></textarea>
            </div>
            <div>
                <input type="submit" name="send" class="btn-submit"
                    value="Send" />

                <div id="statusMessage">
                        <?php
                        if (! empty($response)) {
                            ?>
                            <p
                        class='<?php echo $response['type']; ?>Message'><?php echo $response['text']; ?></p>
                        <?php
                        }
                        ?>
                    </div>
            </div>
        </form>
    </div>
    <script type="text/javascript" src="assets/js/validation.js"></script>
</body>
</html>
The form validation functions restrict the form submit till getting not-empty values of all fields.
It validates the email field data if it matches the specified regex pattern.
function validateContactForm() {

	var emailRegex = /^([a-zA-Z0-9_.+-])+\@(([a-zA-Z0-9-])+\.)+([a-zA-Z0-9]{2,4})+$/;
	var userName = document.getElementById("userName").value;
	var userEmail = document.getElementById("userEmail").value;
	var subject = document.getElementById("subject").value;
	var content = document.getElementById("content").value;

	var valid = true;
	if (userName == "") {
		markAsInvalid("userName", "required");
		document.getElementById("userName").classList.add("error-field");
		valid = false;
	} else {
		markAsValid("userName");
		document.getElementById("userName").classList.remove("error-field");
	}

	if (userEmail == "") {
		markAsInvalid("userEmail", "required");
		document.getElementById("userEmail").classList.add("error-field");
		valid = false;
	} else if (!emailRegex.test(userEmail)) {
		markAsInvalid("userEmail", "invalid email address");
		document.getElementById("userEmail").classList.add("error-field");
		valid = false;
	} else {
		markAsValid("userEmail");
		document.getElementById("userEmail").classList.remove("error-field");
	}

	if (subject == "") {
		markAsInvalid("subject", "required");
		document.getElementById("subject").classList.add("error-field");
		valid = false;
	} else {
		markAsValid("subject");
		document.getElementById("subject").classList.remove("error-field");
	}
	if (content == "") {
		markAsInvalid("userMessage", "required");
		document.getElementById("content").classList.add("error-field");
		valid = false;
	} else {
		markAsValid("userMessage");
		document.getElementById("content").classList.remove("error-field");
	}

	return valid;
}

function markAsValid(id) {
	document.getElementById(id + "-info").style.display = "none";
}

function markAsInvalid(id, feedback) {
	document.getElementById(id + "-info").style.display = "inline";
	document.getElementById(id + "-info").innerText = feedback;
}
PHP controller calls mail sending script
This script is added at the beginning of the index.php file above the contact form HTML.
It connects the PHP MailService to send the contact email using PHPMailer with XOAUTH2.
It captures the response of the mail sending process. It acknowledges the end-user to know if the contact message is received or not.
For sending emails with PHPMailer using GMail SMTP, the linked article has the download with suitable code.
<?php
namespace Phppot;

require_once ("lib/MailService.php");
$mailService = new MailService();
if (! empty($_POST['send'])) {
    $response = $mailService->sendContactMail($_POST);
}
?>
Application configurable directives
This is the configuration file created for this example code. It defines the PHP constants to hold the keys and tokens generated earlier for authentication.
It also defines the recipient email addresses and OAuth user email and details.
<?php
namespace Phppot;

/**
 * This class contains the configuration options
 */
class Config
{

    const SENDER_NAME = 'Vincy';

    const SENDER_EMAIL = 'vincy@phppot.com';

    // you can add one or more emails separated by a comma (,).
    const RECIPIENT_EMAIL = 'vincy@phppot.com';

    const OAUTH_USER_EMAIL = 'vincy@phppot.com';

    const OAUTH_CLIENT_ID = '';

    const OAUTH_SECRET_KEY = '';

    const REFRESH_TOKEN = '';

    const SMTP_HOST = 'smtp.gmail.com';

    const SMTP_PORT = 587;
}
Mail service using PhpMailer and Gmail XOAUTH2
The sendContactMail() function sets the contact form details to build the email body content.
It creates the PHPMailer instance and sets the attributes to authenticate the mail sending requests.
It sets the Google OAuth provider instance with the generated keys and token and the OAuth user details.
Then, it adds the routine mail attributes, the target email, mail-from, reply-to and more.
It constructs a JSON response to return the result of the mail sending process.
<?php
namespace Phppot;

use Phppot\Config;
use PHPMailer\PHPMailer\PHPMailer;
use PHPMailer\PHPMailer\Exception;

class MailService
{

    function sendContactMail($postValues)
    {
        $name = $postValues["userName"];
        $email = $postValues["userEmail"];
        $subject = $postValues["subject"];
        $content = $postValues["content"];

        require_once __DIR__ . '/Config.php';
        $recipientArray = explode(",", Config::RECIPIENT_EMAIL);

        require_once __DIR__ . '/../vendor/autoload.php';
        $mail = new PHPMailer(true);

        // Comment the following lines of code till $mail->Port to send
        // mail using phpmail instead of smtp.
        $mail->isSMTP();
        //Enable SMTP debugging
        //SMTP::DEBUG_OFF = off (for production use)
        //SMTP::DEBUG_CLIENT = client messages
        //SMTP::DEBUG_SERVER = client and server messages
        $mail->SMTPDebug = SMTP::DEBUG_OFF;

        //Set the hostname of the mail server
        $mail->Host = Config::SMTP_HOST;

        //Set the SMTP port number - 587 for authenticated TLS, a.k.a. RFC4409 SMTP submission
        $mail->Port = Config::SMTP_PORT;

        //Set the encryption mechanism to use - STARTTLS or SMTPS
        $mail->SMTPSecure = PHPMailer::ENCRYPTION_STARTTLS;

        //Whether to use SMTP authentication
        $mail->SMTPAuth = true;

        //Set AuthType to use XOAUTH2
        $mail->AuthType = 'XOAUTH2';

        //Fill in authentication details here
        //Either the gmail account owner, or the user that gave consent
        $oauthUserEmail = Config::OAUTH_USER_EMAIL;
        $clientId = Config::OAUTH_CLIENT_ID;
        $clientSecret = Config::OAUTH_SECRET_KEY;

        //Obtained by configuring and running get_oauth_token.php
        //after setting up an app in Google Developer Console.
        $refreshToken = Config::REFRESH_TOKEN;

        //Create a new OAuth2 provider instance
        $provider = new Google(
            [
                'clientId' => $clientId,
                'clientSecret' => $clientSecret,
            ]
            );

        //Pass the OAuth provider instance to PHPMailer
        $mail->setOAuth(
            new OAuth(
                [
                    'provider' => $provider,
                    'clientId' => $clientId,
                    'clientSecret' => $clientSecret,
                    'refreshToken' => $refreshToken,
                    'userName' => $oauthUserEmail,
                ]
                )
            );

        // Recipients
        $mail->setFrom(Config::SENDER_EMAIL, $name);
        $mail->addReplyTo($email, $name);

        $mail->addAddress(Config::RECIPIENT_EMAIL, Config::RECIPIENT_EMAIL);

        $mail->Subject = $subject;

        $mail->CharSet = PHPMailer::CHARSET_UTF8;
        $mail->msgHTML($mailBody);

        //Replace the plain text body with one created manually
        $mail->AltBody = 'This is a plain-text message body';

        if (!$mail->send()) {
            $output = json_encode(array('type'=>'error', 'text' => '<b>'.$from.'</b> is invalid.'));
            $output = json_encode(array('type'=>'error', 'text' => 'Server error. Please mail vincy@phppot.com'));
        } else {
            $output = json_encode(array('type'=>'message', 'text' => 'Thank you, I will get back to you shortly.'));
        }
        return $output;
    }
}
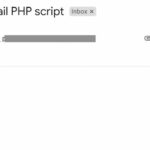
Contact form screenshot of fields to be emailed via Gmail XOAUTH2


Hi Carlson,
Looks like you trying from your localhost. Google will not accept the private IP (local-ip). You have to try this with a hosted server.
There is an another option. You can use your local machine by faking it using a DNS server or using a HOSTS file.
Correct, i managed to get it working by configuring my local DNS.
One other question. I notice the refresh_token has to be frequently updated. is there an automated way to update same without my interaction?
That’s perfect Carlson. I happy you managed to do it.
Regarding the refresh_token you need not update it. If you make changes to your password, then you should re-generate the refresh_token. Otherwise not necessary (within the same server environment).
can i send email via localhost madam
Yes, you can send. If you wish to use SMTP, then you should have access to a email SMTP server. In your local you can install an email SMTP server and configure it or use a remote server. Any case, you can send email via localhost.