Contact form is an ideal component of a website that connects the customer and owner. Feedback, enquiry and all similar purposes can be solved with a simple HTML contact form. It provides a medium for customer interaction.
The HTML contact form interface gives value-add to the website. It helps to boost the conversion. We have seen a lot of contact form examples in PHP with simple to complex UI frameworks.
This article lists the factors that enrich a contact form UI. Those factors will create a full-fledged medium bringing customers to your website.
This list covers the best design practices of creating a HTML contact form and mailing support. The example code is for creating a basic contact form with skeletal design. It is capable of integrating with a live website without having major customization.
Let us see more about creating a responsive HTML contact form with an easy example code.
What is inside?
- About this example
- Things to remember while developing a contact form
- Create custom HTML contact form
- Form validation using JavaScript
- PHP mailing support
- Output – HTML contact form
About this example
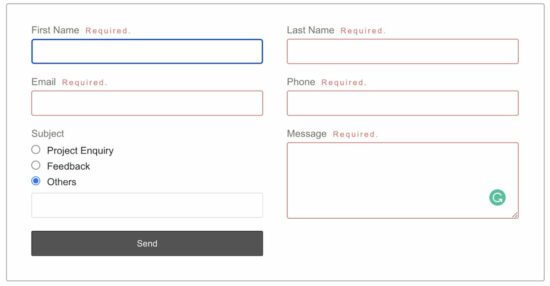
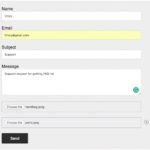
This example code creates a HTML contact form with some frequently used fields. Those are the customer’s name, email, phone, subject and message.
The form UI is with a two-column template displaying two fields in a row. I used this two-column template for avoiding the vertical scroll.
If you are having very few fields, a single column is preferable always. In the mobile view, it displays the HTML contact form with a single-column template.
This code creates an interactive form showing dependent fields based on selection. It has routine backend logic with PHP mail() function. It uses an email template file for building a HTML body content for the contact email.
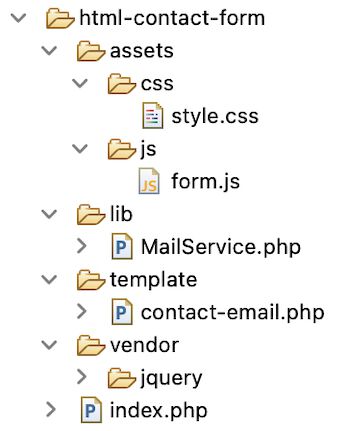
It uses jQuery for handling basic client-side validation on the form fields. The below file structure displays the simple implementation of a HTML contact form. It shows assets used for the form UI and the backend PHP code created for the mailing script.
Things to remember while developing a contact form
- Responsiveness – It’s a minimal need for any layout to fit into all viewport size. Google uses the mobile view of a website for indexing and ranking.
- Simple and less scrollable to minimize the effort to submit the data.
- Skeletal structure to fit into any website layout or theme.
- Design with unique CSS selectors to avoid overrides with the existing styles.
- Validation and sanitization to filter the user data before processing.
- Anti-CSRF protection to check against malicious attempts.
- Pre-population of entered fields on failure to saves the effort of re-entering.
- Intuitive forms let users to experience a friendly interface. It makes it easy to fill the form without guidelines.
- Interaction – changes on the form UI based on the user data. Eg: country-state dependent dropdown.
- Adaptable to plugin popular front-end frameworks like Bootstrap, Tailwind and more.
Create custom HTML contact form
This code shows the markup created for displaying a HTML contact form to the user. It has custom CSS and JavaScript to take care of the UI look and feel and the client-side validation.
This HTML shows some basic contact form fields. It requires to enter the name on two fields First Name and Last Name.
Then, the form has fixed radio options for choosing the contact Subject. If the available options are not suits, it allows users to choose the Others option.
On clicking the Others option, the form will display a text box to enter the custom values.
index.php (HTML Template)
<html>
<head>
<title>HTML Contact Form</title>
<meta name="viewport" content="width=device-width, initial-scale=1.0">
<link href="assets/css/style.css" type="text/css" rel="stylesheet" />
</head>
<body>
    <div class="form-container">
        <h1 class="text-center">HTML Contact Form</h1>
        <form name="frmContact" id="" frmContact"" method="post"
            action="" enctype="multipart/form-data"
            onsubmit="return validateContactForm()">
            <div class="row">
                <div class="inline-block right-margin">
                    <div class="label">
                        First Name <span id="firstName-info"
                            class="info"></span>
                    </div>
                    <input type="text" class="input-field"
                        name="contact-first-name"
                        id="contact-first-name" />
                </div>
                <div class="inline-block responsive">
                    <div class="label">
                        Last Name <span id="lastName-info" class="info"></span>
                    </div>
                    <input type="text" class="input-field"
                        name="contact-last-name" id="contact-last-name" />
                </div>
            </div>
            <div class="row">
                <div class="inline-block right-margin">
                    <div class="label">
                        Email <span id="email-info" class="info"></span>
                    </div>
                    <input type="text" class="input-field"
                        name="contact-email" id="contact-email" />
                </div>
                <div class="inline-block responsive">
                    <div class="label">
                        Phone <span id="phone-info" class="info"></span>
                    </div>
                    <input type="text" class="input-field"
                        name="contact-phone" id="contact-phone" />
                </div>
            </div>
            <div class="row">
                <div class="inline-block right-margin">
                    <div class="label">
                        Subject <span id="subject-info" class="info"></span>
                    </div>
                    <div class="input-field-radio">
                        <div>
                            <input type="radio" name="contact-subject"
                                class="subject-option" id="subject1"
                                value="project-enquiry" />Project
                            Enquiry
                        </div>
                        <div>
                            <input type="radio" name="contact-subject"
                                class="subject-option" id="subject2"
                                value="feedback" />Feedback
                        </div>
                        <div>
                            <input type="radio" name="contact-subject"
                                class="subject-option" id="subject3"
                                value="others" />Others
                            <div id="other-subject">
                                <input type="text" class="input-field"
                                    name="contact-other-subject" />
                            </div>
                        </div>
                    </div>
                </div>
                <div class="inline-block responsive">
                    <div class="label">
                        Message <span id="message-info" class="info"></span>
                    </div>
                    <textarea name="contact-message"
                        id="contact-message" class="input-field"
                        cols="60" rows="6"></textarea>
                </div>
            </div>
            <div class="row">
                <input type="submit" name="send" class="btn-submit"
                    value="Send" />
            </div>
            <div class="row">
                <div id="statusMessage">
                        <?php
                        if (! empty($message)) {
                            ?>
                            <p class='<?php echo $type; ?>Message'><?php echo $message; ?></p>
                        <?php
                        }
                        ?>
                    </div>
            </div>
        </form>
    </div>
    <script type="text/javascript"
        src="vendor/jquery/jquery-3.2.1.min.js"></script>
    <script src="assets/js/form.js" type="text/javascript"></script>
</body>
</html>
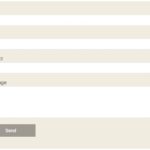
The below CSS is for the two-column HTML contact form template. It contains media queries to keep the template responsive for the various viewport.
There is a lot to learn about designing a webpage with responsiveness to be fluid for any viewport size.
assets/css/style.css
body {
    font-family: Arial;
}

.form-container {
    border: #91949d 1px solid;
    border-radius: 3px;
    -webkit-font-smoothing: antialiased;
    font-family: Arial, "Helvetica Neue", Helvetica, sans-serif;
    font-size: .9em;
    color: #1e2a28;
    width: 740px;
    margin: 0 auto;
    padding: 12px 12px 0px 36px;
}

.label {
    color: #75726c;
}

.input-field {
    width: 340px;
    border-radius: 3px;
    padding: 10px;
    border: #91949d 1px solid;
    box-sizing: border-box;
    margin: 5px 10px 0px 0px;
}

.btn-submit {
    width: 340px;
    padding: 10px 60px;
    background: #555454;
    border: #464646 1px solid;
    color: #ffffff;
    font-size: 0.9em;
    border-radius: 2px;
    cursor: pointer;
}

.errorMessage {
    background-color: #e66262;
    border: #AA4502 1px solid;
    padding: 8px 10px;
    color: #FFFFFF;
    border-radius: 3px;
}

.successMessage {
    background-color: #9fd2a1;
    border: #91bf93 1px solid;
    padding: 8px 10px;
    color: #3d503d;
    border-radius: 3px;
    cursor: pointer;
    font-size: 0.9em;
}

.info {
    font-size: .8em;
    color: #e66262;
    letter-spacing: 2px;
    padding-left: 5px;
}

.row {
    margin: 18px 0;
    display: flex;
}

.right-margin {
    margin-right: 25px;
}

.inline-block {
    display: inline-block;
}

.input-field-radio {
    width: 350px;
    margin-top: 5px;
}

.error-field {
    border: 1px solid #d96557;
}

#other-subject {
    display: none;
}

.subject-option {
    margin-bottom: 8px;
    margin: 4px 10px 6px 0px;
}

.text-center {
    text-align: center;
}

@media only screen and (max-width: 760px) {
    .form-container {
        width: 500px;
    }
    .row {
        margin: 18px 0;
        display: flex;
    }
    .input-field {
        width: 200px;
    }
    .input-field-radio {
        width: 210px;
    }
    .btn-submit {
        width: 200px;
    }
}

@media only screen and (max-width: 500px) {
    .form-container {
        width: 300px;
    }
    .row {
        margin: 10px;
        display: inline-block;
    }
    .input-field {
        width: 280px;
    }
    .btn-submit {
        width: 280px;
    }
    .responsive {
        margin-top: 20px;
    }
}
JavaScript code for validation and UI interaction
This script has a function and an event handler to manage the form submit action. Previously, we have seen example code to prevent multiple-submit action using JavaScript.
The validateContactForm() function validates the HTML contact form fields. It checks if all the fields are not empty. Also, it uses regex to validate the email field data format.
It highlights the form element and notifies the user at the end of the validation. It uses the jQuery .css() and add/remove class methods to highlight the validate fields.
Then, it has an event handler to toggle the custom subject field based on user interaction. If users want to add a new subject other than shown options in the HTML contact form, this event handler will help.
With reference to the radio elements’ class, it handles the on-click event to hide and show form input. If the user selects the 3rd option Others, it displays an additional input field to enter a custom value.
assets/js/form.js
function validateContactForm() {
	var valid = true;
	$(".info").html("");
	$(".input-field").css('border', '#e0dfdf 1px solid');
	$("#contact-first-name").removeClass("error-field");
	$("#contact-last-name").removeClass("error-field");
	$("#contact-email").removeClass("error-field");
	$("#contact-phone").removeClass("error-field");
	$("#contact-message").removeClass("error-field");

	var firstName = $("#contact-first-name").val();
	var lastName = $("#contact-last-name").val();
	var email = $("#contact-email").val();
	var phone = $("#contact-phone").val();
	var message = $("#contact-message").val();

	if (firstName == "") {
		$("#firstName-info").html("Required.");
		$("#contact-first-name").css('border', '#e66262 1px solid');
		$("#contact-first-name").addClass("error-field");
		valid = false;
	}
	if (lastName == "") {
		$("#lastName-info").html("Required.");
		$("#contact-last-name").css('border', '#e66262 1px solid');
		$("#contact-last-name").addClass("error-field");
		valid = false;
	}
	if (email == "") {
		$("#email-info").html("Required.");
		$("#contact-email").css('border', '#e66262 1px solid');
		$("#contact-email").addClass("error-field");
		valid = false;
	}
	if (!email.match(/^([\w-\.]+@([\w-]+\.)+[\w-]{2,4})?$/)) {
		$("#email-info").html("Invalid Email Address.");
		$("#contact-email").css('border', '#e66262 1px solid');
		$("#contact-email").addClass("error-field");
		valid = false;
	}
	if (phone == "") {
		$("#phone-info").html("Required.");
		$("#contact-phone").css('border', '#e66262 1px solid');
		$("#contact-phone").addClass("error-field");
		valid = false;
	}
	if ($('input[name="contact-subject"]:checked').length == 0) {
		$("#subject-info").html("Required.");
		valid = false;
	}
	if (message == "") {
		$("#message-info").html("Required.");
		$("#contact-message").css('border', '#e66262 1px solid');
		$("#contact-message").addClass("error-field");
		valid = false;
	}
	if (valid == false) {
		$('.error-field').first().focus();
	}
	return valid;
}

$(document).ready(function () {
	$(".subject-option").click(function () {
    	if($(this).val() == "others") {
			$("#other-subject").show();
		} else {
			$("#other-subject").hide();
		}
    });
});
PHP mailing support
This PHP code uses a simple mail function for supporting the contact email sending. Using advanced mailer libraries, we can have a wide span with a lot of features for sending emails.
I have used PhpMailer in another example to send email via SMTP. This is the best library that supports mail sending on the server-side.
index.php
<?php
use Phppot\MailService;

if (! empty($_POST["send"])) {
    require_once __DIR__ . '/lib/MailService.php';
    $mailService = new MailService();
    $response = $mailService->sendContactMail($_POST);
    if (! empty($response)) {
        $message = $response["message"];
        $type = $response["type"];
    }
}
?>
This MailService class has a function that calls the PHP mail() function. It prepares the mail header, body and other required params before sending the email.
The body content is dynamically prepared with the data posted by the HTML contact form. Set the admin email for the $toEmail variable where to send the contact email.
It responses with an array with the text and the response type to acknowledge the user.
lib/MailService.php
<?php
namespace Phppot;

class MailService
{

    function sendContactMail($postValues)
    {
        $name = $postValues["contact-first-name"] . " " . $postValues["contact-last-name"];
        $email = $postValues["contact-email"];
        $fname = $postValues["contact-first-name"];
        $lname = $postValues["contact-last-name"];
        $phone = $postValues["contact-phone"];
        $message = $postValues["contact-message"];
        if ($postValues["contact-subject"] == "others") {
            $subject = $postValues["contact-other-subject"];
        } else {
            $subject = $postValues["contact-subject"];
        }
        require_once __DIR__ . '/../template/contact-email.php';
        $content = getHTMLAcknowledgementMessage($fname, $lname, $email, $phone, $message);
        $toEmail = "SET ADMIN EMAIL HERE";
        $mailHeaders = "MIME-Version: 1.0\r\n";
        $mailHeaders .= "Content-type: text/html; charset=UTF-8\r\n";
        $mailHeaders .= "From: " . $name . "<" . $email . ">\r\n";

        if (mail($toEmail, $subject, $content, $mailHeaders)) {
            $response = array(
                "message" => "Hi, Thank you for the message.",
                "type" => "success"
            );
        } else {
            $response = array(
                "message" => "Problem in sending email",
                "type" => "error"
            );
        }
        return $response;
    }
}
?>
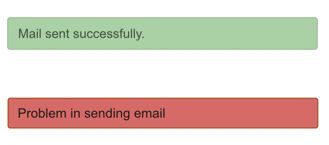
Output – HTML contact form responses
We have seen the screenshot of the HTML contact form at the beginning of this article.
The below response messages are for notifying users after mail sending. In PHP it processes the HTML contact form data and returns these responses. In a previous article, I have given code for setting a time limit to fade out the response messages.
Conclusion
Thus, we have built a HTML contact form with PHP mailing support. We have seen a very basic implementation. We have seen that it is scalable to customize on a need basis depends on the purpose of the application.
I hope it covers major factors to be remembered while designing a HTML contact form. This list will help to enhance this example code further.
There are examples we have seen already to create an AJAX-enabled contact form. All the examples have independent code-block to detach and reuse.
Download


Thanks a lot
Welcome Ghullam.
every time and once again thank you so much vincy for you generosity
Welcome Redouane.