To provide an easier way for your users to reach you the PHP sticky contact form will be useful. By making an element sticky in a web page, it will be made fixed in a specified position and visible even on page scroll. Generally, the sticky component of a website will show the content that needs the highest possible visibility. For example, navigation menu, up down vote controls, social share icons and many.
In a previous tutorial, we have seen how to display sticky social icons using jQuery. In this example, we are going to use only CSS to make the PHP contact form as a sticky element of a webpage. A two-column webpage contains the sticky contact form in its right sidebar. An external stylesheet with the combination of CSS selectors drives the sticky display of the contact form.
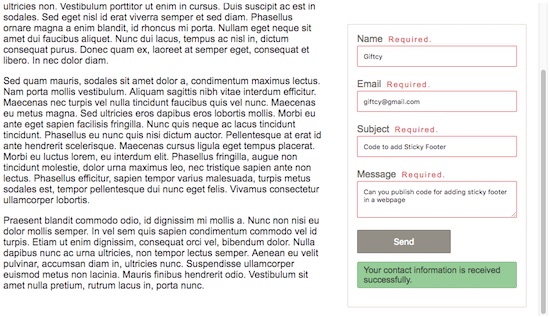
The contact form in this example is dealt with the proper JavaScript validation and contact mail sending script. Though this code is created for the UI learning, I have added a working contact form to this code. You can also find the code for adding a sticky header if you search for.
Two Column Webpage HTML with Sticky Contact Form
This HTML code is used to display a two-column template. The sticky contact form is added to the right sidebar. The left column will display the main content. The style.css included in this HTML drives the stickiness of the contact form. In this section, I have added the validation script used to handle contact form field validation on submit.
<html>
<head>
<title>Sticky Contact Form</title>
<link rel="stylesheet" type="text/css" href="style.css" />
</head>
<body>
    <div class="demo-wrapper">
        <div class="main-col">
            <!-- Add some sample content here -->

        </div>


        <div class="contact-sidebar">
            <form name="frmContact" id="frmContact" method="post"
                action="" enctype="multipart/form-data"
                onsubmit="return validateContactForm()">

                <div class="input-row">
                    <label style="padding-top: 20px;">Name</label> <span
                        id="userName-info" class="info"></span><br /> <input
                        type="text" class="input-field" name="userName"
                        id="userName" />
                </div>
                <div class="input-row">
                    <label>Email</label> <span id="userEmail-info"
                        class="info"></span><br /> <input type="text"
                        class="input-field" name="userEmail"
                        id="userEmail" />
                </div>
                <div class="input-row">
                    <label>Subject</label> <span id="subject-info"
                        class="info"></span><br /> <input type="text"
                        class="input-field" name="subject" id="subject" />
                </div>
                <div class="input-row">
                    <label>Message</label> <span id="userMessage-info"
                        class="info"></span><br />
                    <textarea name="content" id="content"
                        class="input-field" cols="60" rows="3"></textarea>
                </div>
                <div>
                    <input type="submit" name="send" class="btn-submit"
                        value="Send" />

                    <div id="statusMessage">
                        <?php
                        if (! empty($message)) {
                            ?>
                            <p class='<?php echo $type; ?>Message'><?php echo $message; ?></p>
                        <?php
                        }
                        ?>
                    </div>
                </div>
            </form>
        </div>
    </div>
    <script src="https://code.jquery.com/jquery-2.1.1.min.js"
        type="text/javascript"></script>
    <script type="text/javascript">
        function validateContactForm() {
            var valid = true;

            $(".info").html("");
            $(".input-field").css('border', '#e0dfdf 1px solid');
            var userName = $("#userName").val();
            var userEmail = $("#userEmail").val();
            var subject = $("#subject").val();
            var content = $("#content").val();

            if (userName == "") {
                $("#userName-info").html("Required.");
                $("#userName").css('border', '#e66262 1px solid');
                valid = false;
            }
            if (userEmail == "") {
                $("#userEmail-info").html("Required.");
                $("#userEmail").css('border', '#e66262 1px solid');
                valid = false;
            }
            if (!userEmail.match(/^([\w-\.]+@([\w-]+\.)+[\w-]{2,4})?$/))
            {
                $("#userEmail-info").html("Invalid Email Address.");
                $("#userEmail").css('border', '#e66262 1px solid');
                valid = false;
            }

            if (subject == "") {
                $("#subject-info").html("Required.");
                $("#subject").css('border', '#e66262 1px solid');
                valid = false;
            }
            if (content == "") {
                $("#userMessage-info").html("Required.");
                $("#content").css('border', '#e66262 1px solid');
                valid = false;
            }
            return valid;
        }
</script>
</body>
</html>
Sticky Contact Form CSS Selectors
This is the CSS added to the two column webpage. The style.css file contains styles for designing a two-column webpage with a contact form in its sidebar. This also includes the styles to make the contact form container as a sticky element on page scroll.
body {
    font-family: Arial;
    color: #212121;
}

.input-row {
    margin-bottom: 20px;
}

.input-row label {
    color: #75726c;
}

.input-field {
    width: 100%;
    border-radius: 2px;
    padding: 10px;
    border: #e0dfdf 1px solid;
    box-sizing: border-box;
    margin-top: 2px;
}

.btn-submit {
    padding: 10px 60px;
    background: #9e9a91;
    border: #8c8880 1px solid;
    color: #ffffff;
    font-size: 0.9em;
    border-radius: 2px;
    cursor: pointer;
}

.info {
    font-size: .8em;
    color: #e66262;
    letter-spacing: 2px;
    padding-left: 5px;
}

.demo-wrapper {
    justify-content: space-between;
    max-width: 900px;
    margin: 0 auto;
    height: 500px;
    overflow: auto;
    padding: 10px 20px;
}

.main-col {
    float: left;
    flex-direction: column;
    padding: 15px;
    background-color: #fff;
    width: 60%;
}

.contact-sidebar {
    position: sticky;
    top: 25px;
    border: #e2ddd2 1px solid;
    border-radius: 2px;
    padding: 15px;
    background-color: #fff;
    float: right;
    width: 30%;
}.successMessage {
    background-color: #9fd2a1;
    border: #91bf93 1px solid;
    padding: 5px 10px;
    color: #3d503d;
    border-radius: 3px;
    cursor: pointer;
    font-size: 0.9em;
}
Contact Form Mail Sending Script
On submitting the contact form, the form data are posted to the PHP. In the PHP code, it receives the contact data and sends it via an email. In a previous tutorial, we have seen how to send contact data with attachments. In this PHP code, I have used the PHP in-built mail() function for sending the contact mail. If you are looking for the mail sending script using Gmail SMTP, the linked article has the code.
<?php
if(!empty($_POST["send"])) {
	$name = $_POST["userName"];
	$email = $_POST["userEmail"];
	$subject = $_POST["subject"];
	$content = $_POST["content"];

	$toEmail = "test_mail@gmail.com";
	$mailHeaders = "From: " . $name . "<". $email .">\r\n";
	if(mail($toEmail, $subject, $content, $mailHeaders)) {
	    $message = "Your contact information is received successfully.";
	    $type = "success";
	}
}
require_once "contact-view.php";
?>


I really appreciate thank you very much nancy.
Thank you Nik.