WooCommerce is the best among the top eCommerce software which is free. It is based on WordPress platform. Setting up a shopping cart is quite easy with WooCommerce platform.
In previous articles, we have seen some WooCommerce-based code for the following utilities.
- Stripe Payment Gateway integration into a shopping cart.
- Contact form component to send product inquiry.
The WooCommerce product showcase displays the information that meets the customer demand. Sometimes preliminary details cannot convey all and let the customer identify their destiny.
This is something that needs adding additional information using custom-field integration. WooCommerce plugins support adding custom fields to products via the admin interface.
We will see those options below and their usage methodologies of them.
Why a WooCommerce shop admin needs Custom Fields
Before adding custom fields to a product, learn why a WooCommerce shop needs this.
Because, some of the shops have a routine product gallery with usual data like title, image and price. In that case, the custom fields are not required.
The below list shows the advantages of this custom fields feature on a WooCommerce shop.
- To add product metadata that is for displaying additional information about products.
- To allow customers to provide more specifications on the products to purchase.
- To add user-friendly interactive fields to save their effort on giving customizations.
- To add promotions, offers, discounts and all.
- To support end-user to specify a delivery date, time and place.
- To apply tax, and shipping by toggling the custom switch.
Types of custom fields creation supported by WooCommerce plugins
The available WooCommerce plugins can add two types of custom fields for products.
- Data fields – The field accepts information to be displayed on the UI.
- Add-on fields – Fields that collect data from the user on the storefront.
1. Data fields – The field accepts information to be displayed on the UI
This custom field is for showing more information apart from the regular title, price and all. This will help to show product metadata about features, version, rating and all.
For example, a monitor, to show extra information like,
| Brand | Dell |
| Model | Dell 20H |
| Screen Size | 23 |
| Features | HDMI, Anti-glare |
2. Add-on fields – Fields that collect data from the user on the storefront
This type of custom field is about creating options for the customer to interact with. It is to allow adding more specifications or customization on the pursued product.
It is for adding personalized information by the customers on the product purchase. Example,
- A multi-option field to select the size or color of a T-shirt.
- A text field to collect a brand name to be engraved on a purchased pen.
Methods of adding custom fields display in WooCommerce
- Using WooCommerce plugins.
- Adding code to display custom fields for products.
Method 1: Using the plugin
We have taken three plugins to support adding custom fields to a product in a WooCommerce shop. Those are having advanced features and are also easy to set up.
- Advanced Product Fields for WooCommerce
- Product Addons for WooCommerce
- Advanced Custom Fields
1. Advanced Product Fields for WooCommerce
This plugin is used for adding additional fields to the WooCommerce product page. It helps to embed product add-on fields to allow customers to personalize the order.
Look into the plugin details and prerequisites below.
| Version | 4.5 or higher |
| Active installations | 20,000+ |
| PHP version | 5.6 or higher |
| Last updated | 2 weeks ago |
Features
- The custom product field selected on the product page can be carried over to the cart and checkout pages. It is persistent on the entire flow until the order receipt.
- Smooth product field builder in the backend with a seamless experience.
- It has the option to add multiple prices to manipulate the base price of the products on selection.
- It supports all possible interactive fields with the show hide option.
- It allows products and custom-field mapping interfaces to control the visibility.
- WooCommerce tax figure customization is possible.
- Multi-lingual in translation-ready themes.
Steps to use
Download this plugin from the official WordPress repository. Then install and activate it for the WooCommerce shop. If you are new to WordPress, then see here how to set up a plugin.
- Go to Product -> Add New via the WooCommerce admin menu.
- Click “Custom fields” under the “Product data” panel.
- Configure “Field group layout” settings. It is to specify the position of the label or a field note if any. Also, it helps to mark a field as mandatory.
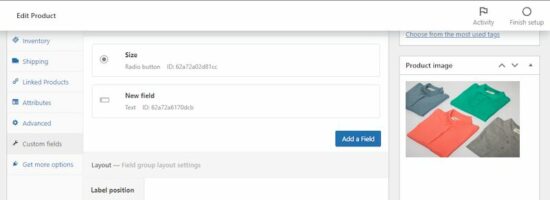
- Select “Add the first field” or “Add field” and specify field type, label, and all.
- Add conditional rules to add dependencies between fields to be displayed.
This is the WooCommerce admin interface to add the custom fields for products. I have added the Size option for the product as a ratio group.
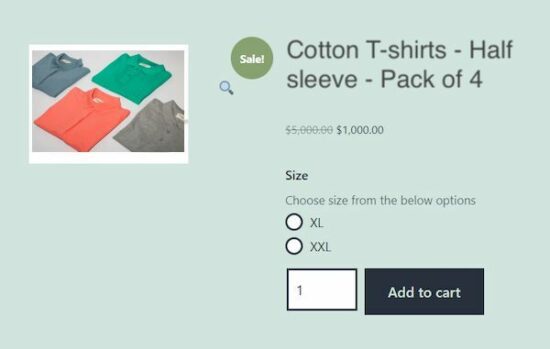
This will show the added custom field on the product front end as a radio option.
2. Product Addons for WooCommerce
This plugin says the purpose clearly by its name itself. Yes, it is to add more add-on fields to let the customer interact with the shop to personalize the purchase.
An easy custom form builder allows for building a field group for the WooCommerce shop pages. Have a look at the version and other details below.
| WordPress Version | 4.0 or higher |
| Active installations | 30,000+ |
| PHP version | 5.6 or higher |
| Last updated at | 3 weeks ago |
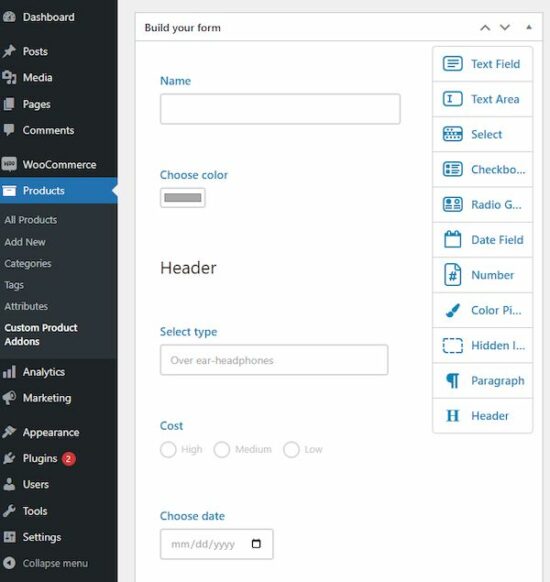
Download this plugin from the WordPress repository linked. The plugin provides a drag-and-drop interface to build custom field groups for products.
Features
- Capable of personalizing the purchase order.
- It saves the customer’s personalized data via a custom field added for products in the backend.
- For builder helps to design a group of the custom fields.
- Allows more types of fields like text, number and email fields, combo fields and all.
- In the base version, it allows adding <p> and <h*> tags to display product meta in the front end.
Steps to use
There are a few steps to add and display a custom field on a product page of a WooCommerce theme.
- Go to Products->Custom Product Addons via the WordPress admin menu.
- Add a new form of product custom fields group and publish it.
- Go to Products and open a new or edit product panel.
- Choose “Custom Product Options” from the Product data group.
- Check the form to add a mapping between custom fields and products.
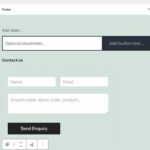
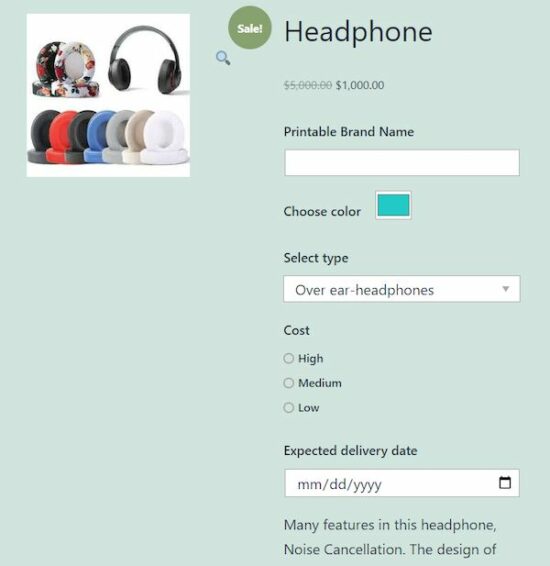
See the following two screenshots to add custom fields and map them for the product.
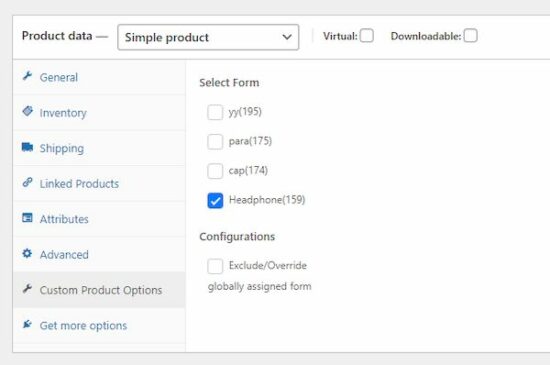
Then, the WooCommerce shop will show the custom fields on the single product page.
3. Advanced Custom Fields
It supports full control of the WordPress edit screen and custom form data.
| WordPress Version | 4.7 or higher |
| Active Installations | 2+ million |
| PHP Version | 5.6 or higher |
| Last updated | 6 days ago |
The simple and intuitive plugin has powerful functions and over 30 field types
Features
- It provides powerful functions to customize and add custom fields for the product
- Good and simple backend interface to add custom field group on a need basis.
- Supports 30+ field types to set more data apart from the standard custom product fields.
Steps to customize
Download or install via admin to enable this plugin before going to read the below steps.
- Add and customize the field group.
- Add form fields into the group.
- Add data for the custom fields on the product page.
- Display the product information on the front end.
Step 1: Add and customize field group
Go to Custom Fields via the admin menu. Add a new field group and specify the UI location and other settings.
It helps to set states and styles to add and show the custom fields on a product page. It manages the relative position and alignment of the field on the UI.
Fields can also be mapped for posts, products, pages and more.
Step 2: Add form fields into the group
The field add interface allows the following data to enter. For combo fields, it asks to enter multiple options to the loaded.
- label, name, type.
- Field notes or helps text.
- If the field is required or not.
- Place holder and default value.
- Content to prepend or append.
- Character restriction, Rules.
- Field wrapper classes or ids.
Step 3: Add data for the custom fields based on products
If the custom field group is mapped for the location of product pages, then the add/edit page will show it.
Add the data for the custom fields which will be displayed on the WooCommerce product at the shop.
##image
Step 4: Display the product information on the front-end
Then display the custom fields data on the product single page at the front-end.
In this plugin, we need to add a simple shortcode to display the custom fields on the product page.
The [acf field=”<field-id or slug>”] shortcode is used for displaying the custom field group.
There are a couple of functions in WordPress to display the fields for a WooCommerce product.
<php
the_field("<field-id or slug>");
?>
or
<php
$customFieldGroup = get_field("<field-id or slug>");
echo $customFieldGroup;
?>
Method 2: Adding custom fields via the program
Thus, we have seen how to add product custom fields in a WooCommerce platform using plugins. If you want to implement the same without using plugins, it’s very simple with a few steps.
These steps render the custom fields on the WooCommerce product page. After collecting the user inputs in the product page, the custom code will display them on the cart page.
Steps to implement this method by adding custom code are listed below.
- Add a custom field in the product data panel on the WooCommerce admin.
- Save added custom field data into cart metadata.
- Display an input field in a product single page.
- Passing the values on the cart and checkout pages.
Add this custom code in the WordPress active theme’s function.php file.
1. Adding custom fields in the product data panel
Create code for displaying custom fields in the WooCommerce product data panel. The woocommerce_product_options_general_product_data hook is used to call this code.
/* Add product meta field for the WooCommerce admin */
function woocommerce_custom_select_dropdown(){
    $select = woocommerce_wp_select(array(
        'id' => '_select_color',
        'label' =>__('Select color', 'woocommerce'),
        'options' => array(
            'Black' => __('Black','woocommerce'),
            'Blue' => __('Blue','wooocommerce'),
            'Pink'=> __('Pink','woocommerce')
        ),

    ));
}
add_action('woocommerce_product_options_general_product_data', 'woocommerce_custom_select_dropdown');
This example adds a dropdown as a custom field for products. So, it uses the woocommerce_wp_select function to set the following parameters.
- id
- label
- description
- desc_tip
- options
There are similar functions to add other types of form fields. For example,
- woocommerce_wp_textarea_input
- woocommerce_wp_checkbox
- woocommerce_wp_hidden_input
2. Save the user input in the custom fields to cart metadata.
Then, another action hook is added to save the custom field value on the product meta. This will be called on saving the product details. It calls the woocommerce_process_product_meta action and hooks the handler.
/* Save custom field data for the product */
function woocommerce_product_custom_fields_save($post_id)
{
    $woocommerce_select_color_field = $_POST['_select_color'];
    if (!empty($woocommerce_select_color_field)) {
        update_post_meta($post_id, '_select_color', esc_attr($woocommerce_select_color_field));
    }
}
add_action('woocommerce_process_product_meta', 'woocommerce_product_custom_fields_save');
3. Display an input field in a product single page
In this section, it prepares an add-on field HTML if the product meta is not empty.
First, the admin chooses and saves the product color option. Then this code will add a dropdown field on the product single page.
It reads the current product meta with the reference of the global post object. Then, it fetches the product meta by the custom field id.
In the WooCommerce product page, this custom field is added before the cart button. It is because of hooking the action woocommerce_before_add_to_cart_button to call this handler.
/* Show add-on field based on the saved custom field */
function woocommerce_display_select_option_value()
{
    global $post;
    $product = wc_get_product($post->ID);
    $select_option_title_field = $product->get_meta('_select_color');

    if ($select_option_title_field) {
        printf('
<div><select name="color_option" class="input-text text">
<option value="Default Color">Default Color</option>
<option value="' . $select_option_title_field . '">' . $select_option_title_field . '</option> </select></div>', esc_html($select_option_title_field));
    }
}
add_action('woocommerce_before_add_to_cart_button', 'woocommerce_display_select_option_value');
4. Display the selected option in the cart and checkout pages
The following filter hooks handle the functions to display the selected custom option. It has the cart and checkout pages as its target to render the UI component.
This code is triggered on loading the cart item data. It calls the filter hook woocommerce_add_cart_item_data and displays the selected custom field value.
It adds the data into the cart item array which will be later used in the checkout page UI.
/*  Display selected option in the cart */
function woocommerce_add_custom_field_item_data($cart_item_data, $product_id)
{
    if (! empty($_POST['color_option'])) {
        $cart_item_data['select_field'] = $_POST['color_option'];
    }
    return $cart_item_data;
}
add_filter('woocommerce_add_cart_item_data', 'woocommerce_add_custom_field_item_data', 10, 2);
This is to parse the cart item array and display the custom field value on the checkout page.
It uses the woocommerce_cart_item_name hook to do this change in the checkout UI.
/*  Display selected option in the checkout */
function woocommerce_cart_display($name, $cart_item, $cart_item_key)
{
    if (isset($cart_item['select_field'])) {
        $name .= sprintf('<p>%s</p>', esc_html($cart_item['select_field']));
    }
    return $name;
}
add_filter('woocommerce_cart_item_name', 'woocommerce_cart_display', 10, 3);
Conclusion
Thus, we have seen both methods to add custom fields to products. It is with or without plugins to enable WooCommerce product custom fields.
I hope, this article gives a basic knowledge in this area. Also, it might help you to understand and replicate the steps to customize your shop.