Building an eCommerce website will be very easy with WordPress and WooCommerce. There are many eCommerce CMS available in the market. As being a long-running content management system, the WordPress has been getting more familiar than other CMS. So, most of us prefer WordPress and WooCommerce for creating a shopping cart application in PHP. With these two CMS, the eCommerce website development is a matter of 15 minutes.
A simple shopping cart system should have three major parts. Product catalog and descriptive page, Cart flow and payment options. By installing the WooCommerce theme and plugin it will change our WordPress website capable of selling products. We need to take care of some minor configuration to make it presentable to the users.
First, make sure that you have WordPress installed in your machine otherwise install it. In a previous tutorial, we have seen how to install WordPress in a few seconds easily. After installing and login to the WordPress admin, the steps in the coming section will help you to create a phenomenally good shopping cart software.
Steps to set up an eCommerce website
- Install and Activate WooCommerce Theme
- Install WooCommerce Plugin
- Create and Manage Products
- Set up Web Store Front Page
- Create Exclusive Gallery Page
1) Install and Activate WooCommerce Theme
Choose a best WooCommerce theme and install it by using WordPress admin. In a previous tutorial, we have seen how to create a minimal WordPress theme. In this demonstration, I have used the Storefront theme. After installing the theme, activate and customize it to build your online store.
The activated theme can be customized by navigating through the Appearance->Themes navigation. Create your storefront and logo and customize it by using WordPress admin.
We can also make our existing theme eCommerce Ready. It can be done by making changes with the theme files or by adding the child theme. Previously, we have seen how to make a theme translation ready.
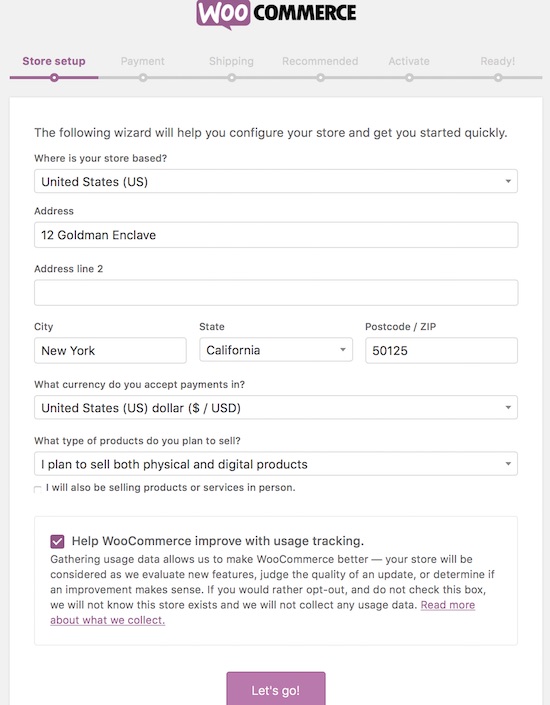
2) Install WooCommerce Plugin
WooCommerce is a popular WordPress plugin having more than 4 million active installations. It provides the best eCommerce solution and many active online stores are running with it at the backend.
It provides many add-ons like product management, in-built cart system, shipping methodologies, payment options and more. By installing and activating this plugin, it will ask for filling up some basic configurations with a wizard-like settings form.
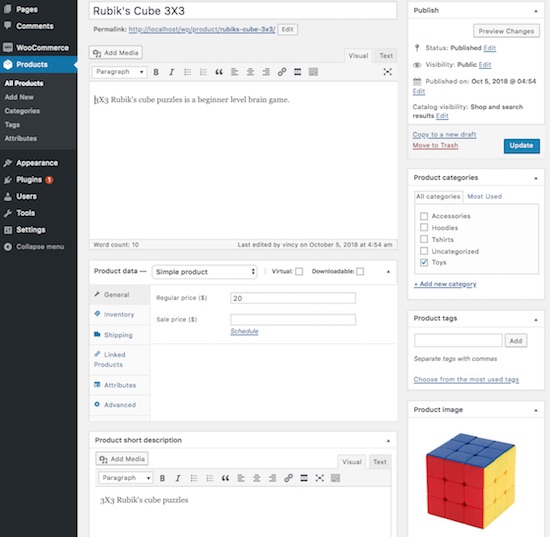
3) Create and Manage Products
By installing the WooCommerce plugin, the product menu link can be seen among the WordPress admin menu navigation links. By using this menu, we can create new products and manage them by accordingly.
In the product add/edit page, it contains fields to enter product title, long/short description, price. Also, it has an option to choose product image and select category as like as the post/page form. The product management interface has many other eCommerce features to mark products as a featured one.
4) Set up Web Store Front Page
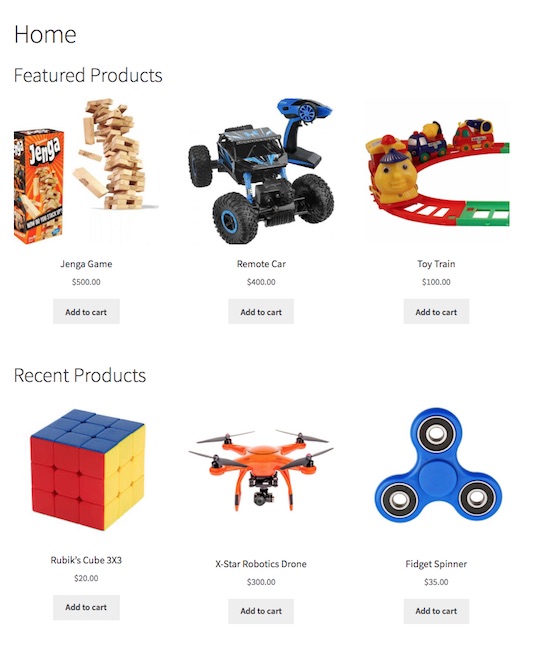
Create a WordPress page which is going to be configured as an eCommerce storefront. The storefront generally shows the popular, featured or best selling products. The WooCommerce plugin provides shortcodes to show featured products, recent products or the products in a particular category. Below screenshot shows how to use these shortcodes to display products in the front page.

The following steps will be used to configure the eCommerce website home page.
- Go to Appearance->Customize.
- Select Homepage Settings from the WordPress theme customization menu.
- Choose Static Page radio option and select the page from the dropdown in which the featured/recent products are displayed by using the WooCommerce shortcodes.
After publishing the front page, go to the eCommerce end-user site and it will look like,
Instead of using the shortcodes in the content area, we can also display front page content by using custom code. For that, we need to create a WordPress page template then choose this template while creating the storefront.
In this template file, we need to query the product database by using WooCommerce and wp instance. The WooCommerce instance will be used to create Meta Query and TAX Query. The following code shows the wp query and product data iteration to display products from the database.
$meta_query  = WC()->query->get_meta_query();
$tax_query   = WC()->query->get_tax_query();
$tax_query[] = array(
    'taxonomy' => 'product_visibility',
    'field'    => 'name',
    'terms'    => 'featured',
    'operator' => 'IN',
);

$args = array(
    'post_type'           => 'product',
    'post_status'         => 'publish',
    'nopaging'               => true,
    'posts_per_page'         => '3',
    'meta_query'          => $meta_query,
    'tax_query'           => $tax_query,
);
$query = new WP_Query($args);
if ( $query->have_posts() ) {
    while ( $query->have_posts() ) {
        // Product Tile UI
    }
}
5) Create Exclusive Gallery Page
In a previous tutorial, we have seen how to create an image gallery in WordPress. In a WooCommerce platform, the gallery page is very important to showcase the available products. If you want to know the importance of the gallery in a shopping cart application the top 10 factors listed in the linked article will really be a value-add for you.
By using the StoreFront theme, it has a Shop menu that shows the product gallery. If you want to create a gallery page as your own, you can obtain this by using WooCommerce supported shortcodes or page templates as we have done for designing the home page in the above section.
Default WooCommerce Shopping Cart Flow Until Payment
Most of the WooCommerce themes have come up with the basic cart system by having reasonably important features. While activating the WooCommerce plugin, the configurations are made related to the cart and the payment settings. With these configurations, the cart flow from the add-to-cart action to payment process will be a default.
The StoreFront theme shows the eCommerce webpage menu that is used to navigate to the Shop, Cart and Checkout pages. The Product gallery and individual page, both contain the add-to-cart option. The added cart items can be seen on the cart page. The cart page has the option to edit the product quantity and apply coupon. On checkout, the payment option has to be chosen and the shipping information is required to place an order.
With more customization on the theme and with the advanced configuration on the eCommerce settings, we can build a full-fledged effective shopping cart.