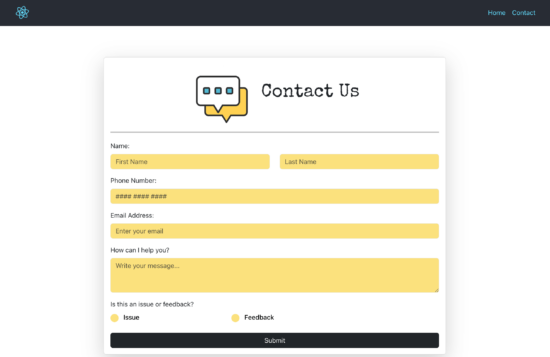
This React example renders Contact Form component to the front end. It is for collecting inquiries or feedback from your website users. This React component uses Bootstrap, React-Bootstrap to design the front-end. It includes form validation, and API call via Axios.
In this simple contact form script, the React Router DOM imported to support navigation with a single page app. There are two pages, home and contact pages with corresponding routes.
Installation
Create a new React app using CRA or any other scaffolding tool. And then, run the below packages that are the dependancies of the React contact form component.
npm install react-router-dom

npm install react-bootstrap bootstrap react-toastify axios
Create React routes for contact pages
This React entry point JS uses Router packages to define routes. The main function returns Router JSX with path-element mappings.
Each <Route /> specifies the page URL and the corresponding component to be rendered.
This will support client-side routing to switch between content without page refresh.
App.js
import './App.css';

import { BrowserRouter as Router, Routes, Route, Link } from "react-router-dom";
import ContactForm from "./views/ContactForm";
import AppHeader from "./views/AppHeader";

function Home() {
  return (
    <div>
      <h2>Home Page</h2>
      <p>Welcome to the Home Page!</p>
    </div>
  );
}

function App() {
  return (
    <Router>
      <div className="App">
        <AppHeader />
        <main>
          <Routes>
            <Route path="/" element={<Home />} />
            <Route path="/contact" element={<ContactForm />} />
          </Routes>
        </main>
      </div>
    </Router>
  );
}

export default App;
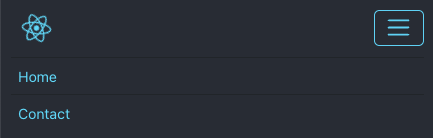
Contact Form AppHeader
The above JSX uses AppHeader component to load above the React contact form. This example provides a simple header with navigation links and site logo.
This is is a responsive header that will make the navigation links in a slide down menu on a mobile view.
views/AppHeader.jsx
import React from "react";
import { Navbar, Nav, Container } from "react-bootstrap";
import "bootstrap/dist/css/bootstrap.min.css";
import logo from "../assets/images/logo.svg";

function AppHeader() {
  return (
    <Navbar expand="lg" className="app-header">
      <Container>
        {/* Logo */}
        <Navbar.Brand href="/">
          <img
            src={logo}
            alt="logo"
            className="App-logo d-inline-block align-top"
            style={{ height: "40px" }}
          />
        </Navbar.Brand>

        {/* Collapse button (for mobile) */}
        <Navbar.Toggle aria-controls="basic-navbar-nav" />

        {/* Nav links */}
        <Navbar.Collapse id="basic-navbar-nav">
          <Nav className="ms-auto">
            <Nav.Link href="/" data-discover="true">
              Home
            </Nav.Link>
            <Nav.Link href="/contact" data-discover="true">
              Contact
            </Nav.Link>
          </Nav>
        </Navbar.Collapse>
      </Container>
    </Navbar>
  );
}

export default AppHeader;
Contact form React component
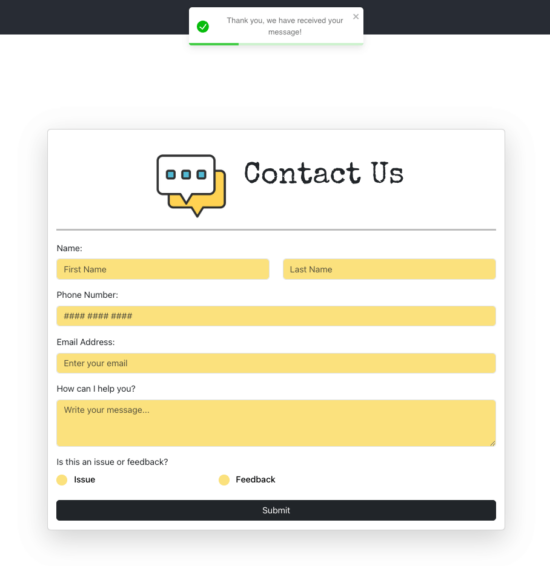
This contact form component includes basic fields. All fields are required to post the form to the API endpoint.
It uses react-bootstrap for rendering the front-end elements like Form, Button, Card and more.
This React UI imports react-toastify packages to display the error and success notification in a <ToastContainer />.
views/ContactForm.jsx
import React, { useState } from "react";
import { Form, Button, Container, Row, Col, Card } from "react-bootstrap";
import "bootstrap/dist/css/bootstrap.min.css";
import { ToastContainer, toast } from "react-toastify";
import "react-toastify/dist/ReactToastify.css";
import axios from "axios";
import "./../assets/css/contact-form.css";
import imgContactHeader from "../assets/images/contact.png";

function ContactForm() {
  const [formData, setFormData] = useState({
    firstName: "",
    lastName: "",
    phone: "",
    email: "",
    message: "",
    issue: "",
  });

  const handleChange = (e) => {
    const { name, value } = e.target;
    setFormData({ ...formData, [name]: value });
  };

  const validateForm = () => {
    // Validation here
  };

  const handleSubmit = (e) => {
    // Handle form submit here
  };

  return (
    <Container className="d-flex justify-content-center align-items-center min-vh-100">
      <Row className="w-100">
        <Col md={8} className="mx-auto">
          <Card className="shadow-lg">
            <Card.Body className="p-3">
              <div className="contact-header">
                <img
                  src={imgContactHeader}
                  alt="contact"
                  className="contact-icon"
                />
                <h1 className="contact-title">Contact Us</h1>
              </div>

              <hr className="custom-hr" />
              <Form onSubmit={handleSubmit}>
                <Form.Group className="mb-3">
                  <Form.Label className="d-block">Name:</Form.Label>
                  <Row>
                    <Col>
                      <Form.Control
                        type="text"
                        name="firstName"
                        value={formData.firstName}
                        onChange={handleChange}
                        placeholder="First Name"
                        style={{ backgroundColor: "#fbe17d" }}
                      />
                    </Col>
                    <Col>
                      <Form.Control
                        type="text"
                        name="lastName"
                        value={formData.lastName}
                        onChange={handleChange}
                        placeholder="Last Name"
                        style={{ backgroundColor: "#fbe17d" }}
                      />
                    </Col>
                  </Row>
                </Form.Group>
                <Form.Group className="mb-3">
                  <Form.Label>Phone Number:</Form.Label>
                  <Form.Control
                    type="tel"
                    name="phone"
                    value={formData.phone}
                    onChange={handleChange}
                    placeholder="#### #### ####"
                    style={{ backgroundColor: "#fbe17d" }}
                  />
                </Form.Group>
                <Form.Group className="mb-3">
                  <Form.Label>Email Address:</Form.Label>
                  <Form.Control
                    type="email"
                    name="email"
                    value={formData.email}
                    onChange={handleChange}
                    placeholder="Enter your email"
                    style={{ backgroundColor: "#fbe17d" }}
                  />
                </Form.Group>
                <Form.Group className="mb-3">
                  <Form.Label>How can I help you?</Form.Label>
                  <Form.Control
                    as="textarea"
                    rows={3}
                    name="message"
                    value={formData.message}
                    onChange={handleChange}
                    placeholder="Write your message..."
                    style={{ backgroundColor: "#fbe17d" }}
                  />
                </Form.Group>

                <Form.Group className="mb-4">
                  <Form.Label>
                    Is this an issue or feedback?
                  </Form.Label>
                  <div className="radio-group">
                    <Form.Check
                      inline
                      type="radio"
                      name="issue"
                      label="Issue"
                      value="Issue"
                      onChange={handleChange}
                      checked={formData.issue === "Issue"}
                      className="custom-radio me-3"
                    />
                    <Form.Check
                      inline
                      type="radio"
                      name="issue"
                      label="Feedback"
                      value="Feedback"
                      onChange={handleChange}
                      checked={formData.issue === "Feedback"}
                      className="custom-radio"
                    />
                  </div>
                </Form.Group>
                <Button type="submit" variant="dark" className="w-100">
                  Submit
                </Button>
              </Form>
            </Card.Body>
          </Card>
        </Col>
      </Row>
      <ToastContainer
        position="top-center"
        autoClose={3000}
        toastClassName="text-center small"
      />
    </Container>
  );
}

export default ContactForm;
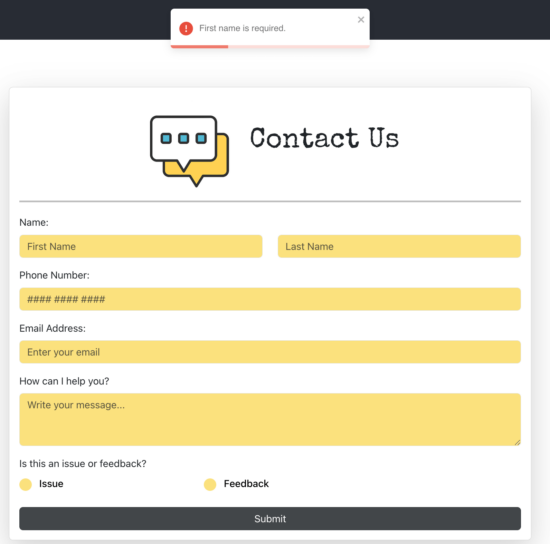
Contact form validation
This is a simple JS validation ladder that checks the data entered by the user. Then, it confirms that the data is not empty and in a correct format. The phone number and email data are sent to a format validation process. The format validation uses regular expression to match the format.
const validateForm = () => {
  let errors = [];

  if (!formData.firstName.trim()) {
    errors.push("First name is required.");
  }
  if (!formData.lastName.trim()) {
    errors.push("Last name is required.");
  }
  if (!formData.phone.trim()) {
    errors.push("Phone number is required.");
  } else if (!/^[0-9]{10}$/.test(formData.phone)) {
    errors.push("Phone number must be 10 digits.");
  }
  if (!formData.email.trim()) {
    errors.push("Email is required.");
  } else if (!/^[^\s@]+@[^\s@]+\.[^\s@]+$/.test(formData.email)) {
    errors.push("Invalid email format.");
  }
  if (!formData.message.trim()) {
    errors.push("Message is required.");
  }
  console.log();
  return errors;
};
Submit contact via API call
The React ContactForm component defines a callback to handle the form-submit action. It bundles the submitted data and sends it to API via Axios.
When user enters data on each field, the handleChange() function prepares the contact form action parameters. And, it will update the state of the formData.
const handleSubmit = (e) => {
  e.preventDefault();

  const errors = validateForm();
  if (errors.length > 0) {
    toast.error(errors[0]);
    return;
  }

  axios
    .post("http://localhost/react-contact-api/contact.php", formData)
    .then((res) => {
      if (res.data.success) {
        toast.success(res.data.message);
        setFormData({
          firstName: "",
          lastName: "",
          phone: "",
          email: "",
          message: "",
          issue: "",
        });
      } else {
        toast.error(res.data.error || "Something went wrong.");
      }
    })
    .catch(() => {
      toast.error("Server error. Please try again.");
    });
};
API endpoint to send contact mail
Create a server environment to put this PHP API endpoint files. This code will be familiar to most of you reading this tutorial.
This PHP program validates the formdata received from the React app. After validation, it sends the email via simple PHP mail(). You can also integrate PhpMailer library to replace the built-in mail().
Note: After creating the API, update the API URL in the Axios script created for the React ContactForm component.
/path-to-api/contact.php
<?php
header("Access-Control-Allow-Origin: http://localhost:3000");
header("Access-Control-Allow-Methods: POST, GET, OPTIONS");
header("Access-Control-Allow-Headers: Content-Type");

if ($_SERVER['REQUEST_METHOD'] === 'OPTIONS') {
    http_response_code(200);
    exit();
}

$data = json_decode(file_get_contents("php://input"), true);

// Validation function
function validateForm($data) {
    $errors = [];

    if (empty($data['firstName']))
         $errors[] = "First name is required.";

    if (empty($data['lastName']))
         $errors[] = "Last name is required.";

    if (empty($data['phone']) || !preg_match("/^[0-9]{10}$/", $data['phone']))
         {
        $errors[] = "Phone number must be 10 digits.";
      }
    if (empty($data['email']) || !filter_var($data['email'], FILTER_VALIDATE_EMAIL)) {
        $errors[] = "Valid email is required.";
    }
    if (empty($data['message'])) $errors[] = "Message is required.";

    return $errors;
}

$errors = validateForm($data);

if (!empty($errors)) {
    echo json_encode([
        "success" => false,
        "errors" => $errors
    ]);
    exit;
}

$to = "yourmail@domain.com";
$subject = "New Contact Form Message";
$body = "Name: {$data['firstName']} {$data['lastName']}\n".
        "Phone: {$data['phone']}\n".
        "Email: {$data['email']}\n".
        "Message:\n{$data['message']}";
$headers = "From: {$data['email']}";

$mailSent = mail($to, $subject, $body, $headers);

if ($mailSent) {
    echo json_encode(["success" => true, "message" => "Thank you, we have received your message!"]);
} else {
    echo json_encode(["success" => false, "error" => "Failed to send email."]);
}
?>
Thus, we have created a beautiful contact form component using React. We handled the form validation and alert the user with a rich toast message window. The validation handled in both client and server-side increases the security.
References