There are many payment services available in the market. For example, PayPal, Stripe, Sage Pay, CCAvenue, and more. They are to integrate a payment gateway into an application.
All provide API to access the payment services via the gateway. Stripe is one of the most widely used payment gateways among the available options. It is famous for doing smooth transactions with credit and debit cards.
By integrating payment gateway API, we can enable payment options in an application.
We need to choose a popular payment provider with a good reputation since it involves real money. It is for having professional support and trustworthiness. Stripe will be the best option to have guaranteed transactions.
About this example
This article will show how to integrate the Stripe payment gateway into a PHP application. It contains an example code to create a one-time payment option in PHP.
It implements Stripe’s custom form method to allow payment. Stripe provides a less code, hosted checkout method for accepting one-time payments.
In a previous tutorial, we have seen the PayPal payment method in PHP. If you are looking for a code PayPal payment gateway integration, the linked article will be helpful.
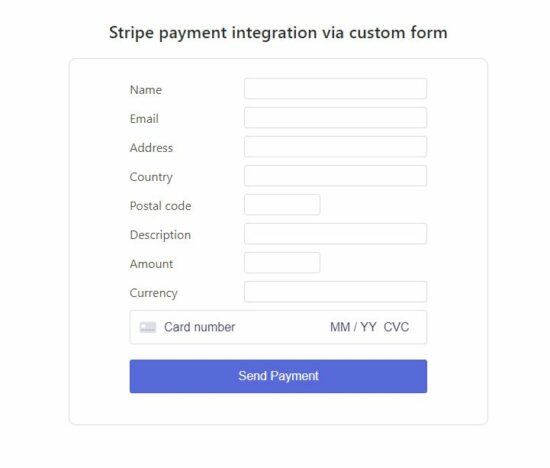
The below screenshot shows the custom form with the Stripe card element. It allows users to enter their billing and card details to make the payment.
Stripe.js mounts the UI element to accept the customer’s card details. It hits the endpoint URL and sends the payment request to the API. The API keys are used for authentication before processing the payment.
Steps to integrate the Stripe payment gateway
- Create a Stripe account and log in to get the API keys.
- Create a payment form and render the Stripe element to get the user’s card details.
- Include Stripe.js to validate, create and confirm card payment in a secure way
- Process Stripe payment requests in PHP.
- Create and configure webhook to notify the response.
- Parse the payment response object and store it in a database.
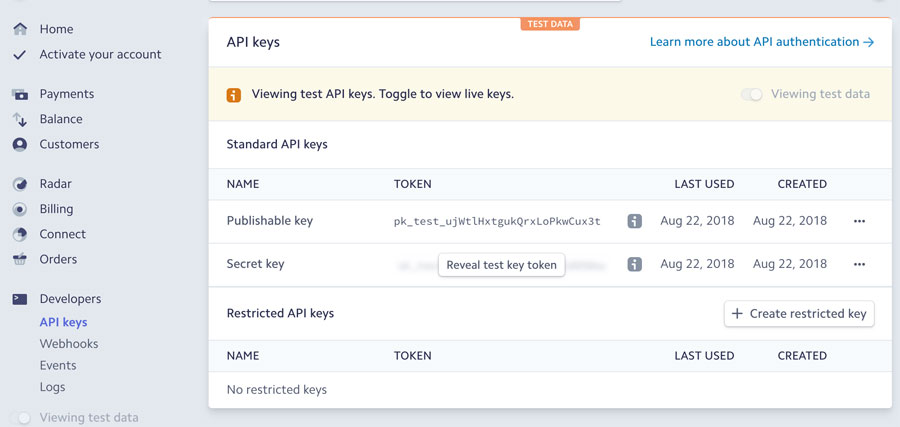
1. Create a Stripe account and get API keys
Create a Stripe account and log in to the dashboard. Navigate through the Developers -> API keys menu to get the API keys. There is two types of standard API keys named secret key and publishable key. The secret key will be masked by default which has to be revealed by clicking reveal key token control explicitly.
These keys are stored in a config file as PHP constants and will be used in the Stripe payment code later.
2. Create a payment form and render a Stripe element to get the user’s card details
This HTML form includes fields like cardholder name, card number, CVC, and expiration month/year to get the user input. We have already created this form with such fields for the credit card validator example. It also includes the item_number, item_name, amount, and currency_code as the hidden input.
Stripe API recommends using tokens instead of submitting test card details while testing the Payment integration. The test tokens are mapped with the tokenized card details using the Stripe JavaScript library.
payment-form-ui.php
<?php
namespace Phppot;

require_once __DIR__ . '/config.php';
$currencies = Config::getCurrency();
$country = Config::getAllCountry();

?>
<h1>Stripe payment integration via custom form</h1>
<div class="phppot-container">
    <div id="payment-box"
        data-consumer-key="<?php echo Config::STRIPE_PUBLISHIABLE_KEY; ?>"
        data-create-order-url="<?php echo Config::CREATE_STRIPE_ORDER;?>"
        data-return-url="<?php echo Config::THANKYOU_URL;?>">
        <div class="row">
            <div class="label">
                Name <span class="error-msg" id="name-error"></span>
            </div>
            <input type="text" name="customer_name" class="input-box"
                id="customer_name">
        </div>
        <div class="row">
            <div class="label">
                Email <span class="error-msg" id="email-error"></span>
            </div>
            <input type="text" name="email" class="input-box" id="email">
        </div>
        <div class="row">
            <div class="label">
                Address <span class="error-msg" id="address-error"></span>
            </div>
            <input type="text" name="address" class="input-box"
                id="address">
        </div>
        <div class="row">
            <div class="label">
                Country <span class="error-msg" id="country-error"></span>
            </div>
            <input list="country-list" name="country" class="input-box"
                id="country">
            <datalist id="country-list">
                <?php foreach ($country as $key => $val) { ?>
             <option value="<?php echo $key;?>"><?php echo $val;?></option>
                <?php }?>
                    </datalist>
        </div>
        <div class="row">
            <div class="label">
                Postal code <span class="error-msg" id="postal-error"></span>
            </div>
            <input type="text" name="postal_code" class="input-box"
                id="postal_code">
        </div>
        <div class="row">
            <div class="label">
                Description <span class="error-msg" id="notes-error"></span>
            </div>
            <input type="text" name="notes" class="input-box" id="notes">
        </div>
        <div class="row">
            <div class="label">
                Amount <span class="error-msg" id="price-error"></span>
            </div>
            <input type="text" name="price" class="input-box" id="price">
        </div>
        <div class="row">
            <div class="label">
                Currency <span class="error-msg" id="currency-error"></span>
            </div>
            <input list="currency-list" name="currency"
                class="input-box" id="currency">
            <datalist id="currency-list">
            <?php foreach ($currencies as $key => $val) { ?>
             <option value="<?php echo $key;?>"><?php echo $val;?></option>
                <?php }?>
                    </datalist>

        </div>
        <div class="row">
            <div id="card-element">
                <!--Stripe.js injects the Card Element-->
            </div>
        </div>
        <div class="row">
            <button class="btnAction" id="btn-payment"
                onclick="confirmOrder(event);">
                <div class="spinner hidden" id="spinner"></div>
                <span id="button-text">Send Payment</span>
            </button>
            <p id="card-error" role="alert"></p>
        </div>

    </div>
        <?php
        if (! empty($_GET["action"]) && $_GET["action"] == "success") {
            ?><div class="success">Thank you for the payment.</div>
    <?php
        }
        ?>

<script src="https://js.stripe.com/v3/"></script>
    <script src="./assets/js/card.js"></script>
3. Include Stripe.js to validate, create and confirm card payments in a secure way
On submitting the card details, the entered data will be validated on the client-side. Once the validation returns true, the card details will be sent to the get Stripe server to get a token. The Stripe API will return the token and be added to the payment form fields using Stripe ResponseHandler. This is the most welcoming feature of the Stripe payment handling card details and validation with the Stripe server via JavaScript.
After inserting the token, the form will be submitted programmatically using the Javascript. While implementing Sage Pay payment integration, we have seen how to send payment requests using JavaScript.
var stripeKey = document.querySelector('#payment-box').dataset.consumerKey;
var createOrderUrl = document.querySelector('#payment-box').dataset.createOrderUrl;
var returnUrl = document.querySelector('#payment-box').dataset.returnUrl;
var stripe = Stripe(stripeKey);
var elements = stripe.elements();
var style = {
	base: {
		color: "#32325d",
		fontFamily: 'Arial, sans-serif',
		fontSmoothing: "antialiased",
		fontSize: "16px",
		"::placeholder": {
			color: "#32325d"
		}
	},
	invalid: {
		fontFamily: 'Arial, sans-serif',
		color: "#fa755a",
		iconColor: "#fa755a"
	}
};
var card = elements.create("card", {
	hidePostalCode: true,
	style: style
});
// Stripe injects an iframe into the DOM
card.mount("#card-element");
card
	.on(
		"change",
		function(event) {
			// Disable the Pay button if there are no card details in
			// the Element
			document.querySelector("button").disabled = event.empty;
			document.querySelector("#card-error").textContent = event.error ? event.error.message
				: "";
		});

function confirmOrder(event) {
	var valid = formValidate();
	if (valid) {
		var purchase = {
			email: document.getElementById("email").value,
			notes: document.getElementById("notes").value,
			unitPrice: document.getElementById("price").value,
			currency: document.getElementById("currency").value,
			name: document.getElementById("customer_name").value,
			address: document.getElementById("address").value,
			country: document.getElementById("country").value,
			postalCode: document.getElementById("postal_code").value
		};

		// Disable the button until we have Stripe set up on the page
		// document.querySelector("btnSubmit").disabled = true;
		fetch(createOrderUrl, {
			method: "POST",
			headers: {
				"Content-Type": "application/json",

			},
			body: JSON.stringify(purchase)
		}).then(function(result) {
			return result.json();
		}).then(function(data) {
			// Complete payment when the submit button is clicked
			payWithCard(stripe, card, data.clientSecret, data.orderHash);
		});
		// Calls stripe.confirmCardPayment
		// If the card requires authentication Stripe shows a pop-up modal
		// to
		// prompt the user to enter authentication details without leaving
		// your
		// page.
		var payWithCard = function(stripe, card, clientSecret, orderHash) {
			loading(true);
			stripe.confirmCardPayment(clientSecret, {
				payment_method: {
					card: card
				}
			}).then(function(result) {
				if (result.error) {
					// Show error to your customer
					showError(result.error.message);
				} else {
					// The payment succeeded!
					orderComplete(result.paymentIntent.id, orderHash);
				}
			});
		};
		/* ------- UI helpers ------- */
		// Shows a success message when the payment is complete
		var orderComplete = function(paymentIntentId, orderHash) {
			loading(false);
			window.location.href = returnUrl + "?orderId=" + orderHash;
		};
		// Show the customer the error from Stripe if their card fails to
		// charge
		var showError = function(errorMsgText) {
			loading(false);
			var errorMsg = document.querySelector("#card-error");
			errorMsg.textContent = errorMsgText;
			setTimeout(function() {
				errorMsg.textContent = "";
			}, 10000);
		};
		// Show a spinner on payment submission
		var loading = function(isLoading) {
			if (isLoading) {
				// Disable the button and show a spinner
				document.querySelector("button").disabled = true;
				document.querySelector("#spinner").classList.remove("hidden");
				document.querySelector("#button-text").classList.add("hidden");
			} else {
				document.querySelector("button").disabled = false;
				document.querySelector("#spinner").classList.add("hidden");
				document.querySelector("#button-text").classList
					.remove("hidden");
			}

		};
	}
}
4. Process Stripe payment requests in PHP
Download Stripe PHP library, which is required for processing charges using PHP code. The payment-related functions are created in the PHP class StripePayment.php. It processes the Stripe charges by sending the API token and other payment request data like customer id, amount, currency, etc. After processing the payment request the Stripe API will return the payment response as a JSON object.
lib/StripeService.php
<?php
namespace Phppot;

use Stripe\Stripe;
use Stripe\WebhookEndpoint;
require_once __DIR__ . '/../vendor/autoload.php';
require_once __DIR__ . '/../Config.php';

class StripeService
{

    private $apiKey;

    private $stripeService;

    public function __construct()
    {
        require_once __DIR__ . '/../Config.php';
        $this->apiKey = Config::STRIPE_SECRET_KEY;
        $this->stripeService = new Stripe();
        $this->stripeService->setVerifySslCerts(false);
        $this->stripeService->setApiKey($this->apiKey);
    }

    public function createPaymentIntent($orderReferenceId, $amount, $currency, $email, $customerDetailsArray, $notes, $metaData)
    {
        try {
            $this->stripeService->setApiKey($this->apiKey);

            $paymentIntent = \Stripe\PaymentIntent::create([
                'description' => $notes,
                'shipping' => [
                    'name' => $customerDetailsArray["name"],
                    'address' => [
                        'line1' => $customerDetailsArray["address"],
                        'postal_code' => $customerDetailsArray["postalCode"],
                        'country' => $customerDetailsArray["country"]
                    ]
                ],
                'amount' => $amount * 100,
                'currency' => $currency,
                'payment_method_types' => [
                    'card'
                ],
                'metadata' => $metaData
            ]);
            $output = array(
                "status" => "success",
                "response" => array('orderHash' => $orderReferenceId, 'clientSecret'=>$paymentIntent->client_secret)
            );
        } catch (\Error $e) {
            $output = array(
                "status" => "error",
                "response" => $e->getMessage()
            );
        }
        return $output;
    }


    public function getToken()
    {
        $token = "";
        $codeAlphabet = "ABCDEFGHIJKLMNOPQRSTUVWXYZ";
        $codeAlphabet .= "abcdefghijklmnopqrstuvwxyz";
        $codeAlphabet .= "0123456789";
        $max = strlen($codeAlphabet) - 1;
        for ($i = 0; $i < 17; $i ++) {
            $token .= $codeAlphabet[mt_rand(0, $max)];
        }
        return $token;
    }

}
Create and configure a webhook to notify the response
Navigate to the Stripe Developers->Webhook menu in the dashboard. Then create a webhook endpoint URL to notify the payment event occurrences to the application.
The webhook creation window will require mapping events for the webhook endpoint. This example uses a webhook URL mapped for the events listed below.
- payment_intent.succeeded
- payment_intent.payment_failed
After creating the webhook endpoint in the dashboard, configure it in the application. It will be helpful for dynamic verification of the endpoint while requesting the API.
5. Parse the payment response object and store it in a database
The serialized JSON object is parsed to get the payment status and response. The details like email, item_number, item_name, payment status, and response are stored in the tbl_payment table by using the MySQL insert. I used the prepared statement with MySQLi for handling the database operations.
<?php
namespace Phppot;

use Stripe\Stripe;
use Stripe\WebhookEndpoint;
require_once __DIR__ . '/../vendor/autoload.php';

use Phppot\StripePayment;
\Stripe\Stripe::setApiKey('CLIENT_SECRET_KEY_HERE');

$json = file_get_contents("php://input");
$file = fopen("app.log", "a");

fwrite($file, $json);
$sig_header = $_SERVER['HTTP_STRIPE_SIGNATURE'];
$event = null;
try {
    $event = \Stripe\Webhook::constructEvent($json, $sig_header, "WEBHOOK_SECRET_HERE");
} catch (\UnexpectedValueException $e) {
    // Invalid payload
    http_response_code(400);
    exit();
} catch (\Stripe\Exception\SignatureVerificationException $e) {
    // Invalid signature
    http_response_code(400);
    exit();
}

if (! empty($event)) {

    $eventType = $event->type;
    fwrite($file, $event);

    $orderId = $event->data->object->metadata->order_id;
    $email = $event->data->object->metadata->email;
    $paymentIntentId = $event->data->object->id;
    $amount = $event->data->object->amount;
    $stripePaymentStatus = $event->data->object->status;

    if ($eventType == "payment_intent.payment_failed") {
        $orderStatus = 'Payement Failure';

        $paymentStatus = 'Unpaid';

        $amount = $amount / 100;

        require_once __DIR__ . '/../lib/StripePayment.php';
        $stripePayment = new StripePayment();

        $stripePayment->updateOrder($paymentIntentId, $orderId, $orderStatus, $paymentStatus, $stripePaymentStatus, $event);
    }
    if ($eventType == "payment_intent.succeeded") {
        /*
         * Json values assign to php variables
         *
         */
        $orderStatus = 'Completed';

        $paymentStatus = 'Paid';

        $amount = $amount / 100;

        require_once __DIR__ . '/../lib/StripePayment.php';
        $stripePayment = new StripePayment();

        $stripePayment->updateOrder($paymentIntentId, $orderId, $orderStatus, $paymentStatus, $stripePaymentStatus, $event);

        http_response_code(200);
    }
}

?>
Payment Database Structure
The following SQL script shows the query statement for creating the payment database table to store the payment data returned by the Stripe API after processing our payment request.
--
-- Table structure for table `tbl_payment`
--

CREATE TABLE `tbl_payment` (
  `id` int(11) NOT NULL,
  `order_hash` varchar(255) NOT NULL,
  `payer_email` varchar(100) NOT NULL,
  `amount` double(10,2) NOT NULL,
  `currency` varchar(25) NOT NULL,
  `payment_type` varchar(25) NOT NULL,
  `order_date` timestamp NOT NULL DEFAULT current_timestamp() ON UPDATE current_timestamp(),
  `order_status` varchar(25) NOT NULL,
  `notes` text NOT NULL,
  `name` varchar(25) NOT NULL,
  `address` varchar(255) NOT NULL,
  `country` varchar(25) NOT NULL,
  `postal_code` varchar(25) NOT NULL,
  `stripe_payment_intent_id` varchar(255) NOT NULL,
  `payment_status` varchar(25) NOT NULL,
  `stripe_payment_status` varchar(25) NOT NULL,
  `stripe_payment_response` text NOT NULL
) ENGINE=InnoDB DEFAULT CHARSET=utf8mb4;

--
-- Indexes for dumped tables
--

--
-- Indexes for table `tbl_payment`
--
ALTER TABLE `tbl_payment`
  ADD PRIMARY KEY (`id`);

--
-- AUTO_INCREMENT for dumped tables
--

--
-- AUTO_INCREMENT for table `tbl_payment`
--
ALTER TABLE `tbl_payment`
  MODIFY `id` int(11) NOT NULL AUTO_INCREMENT;
Testing with Stripe Payment Gateway
Find more test data in the Stripe API testing documentation. You can use the test card numbers to demonstrate Stripe payment integration.
Note: Before going live, we must test Stripe payment in test data mode. Once we find everything is working well with the test mode, it will be easy to go live by toggling the data mode.


This is great but do you have a Stripe v3 tutorial?
Will post it soon :-)
Article updated to V3.
Is this secure method as user card credentials can be manipulated by the site owner?
This is how Stripe works. It depends on the website and the site owner. User should choose to submit his card information or not to.
Looks like you are wish to see something where the user submits the card information when he is in Stripe domain. Like you see in majority of PayPal integrations.
Even PayPal has an option (it’s called PayPal Pro) where the website owner can have a custom form and get user card information.
Hello! Vincy,
I want to your help regarding stripe integration. Actually I have a stripe account for Accept Donation from donors but some international transaction not received always showing error .so please let me know how to working fast non 3d with stripe payment gateway.
Can you make a stripe html form for us. So that we can receive donation easier.
Sure I can work for you and make the Stripe payments accept International transactions. Let us take the conversation via my email.
Hello! Vincy,
Can you help me make a api thats has stripe v2 and v3 on it and also im having a problem that cvc:unchecked.I need it to run the doantion here in ph i dont have much knowledge in it.Can you help me??
Hi SimShen,
I provide freelance services. Sure get in touch with via my email and we can take things forward.
Good Tutorial.
I worked with almost the payment gateway. I just tried with stripe and also integrate split payment successfully. Its really great PG.
Thank you Pragnesh.
This is really helpful but do you have a Razorpay tutorial?
Hi Vishnu,
I will post Razorpay tutorial soon.
Nice Work … Very Helpful Tutorial…
Thank you Kuben.
Great tutorial!
How would I be able to charge to a specific product using the product code from Stripe?
Hi Bob,
Thank you.
Are you asking about selling a single product with Stripe integration?
Very good tutorial, it helped me a lot. Thank you.
Welcome Artist.
Thanks to PHPPot team doing good job
Thanks for this fantastic tutorial. Will this work for Stripe Connect too?
Hi Ben,
Thank you.
I will not work with Stripe Connect.
It is for making simple one-time payment for the Stripe own account.
For integrating Stripe Connect to allow split-payment, a different set of steps has to be done.
https://docs.stripe.com/connect
I have to develop a stripe payment gateway in woocommerce. how can I do it? is there any exact guide?
Hi Asad Khan,
Thank you for reading.
Check if this woocommerce tutorial contains what do you need.
https://phppot.com/woocommerce/woocommerce-stripe/
Great code work! I haven’t tested your code yet but I discovered after downloading your source code this file is missing /../vendor/autoload.php. Is this on purpose or how do I get the autoload file?
Blaise, you need to get it via running composer. It is a dependency.
Can see payment integration using any type of cryptocurrency
Sure Chris. I am planning to write on it soon.
I previously left a comment for help, but I figured out the issue. I had to rename some paths to config.php instead of Config.
Code works great though, very helpful thank you.
Welcome Art. Best wishes.
how to get autoload file? I also download the project but autoload file is missing
Hi Zark Abid,
After setting this project in your root, run this composer command in this project directory
composer require stripe/stripe-php
It will generate the required vendor/ directory with autoload.php
Hi.. how can i implement webhooks
Hi Sathibabu,
Create a webhook endpoint in this project to capture the payment events.
Then configure the webhook URL on the Stripe developer dashboard. Map which event has to be captured at the time of the callback.
for more details, the official link is
https://docs.stripe.com/webhooks/quickstart?lang=php
I was very much delighted to read your blog which was on payment gateways. Integrating payment gateways into a PHP website involves a series of steps. Here’s a general outline of the process:
1.Choose a Payment Gateway
2.Set Up an Account
3.Obtain API Credentials
4.Install Required Libraries or SDKs
5.Configure Webhooks (Optional)
6.Implement the Payment Flow
7.Test the Integration
8.Handle Responses
These are some points which I wanted to include in your article.
Thank you Julia.
Thanks!
Thanks so much…, really helpful and I love it.
Great code, it worked nice
How do i set the price.
Hi Victor wendu,
The amount field in the form is for setting the price.