Laravel is one of the popular PHP frameworks for building dynamic websites. It uses MVC architecture.
There are a lot of reasons to choose Laravel among the list of PHP frameworks available. One among them is its simplicity and beginners can learn it quickly.
Don’t worry if you are new to Laravel. This article will guide you on how to get started with the Laravel with a simple example project.
This example is to guide how to perform create, read, update, delete actions with a database.
We can separate this article into two sections.
- Creating a development environment to run a PHP Laravel example with database.
- Creating Laravel example to create, read, update and delete database records.
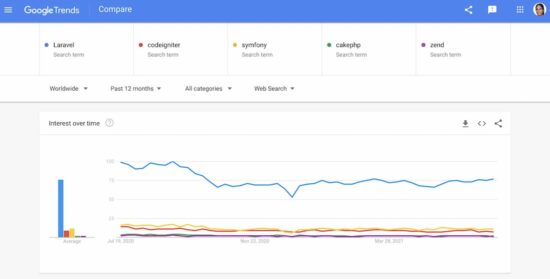
Laravel has a higher market share among other PHP frameworks. Also, it provides packages for building websites.
Prerequisite
This section tells the TODO to prepare the development to run a PHP Laravel app.
Make sure that you have a PHP ecosystem on your computer. Install latest PHP and MySQL or MariaDB with a webserver like Apache.
If you haven’t yet had PHP on your computer, the preference is to use any one of the stacks like WAMP, LAMP. I used XAMPP bundle to install PHP.
This example uses Laravel 8, the latest version as of now launched in September 2020. This article describes how to create a PHP Laravel app in the server root via Composer.
Part 1: Creating a development environment to run a PHP Laravel example with database.
These are the steps to create the development environment to run a PHP Laravel project.
- Creating Laravel app files
- Create database and schema
- Configure Laravel app environment
- Migrate schema into the database
- Start the development server
Step 1: Creating Laravel app files
Run the following command in your terminal window. It creates a PHP Laravel app in the development root path
composer create-project laravel/laravel php-laravel-project-crud
It creates the Laravel project php-laravel-project-crud in the MVC structure.
Step 2: Create database and schema
Create a database using PhpMyAdmin or any other clients you generally use. This example uses the php-laravel-crud database as configured in the app .env.
We have to use a migration command to prepare the database migration classes for the target tables. The syntax shows this command where the <table-name> is replacable.
php artisan make:migration create_<table-name>_table
Follow the convention for naming the PHP Laravel project tabel names.
- It should be in all-small letters.
- It should be in the plural form of the corresponding Model name
php artisan make:migration create_products_table
It will create a PHP Laravel migration class in the database/migrations path.
It had included the auto-generation id and timestamp by default. We have to modify it to add additional fields to the products database table. See the modification done with the Schema::create function.
2021_07_17_054329_create_products_table.php
<?php

use Illuminate\Database\Migrations\Migration;
use Illuminate\Database\Schema\Blueprint;
use Illuminate\Support\Facades\Schema;

class CreateProductsTable extends Migration
{
    /**
     * Run the migrations.
     *
     * @return void
     */
    public function up()
    {
        Schema::create('products', function (Blueprint $table) {
            $table->id();

            /* Add additional fields */
            $table->text('title');  // product title
            $table->text('description');   // description
            $table->text('short_notes');   // short notes
            $table->decimal('price', 10, 2); // price
            $table->text('image'); // product image
            $table->text('slug'); // product slug


            $table->timestamps();
        });
    }

    /**
     * Reverse the migrations.
     *
     * @return void
     */
    public function down()
    {
        Schema::dropIfExists('products');
    }
}
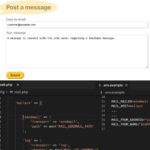
Step 3: Configure Laravel app environment
In the project root (For example <document-root>/php-laravel-project-crud) it contains a .env file.
It is the application configuration files to set the app name, home-url and others. See the database details configured with the .env below.
.env (Database Config)
DB_CONNECTION=mysql
DB_HOST=127.0.0.1
DB_PORT=3306
DB_DATABASE=php-laravel-crud
DB_USERNAME=root
DB_PASSWORD=
Step 5: Migrate schema into the database
This is to create tables into the database as defined. This CLI command will create tables corresponding to the migration classes schema defined.
php artisan migrate
Step 5: Start the development server
Thus we have the Laravel application files and database. So, the initial steps are done successfully.
Now, it’s time to start the development server to run the PHP Laravel application.
This command will do this and return the URL to run the application.
php artisan serve
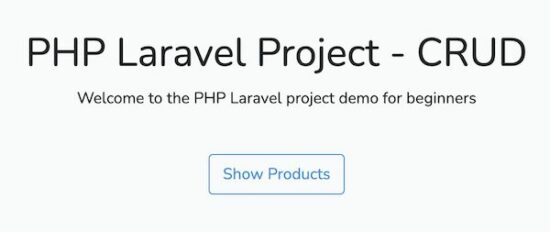
By running the returned URL it will render the welcome page a default landing page.
File Structure
Once the Laravel application is created, it has the following file structure. It shows the application files in the MVC structure.
The app directory includes the model, controller, HTTP/Console kernel and more files. The controller performs routing and the Model is more about backend logic.
The route-specific controller returns HTTP response in the form of UI views or anything.
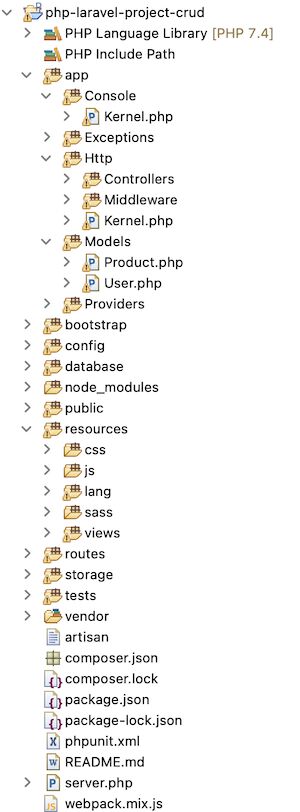
We will see how to create PHP Laravel project models and controllers. Those are for the product entity taken for example to create the database crud for beginners.
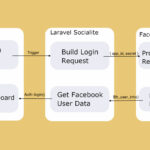
Request Flow
The following diagram shows the PHP Laravel project request flow life cycle. It shows the HTTP request-response cycle of a Laravel application. Laravel uses HTTP or console kernels based on the request.
This lifecycle diagram shows how the kernel gets ready to process the request. It loads the providers and defines the middleware required to process the request.
For example, the RouteServiceProvider loads all the routes created for the application. The routes are mapped with a corresponding middleware to filter requests. A middleware can be assigned to multiple routes.

Part 2: Creating Laravel example to create, read, update and delete database rows
We had a short and quick glance at the PHP Laravel framework structure and request handling. Let’s create a simple example to create, read, update and delete operations with a database.
Creating PHP Laravel Models, Controllers
Create Laravel project Model using the PHP artisan make:model command. Naming the model has the convention to let it be with singular words start with uppercase.
php artisan make:model Product
The above command will create the following Model class into the app/Model directory. It has an array of fillable fields protected from improper data entries.
The product add-form UI will show input for these three fields to accept user data.
<?php

namespace App\Models;

use Illuminate\Database\Eloquent\Factories\HasFactory;
use Illuminate\Database\Eloquent\Model;

class Product extends Model
{
    use HasFactory;

    protected $fillable = ['title', 'short_notes', 'price'];
}
Creating the PHP Laravel app controller also has the same naming convention. But, it should be with the suffix ‘Controller’. Example: ProductController.php. The PHP artisan command for creating a controller is,
php artisan make:controller ProductController
The controller class includes the following functions to perform read, store, update, delete actions. Each function is associated with the corresponding request methods and route path.
The value inside curly brackets {} in the URI is the unique identifier to fetch the record.
| Function Name | Request Method | Description |
|---|---|---|
| index() | GET | List results. URI: /products |
| create() | GET | Show add form. URI: /products/create |
| store() | POST | Add new row into the database. URI: /products/create |
| show() | GET | View record by ID. URI: /products/{product} |
| edit() | GET | Show edit form by populating fields. URI: /products/{product}/edit |
| update() | PUT | Save modified data to a particular row. URI: /products/{product} |
| destroy() | POST | Delete record. URI: /products/{product} |
<?php

namespace App\Http\Controllers;

use App\Models\Product;
use Illuminate\Http\Request;

class ProductController extends Controller
{
    /**
     * Display a listing of the resource.
     *
     * @return \Illuminate\Http\Response
     */
    public function index()
    {
        $products = Product::all(); //fetch all products from DB
        return view('product.list', ['products' => $products]);
    }

    /**
     * Show the form for creating a new resource.
     *
     * @return \Illuminate\Http\Response
     */
    public function create()
    {
        return view('product.add');
    }

    /**
     * Store a newly created resource in storage.
     *
     * @param  \Illuminate\Http\Request  $request
     * @return \Illuminate\Http\Response
     */
    public function store(Request $request)
    {
        $newPost = Product::create([
            'title' => $request->title,
            'short_notes' => $request->short_notes,
            'price' => $request->price
        ]);

        return redirect('product/' . $newPost->id . '/edit');
    }

    /**
     * Display the specified resource.
     *
     * @param  \App\Models\Product  $product
     * @return \Illuminate\Http\Response
     */
    public function show(Product $product)
    {
        //
    }

    /**
     * Show the form for editing the specified resource.
     *
     * @param  \App\Models\Product  $product
     * @return \Illuminate\Http\Response
     */
    public function edit(Product $product)
    {
        return view('product.edit', [
            'product' => $product,
        ]);
    }

    /**
     * Update the specified resource in storage.
     *
     * @param  \Illuminate\Http\Request  $request
     * @param  \App\Models\Product  $product
     * @return \Illuminate\Http\Response
     */
    public function update(Request $request, Product $product)
    {
        $product->update([
            'title' => $request->title,
            'short_notes' => $request->short_notes,
            'price' => $request->price
        ]);

        return redirect('product/' . $product->id . '/edit');
    }

    /**
     * Remove the specified resource from storage.
     *
     * @param  \App\Models\Product  $product
     * @return \Illuminate\Http\Response
     */
    public function destroy(Product $product)
    {
        $product->delete();
        return redirect('product/');
    }
}
Building layouts and views
This is the redesigned welcome page. This example uses the Laravel app.layout for all the pages.
The welcome page child template is welcome.blade.php. And the HTML is shown below. It links the product listing template view page.
All the template files in this example use Laravel blade {{}} statements. It applies PHP htmlspecialchars() on the value to be printed. It helps to avoid the XSS attack.
resources/views/welcome.blade.php
@extends('layouts.app')
@section('content')
    <div class="container">
        <div class="row">
            <div class="col-12 text-center pt-5">
                <h1 class="display-one mt-5">PHP Laravel Project - CRUD</h1>
                <p>Welcome to the PHP Laravel project demo for beginners</p>
                <br>
                <a href="product" class="btn btn-outline-primary">Show Products</a>
            </div>
        </div>
    </div>
@endsection
It extends the parent layout at the beginning. It encloses the child content HTML inside the @section-@ensection enclosure.
The welcome page uses the default app.layout. This layout comes with the PHP Laravel resources/view directory. We can also create additional layouts and templates.
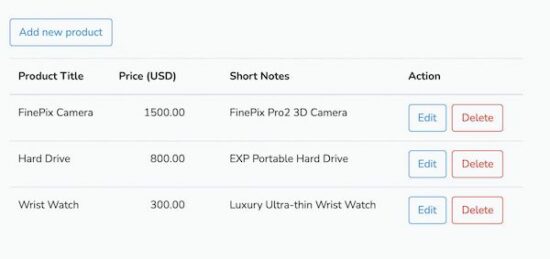
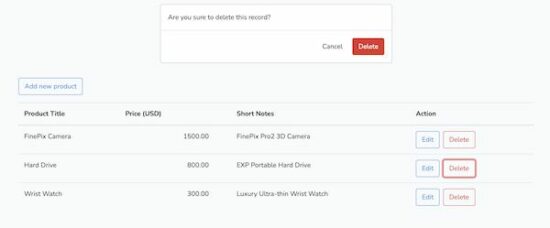
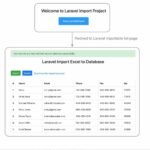
Product Listing
Users will reach this page from the welcome page navigation. The navigation link maps the route assigned to the product list page.
The list page has all the controls to perform the product create, edit, delete actions. It displays three columns from the product database.
It passes the unique to handle database action for a particular product.
The Delete button link will show a confirmation dialog. It posts the delete request with the appropriate identifier once the user confirms.
The template view for displaying the dynamic product listing is shown below. It uses PHP Laravel loop statement forelse to iterate the product array.
resources/views/product/list.blade.php
@extends('layouts.app') @section('content')
<div class="container">
	<div class="row">
		<div class="col-12 text-center pt-5">
			<h1 class="display-one m-5">PHP Laravel Project - CRUD</h1>
			<div class="text-left"><a href="product/create" class="btn btn-outline-primary">Add new
				product</a></div>

			<table class="table mt-3  text-left">
				<thead>
					<tr>
						<th scope="col">Product Title</th>
						<th scope="col" class="pr-5">Price (USD)</th>
						<th scope="col">Short Notes</th>
						<th scope="col">Action</th>
					</tr>
				</thead>
				<tbody>
					@forelse($products as $product)
					<tr>
						<td>{!! $product->title !!}</td>
						<td class="pr-5 text-right">{!! $product->price !!}</td>
						<td>{!! $product->short_notes !!}</td>
						<td><a href="product/{!! $product->id !!}/edit"
							class="btn btn-outline-primary">Edit</a>
							<button type="button" class="btn btn-outline-danger ml-1"
								onClick='showModel({!! $product->id !!})'>Delete</button></td>
					</tr>
					@empty
					<tr>
						<td colspan="3">No products found</td>
					</tr>
					@endforelse
				</tbody>
			</table>
		</div>
	</div>
</div>


<div class="modal fade" id="deleteConfirmationModel" tabindex="-1" role="dialog"
	aria-labelledby="myModalLabel">
	<div class="modal-dialog" role="document">
		<div class="modal-content">
			<div class="modal-body">Are you sure to delete this record?</div>
			<div class="modal-footer">
				<button type="button" class="btn btn-default" onClick="dismissModel()">Cancel</button>
				<form id="delete-frm" class="" action="" method="POST">
                    @method('DELETE')
                    @csrf
                    <button class="btn btn-danger">Delete</button>
                </form>
			</div>
		</div>
	</div>
</div>

<script>
function showModel(id) {
	var frmDelete = document.getElementById("delete-frm");
	frmDelete.action = 'product/'+id;
	var confirmationModal = document.getElementById("deleteConfirmationModel");
	confirmationModal.style.display = 'block';
	confirmationModal.classList.remove('fade');
	confirmationModal.classList.add('show');
}

function dismissModel() {
	var confirmationModal = document.getElementById("deleteConfirmationModel");
	confirmationModal.style.display = 'none';
	confirmationModal.classList.remove('show');
	confirmationModal.classList.add('fade');
}
</script>
@endsection
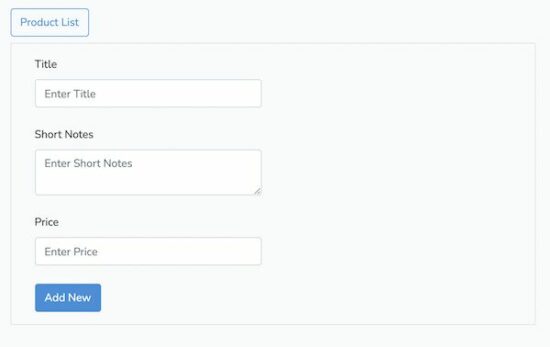
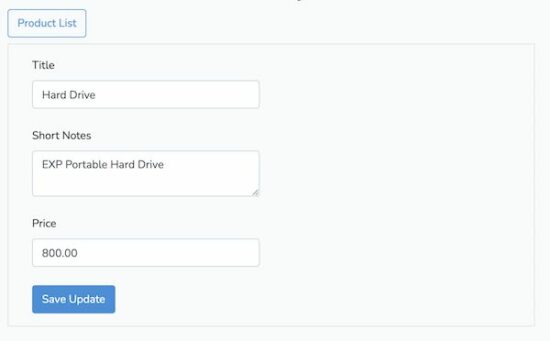
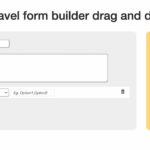
Product add or edit template
Both add and edit templates have the same HTML. The edit screen populates populates product details.
The add and edit form gets the input for the product fields Title, Short notes and Price. Those are added as fillable fields in the PHP Laravel app model.
resources/views/product/list.blade.php
@extends('layouts.app') @section('content')
<div class="container">
	<div class="row">
		<div class="col-12 text-center pt-5">
			<h1 class="display-one mt-5">PHP Laravel Project - CRUD</h1>
			<div class="text-left"><a href="/product" class="btn btn-outline-primary">Product List</a></div>

			<form id="add-frm" method="POST" action="" class="border p-3 mt-2">
				<div class="control-group col-6 text-left">
					<label for="title">Title</label>
					<div>
						<input type="text" id="title" class="form-control mb-4" name="title"
							placeholder="Enter Title" required>
					</div>
				</div>
				<div class="control-group col-6 text-left mt-2">
					<label for="body">Short Notes</label>
					<div>
						<textarea id="short_notes" class="form-control mb-4" name="short_notes"
							placeholder="Enter Short Notes" rows="" required></textarea>
					</div>
				</div>
				<div class="control-group col-6 text-left mt-2">
					<label for="body">Price</label>
					<div>
						<input type="text" id="price" class="form-control mb-4" name="price"
							placeholder="Enter Price" required>
					</div>
				</div>

				@csrf

				<div class="control-group col-6 text-left mt-2"><button class="btn btn-primary">Add New</button></div>
			</form>
		</div>
	</div>
</div>
@endsection
resources/views/product/list.blade.php
@extends('layouts.app') @section('content')
<div class="container">
	<div class="row">
		<div class="col-12 text-center pt-5">
			<h1 class="display-one mt-5">PHP Laravel Project - CRUD</h1>
			<div class="text-left"><a href="/product" class="btn btn-outline-primary">Product List</a></div>

			<form id="edit-frm" method="POST" action="" class="border p-3 mt-2">
				<div class="control-group col-6 text-left">
					<label for="title">Title</label>
					<div>
						<input type="text" id="title" class="form-control mb-4" name="title"
							placeholder="Enter Title" value="{!! $product->title !!}"
							required>
					</div>
				</div>
				<div class="control-group col-6 mt-2 text-left">
					<label for="body">Short Notes</label>
					<div>
						<textarea id="short_notes" class="form-control mb-4" name="short_notes"
							placeholder="Enter Short Notes" rows="" required>{!! $product->short_notes !!}</textarea>
					</div>
				</div>

				<div class="control-group col-6 mt-2 text-left">
					<label for="body">Price</label>
					<div>
						<input type="text" id="price" class="form-control mb-4" name="price"
							placeholder="Enter Price" value="{!! $product->price !!}"
							required>
					</div>
				</div>

				@csrf
				@method('PUT')
				<div class="control-group col-6 text-left mt-2"><button class="btn btn-primary">Save Update</button></div>
			</form>
		</div>
	</div>
</div>
@endsection
Conclusion
Thus, we have created a simple PHP Laravel project with database intervention. It had navigation links to the create, read, update and delete actions.
The steps plotted above will make you build your own Laravel app from scratch. The basic need is not more than a PHP ecosystem.
Try with the Laravel framework and share your comments and questions below.

Thank you very much for the Laravel tutorial. Please continue.
Welcome Zafer.
I like all your work, Please keep it up.
Thank you Stephen.
i was quite impressd!
Very good and detailed steps for the beginner to get the understanding of Laravel
Great summary!
Thank you Zoltan.
great thanks vincy every time you are helpfull for humanity specialy developpers
Welcome Redouane Sehbani.
Thank you so much. Looking forward to many more of these. I love Laravel
Welcome Bhongo, yes lots of articles in plan for Laravel. Keep watching.
Great tutorial. Appreciation came by heart.
Thank you Rehman.
Thank you so much, Vincy, for this code.
Welcome Alfredo.
Very helpful for new developers thankyou madam
Welcome Venkat.
Nice tutorial. Is it on GitHub?
Hi Beat,
Thank you. I haven’t hosted it on GitHub. You can download the code as it is free and host it yourself.
Hi! I am new. Can you help to understand route for this.
Very Nice tutorial… Helped me lot
the best tutorial, Thanks with love from egypt
Welcome Mohamed.
great work keep it up
Thank you Farooq
good job.thanks. I m a beginner.
Welcome Rahman.
Very helpful Laravel project example—clear structure and easy to follow, especially for beginners. Practical tutorials like this make it easier to understand real-world Laravel development. Thanks for sharing this valuable guide!
Welcome Olivia.