This tutorial is to learn how to send email via sendmail mailer in Laravel. The Laravel supports email transactions by using its email API.
It allows the use of various mailers like SMTP, Mailgun, Amazon SES (Simple Email System), and more. A few days ago, we have seen how to send email using Laravel via SMTP.
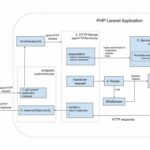
This Laravel example collects customers’ messages with an email via a form. It sends an email to the site owner with CC to the customer.
How to create a Laravel project folder?
Make sure you have a Laravel project set up and configured correctly. If you haven’t already, run the following composer command to create a new project.
composer create-project --prefer-dist laravel/laravel send-email-via-laravel-sendmail
How to configure Laravel mail directives
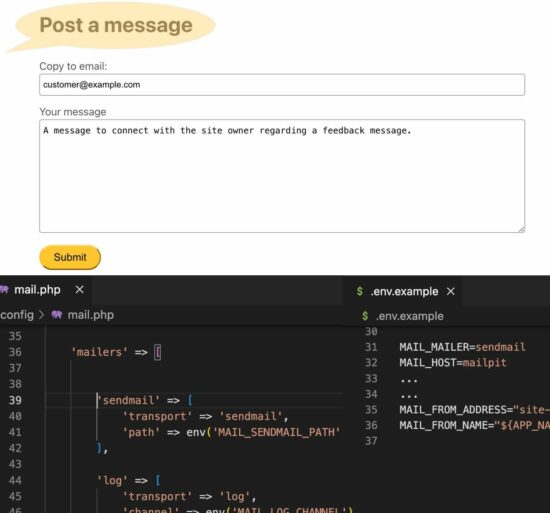
The Laravel application configuration has the default values set with the MAIL_* directives in the .env file.
It needs changes to configure the preferred mailer. The following script configures the MAIL_MAILER directive to sendmail.
Set the mail from-header in the Laravel environmental configuration as below.
MAIL_MAILER=sendmail
MAIL_FROM_ADDRESS=your_email@example.com
MAIL_FROM_NAME=Your Name
The .env configurations are used in the config/mail.php file. In this file, we can set an alternate option in case of empty .env settings.
<?php

return [

    'default' => env('MAIL_MAILER', 'sendmail'),

    'mailers' => [

        'sendmail' => [
            'transport' => 'sendmail',
            'path' => env('MAIL_SENDMAIL_PATH', ''),
        ],

        'log' => [
            'transport' => 'log',
            'channel' => env('MAIL_LOG_CHANNEL'),
        ],

        'array' => [
            'transport' => 'array',
        ],

        'failover' => [
            'transport' => 'failover',
            'mailers' => [
                'sendmail',
                'log',
            ],
        ],
    ],

    'from' => [
        'address' => env('MAIL_FROM_ADDRESS', 'site-owner@example.com'),
        'name' => env('MAIL_FROM_NAME', 'Site Owner'),
    ],

];
The failover configuration is for setting the order of fallbacks. In case of failure to use the configured mailer, this order helps to jump to the following option to increase the success rate. Then, the ‘failover’ has to be set as the default mailer to enable this feature.
Create a blade template to show a mail-sending form
In this example, the HTML form is added to the default welcome template of the Laravel project.
This form has simply two basic fields, customer email and message text area. If you are looking for a simple PHP contact form for sending emails to the site owner, the linked article has a working code.
The form action routes to the action URL to process the form. The routing rules created for this application map the form action URL and the form processing handler.
This template verifies the success or error type of response received from the endpoint. Then, it will show the acknowledgment regarding the mail-sending process.
resources/views/welcome.blade.php
<!DOCTYPE html>
<html lang="{{ app()->getLocale() }}">

<head>
    <meta charset="utf-8">
    <meta name="viewport" content="width=device-width, initial-scale=1">

    <title>Mail sending form</title>
    <link rel="stylesheet" type="text/css" href="{{ asset('css/form.css') }}">
    <link rel="stylesheet" type="text/css" href="{{ asset('css/style.css') }}">
</head>

<body>
    <div class="phppot-container">
        <h1>Post a message</h1>

        <form method="POST" action="{{ route('process.form') }}">
            @csrf <!-- CSRF protection -->

            <div class="row">
                <label for="email">Copy to email</label>
                <input type="text" id="email" name="email" class="full-width">
            </div>

            <div class="row">
                <label for="message">Your message</label>
                <textarea name="message" id="message" class="full-width" rows="10" required></textarea>
            </div>

            <div class="row">
                <button type="submit">Submit</button>
            </div>
        </form>
        @if ($errors->any())
        <div class="message error">
            <ul>
                @foreach ($errors->all() as $error)
                <li>{{ $error }}</li>
                @endforeach
            </ul>
        </div>
        @elseif (session()->has('success'))
        <div class="message success">
            {{ session()->get('success') }}
        </div>
        @endif
    </div>
</body>

</html>
Define a form action root in the web application router
The below rules are created for this Laravel application to route the execution flow on form submission. It contains rules to land the welcome template to display the form.
Then, it connects the process-form/ action URL with the backend handler created in the Laravel HTTP controller.
routes/web.php
<?php

use Illuminate\Support\Facades\Route;
use App\Http\Controllers\FormController;

/*
|--------------------------------------------------------------------------
| Web Routes
|--------------------------------------------------------------------------
|
| Here is where you can register web routes for your application. These
| routes are loaded by the RouteServiceProvider and all of them will
| be assigned to the "web" middleware group. Make something great!
|
*/

Route::get('/', function () {
    return view('welcome');
});
Route::post('/process-form', [FormController::class, 'processForm'])->name('process.form');
?>
Form action handler with the FormController
This command generates the FormController to the Laravel app’s Http/Controllers root. php artisan make:controller FormController.
This class imports the HTTP request instance and sets the customer data to the MailService. This service is a custom class that takes care of mail sending.
app/Http/Controllers/FormController.php
<?php

namespace App\Http\Controllers;

use Illuminate\Http\Request;
use App\Mail\MailService;

class FormController extends Controller
{
    public function processForm(Request $request)
    {
        $messageText = $request->input('message');
        $copyToEmail = $request->input('email');
        $mailService = new MailService($messageText, $copyToEmail);
        $mailService->sendEmail();
        return redirect()->back()->with('success', 'Hi, thank you for writing to us!');
    }
}
How to handle mail sending with the mailing service?
Create a Mailable class using this command. php artisan make:mail MailService.
The Mailable represents a mailable instance or a message from your application.
The Laravel Mail facade’s send() method is used in this class. This method sets the email template and the customer data array in the view folder.
The customer data interpolates the customer message to the email body. The variable interpolation is the key advantage of any templating engine.
The mail recipient, from the header, CC, and the mail subject, are set in the callback function.
app/Mail/MailService.php
<?php

namespace App\Mail;

use Illuminate\Support\Facades\Mail;
use Illuminate\Mail\Mailable;

class MailService extends Mailable
{
    private $toAddress = "site-owner@example.com";
    public $messageText;
    public $copyToEmail;
    public $emailbody;

    public function __construct($messageText, $copyToEmail)
    {
        $this->messageText = $messageText;
        $this->copyToEmail = $copyToEmail;
    }

    public function sendEmail()
    {
        $emailTemplateParams = ['messageText' => $this->messageText, 'copyToEmail' => $this->copyToEmail];
        Mail::send("emailbody", $emailTemplateParams, function ($message) {
            $message->from(env('MAIL_FROM_ADDRESS'))
                ->to($this->toAddress)
                ->cc($this->copyToEmail)
                ->subject('Email subject here');
        });
    }
}
How to construct an email template in the view?
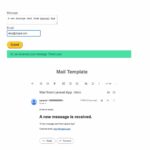
The following view file shows the email template created for this Laravel example.
It addresses the site owner or admin and has the placeholder dynamically load the variable into the place.
It displays the received message and the customer email entered via the form shown in the welcome template on landing.
<!DOCTYPE html>
<html lang="{{ app()->getLocale() }}">

<head>
    <meta charset="utf-8">
    <meta name="viewport" content="width=device-width, initial-scale=1">
</head>

<body>
    <p>Hi Administrator,</p>
    <h1>A new message is received</h1>

    @if ($messageText)
    <p>
        <i>"{{ $messageText }}"</i>
    </p>
    @endif
    @if ($copyToEmail)
    <p>
        Customer email: {{ $copyToEmail }}
    </p>
    @endif
</body>

</html>
Conclusion
Laravel eases the mail-sending process by supporting various mailers. The email API gives a guaranteed and dependable success rate compared to the custom-built solutions. Thus, we have started learning how to use this solution with the sendmail option.
Download