This article is for creating a mail-sending code in PHP Laravel with step-by-step easy guidance.
Mail sending is an often-used feature in software applications and websites. Laravel framework has a built-in API to handle mail-sending features.
The implementation steps are below, assuming the Laravel setup is ready. If you are new to setting up a Laravel environment, this article also provides the steps.
Steps to create a mail-sending code in Laravel using the SMTP mailer
- Create blade templates to show a mail-sending form in the browser.
- Define a form action root in the web application router.
- Create the FormController to prepare the mail-sending request with the received form data.
- Create the MailService class to send the mail.
- Create a new email template to prepare the mail body.
- Configure SMTP credentials in the Laravel .env file.

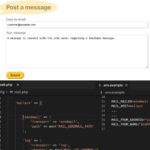
Create blade templates to show a mail-sending form
Find the template files in the resources/views directory. The welcome.blade.php is the default landing template.
Create a new blade template file to add the below form HTML. It contains two primary fields, message (textarea) and email, to collect data from the user.
On submitting this form, it will call the form processing endpoint configured in the Laravel application routes/web.php.
The form action attribute calls the route() with the reference of the property name set with the web router.
This template file has the code to check if any error or success alert exists in the session. This session is set on the server side to acknowledge the user.
resources/views/form.blade.php
<!DOCTYPE html>
<html lang="{{ app()->getLocale() }}">

<head>
    <meta charset="utf-8">
    <meta name="viewport" content="width=device-width, initial-scale=1">

    <title>Mail sending form</title>
    <link rel="stylesheet" type="text/css" href="{{ asset('css/form.css') }}">
    <link rel="stylesheet" type="text/css" href="{{ asset('css/style.css') }}">
</head>

<body>
    <div class="phppot-container">
        <h1>Send Email in Laravel</h1>

        <form method="POST" action="{{ route('process.form') }}">
            @csrf <!-- CSRF protection -->
            <!-- Fields collect customer message -->
            <label for="message">Message</label>
            <textarea name="message" id="message"></textarea>

            <label for="email">Email:</label>
            <input type="text" id="email" name="email"><br><br>

            <button type="submit">Submit</button>
        </form>
        @if ($errors->any())
        <div class="message error">
            <ul>
                @foreach ($errors->all() as $error)
                <li>{{ $error }}</li>
                @endforeach
            </ul>
        </div>
        @elseif (session()->has('success'))
        <div class="message success">
            {{ session()->get('success') }}
        </div>
        @endif
    </div>
</body>

</html>
Define a form action root in the web application router
Find web.php in the Laravel routes directory to set the landing page URL, the form action URL, and more.
This code binds a URL with its corresponding PHP endpoint.
In the below routing, the /process-form/ is the form action URL. The PHP endpoint is the processForm()< function in the FormController.
routes/web.php
<?php

use Illuminate\Support\Facades\Route;
use App\Http\Controllers\FormController;

/*
|--------------------------------------------------------------------------
| Web Routes
|--------------------------------------------------------------------------
|
| Here is where you can register web routes for your application. These
| routes are loaded by the RouteServiceProvider and all of them will
| be assigned to the "web" middleware group. Make something great!
|
*/

Route::get('/', function () {
    return view('welcome');
});
Route::get('/show-mail-form', [FormController::class, 'showMailForm'])->name('show.mail.form');
Route::post('/process-form', [FormController::class, 'processForm'])->name('process.form');
?>
Create the FormController to prepare the mail-sending request
The following command is for creating the FormController that handles mail-sending actions.
php artisan make:controller FormController
This will create the FormController PHP class in the app/Http/Controllers/ path.
It has the processForm() function to email the submitted form data. The order or execution is listed below.
- It validates the form data. The message field is a mandatory field. and the customer email is tested with a email format validation regex.
- Then, it invokes the MailService class for the email body by using the form data posted.
- Finally, it redirects back to a view with the success or error alerts.
Laravel provides various validation techniques. This example uses the validate() method in the HTTP request.
Laravel Mail
Laravel depends on an excellent mailing API. The below code calls the API class Mail, which requires setting the recipient address and the mailable object.
It allows the use of SMTP, Mailgun, and more mailers to send email. If you are looking for the code in core PHP to send email using SMTP, the code is in the link.
The to() method accepts one or more recipients as a string, array, or object. I used a single recipient as a string in this code.
Each instance should have name and email attributes for giving a collective recipient object.
The mailable object contains the email body. The below code instantiates the MailService() class to get this mailable object.
app/Http/Controllers/FormController.php
<?php

namespace App\Http\Controllers;

use Illuminate\Http\Request;
use Illuminate\Support\Facades\Mail;
use App\Mail\MailService;

class FormController extends Controller
{
    public function showMailForm()
    {
        return view('form');
    }

    public function processForm(Request $request)
    {
        // Validate the form data on the server side
        $validatedData = $request->validate([
            'message' => 'required',
            'email' => 'email',

        ]);

        //Once validated, process the mail
        if (!empty($validatedData)) {
            $formData = [
                'message' => $request->input('message'),
                'email' => $request->input('email'),

            ];
            $recipientEmail = env('APPLICATION_MAIL_RECIPIENT');
            Mail::to($recipientEmail)->send(new MailService($formData));
        }
        return redirect()->back()->with('success', 'Hi, we received your message. Thank you!');
    }
}
?>
MailService to build the mailable object
The following command creates an instance of the Laravel Mail library. This command creates a PHP class MailServer.php in the path app/Mail.
php artisan make: mail MailService
The build function returns the mailable object by loading the posted data to an email template file. A blade template named emailbody.blade.php is created for this Laravel example.
app/Mail/MailService.php
<?php

namespace App\Mail;

use Illuminate\Bus\Queueable;
use Illuminate\Mail\Mailable;
use Illuminate\Queue\SerializesModels;

class MailService extends Mailable
{
    use Queueable, SerializesModels;

    public $formData;

    public $emailbody;

    /**
     * Create a new message instance.
     *
     * @param array $formData
     */
    public function __construct($formData)
    {
        $this->formData = $formData;
    }

    /**
     * Build the message.
     *
     * @return $this
     */
    public function build()
    {
        return $this->subject('Mail from Laravel App')
            ->view('emailbody', [
                'email_message' => $this->formData["message"],
                'customer_email' => $this->formData["email"]
            ]);
    }
}
?>
Create a new email template to prepare the mail body
This email template is created for the mail body. It has a placeholder to load dynamic data collected from the user.
The MailService assigns and returns values for these placeholders from the formData.
resources/views/emailbody.blade.php
<!DOCTYPE html>
<html lang="{{ app()->getLocale() }}">

<head>
    <meta charset="utf-8">
    <meta name="viewport" content="width=device-width, initial-scale=1">
</head>

<body>
    <p>Hi Administrator,</p>
    <h1>A new message is received.</h1>

    @if ($email_message)
    <p>
        <i>"{{ $email_message }}"</i>
    </p>
    @endif
    @if ($customer_email)
    <p>
        Cutomer email: {{ $customer_email }}
    </p>
    @endif
</body>

</html>
Configure SMTP credentials in the Laravel .env file
The mail configuration has to be added to the config/mail.php file. This file uses the env() method to access the contents from the .env file.
So, this example configures the mail settings in the .env file, which is used in the mail configuration file. Here’s an example of configuring mail settings in the environment settings file.
.env
MAIL_MAILER=smtp
MAIL_HOST=SMTP host
MAIL_PORT=587
MAIL_USERNAME=SMTP username
MAIL_PASSWORD=SMTP password
MAIL_ENCRYPTION=tls
MAIL_FROM_ADDRESS=sender email
MAIL_FROM_NAME=sender name

APPLICATION_MAIL_RECIPIENT="vincy@example.com"
config/mail.php
<?php
return [

    /*
    |--------------------------------------------------------------------------
    | Default Mailer
    |--------------------------------------------------------------------------
    |
    */

    'default' => env('MAIL_MAILER', 'SMTP'),

    'mailers' => [
        'smtp' => [
            'transport' => 'SMTP',
            'url' => env('MAIL_URL'),
            'host' => env('MAIL_HOST', 'smtp.mailgun.org'),
            'port' => env('MAIL_PORT', 587),
            'encryption' => env('MAIL_ENCRYPTION', 'tls'),
            'username' => env('MAIL_USERNAME'),
            'password' => env('MAIL_PASSWORD'),
            'timeout' => null,
            'local_domain' => env('MAIL_EHLO_DOMAIN'),
        ],
...
...
?>
Set up Laravel development environment
This section supports knowing the prerequisites and commands for setting up the Laravel development environment. It will be helpful for Laravel beginners.
Prerequisites
Ensure you have the latest PHP and its constellations installed on your system.
To install PHP, I recommend XAMPP-like packages for quickness and simplicity. Get the XAMPP installer from its official site.
Also, get the latest composer version to experience a frictionless installation.
Creating a new project via the Laravel installer
Run this in your command line terminal to install Laravel globally:
composer global requires laravel/installerThen, create a new Laravel project using the below command. The <project-name> is a placeholder to enter the project’s name.
laravel new <project-name>Then, the command line interface prompts you to choose the starter kit, PHP testing type, Git collaboration, and database.
Based on this, it creates Laravel app dependencies in the vendor directory.
Creating a new project via the Laravel installer
You can create a new Laravel project by running this composer command.
composer create-project laravel/laravel php-laravel-mailStart a Laravel PHP Artisan development server.
The next step is to get the development server URL to run the Laravel application. The following command starts the development server and shows it to the terminal.
php artisan serveThe server URL includes the address and the port. The default is http://localhost:8000 to see your application running in the browser.
This command also helps to change the host and the port to point to a different server if one exists.
That’s it! You’ve successfully created a new Laravel project. You can now start building your web application using the Laravel framework.
Conclusion
Thus, we have seen how to implement a mail-sending script in a Laravel application. Keep on reading if you want to learn more about coding in Laravel.
Previously, we implemented login authentication in Laravel. If you want to see the linked article, it has the code.
The below downloadable source contains the blade templates and the PHP classes created for this send email task.
Download