Why do we need a contact form on a website? It is to enable (prospective) customers to connect with you.
Elon Musk says, “…maximize the area under the curve of customer happiness…”.
So, increasing the possibilities of reading the customer’s mind will drive us forward to attain the goal. The contact form interface is one of the tools to know our customers.
Let’s design a simple and useful contact form component for your website. The below sections explain how to create a contact form from the scratch.
Uses of a contact form in a website
There are a few more advantages of having a contact form interface.
- It helps have conversions by knowing the requirement of the customers.
- It helps to know the scope of improvements.
- It helps to collect the end users’ ideas and opinions relevant to the business model.
About this example
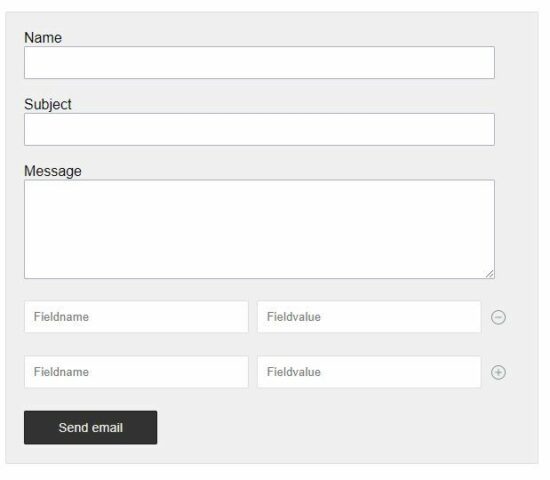
This example code is for designing an HTML contact form with the following features.
- Contact form with custom fields.
- Add/Delete custom fields dynamically via jQuery.
- Send an email with the posted form data.
- Storing the form data into the database.
Application configuration
This HTML contact form backend code allows both send an email and the store-to-database action. But, The store-to-database feature is optional and disabled initially.
This configuration file has the flag to enable or disable the store-to-database feature.
By default, the ENABLE_DATABASE flag is set to false. Make it true to show the “store-to-database” control in the UI.
config.php
<?php

const ENABLE_DATABASE = false;
?>
HTML contact form landing page code
This HTML code is to display a contact form on a landing page. The index.php file includes the following to make an HTML contact form dynamic.
- It contains the form HTML.
- It includes the application configuration file.
- It requires the form action PHP file to process data submitted by the user.
- It includes the form validation javascript and required jQuery dependency.
By connecting all the contact form example components, this file lets the HTML contact form be interactive.
It shows two controls to save to the database or to send an email. By default the save to the database control will be hidden. It is configurable to display this option.
index.php
<?php require_once __DIR__ . '/contact-form-action.php';?>
<?php require_once __DIR__ . '/config.php';?>
<!DOCTYPE html>
<html>
<head>
<link href="style.css" rel="stylesheet" type="text/css" />
<title>HTML Contact Form with Add More Custom Fields</title>
<script src="https://code.jquery.com/jquery-2.1.1.min.js"
    type="text/javascript"></script>
<script type="text/javascript" src="js/contact.js">
</script>
</head>
<body>

    <h1>HTML Contact Form with with Add More Custom Fields</h1>

    <div class="form-container">
        <form name="mailForm" id="mailForm" method="post" action=""
            enctype="multipart/form-data" onsubmit="return validate()">

            <div class="input-row">
                <label style="padding-top: 20px;">Name</label> <span
                    id="userName-info" class="info"></span><br /> <input
                    type="text" class="input-field" name="userName"
                    id="userName" />
            </div>

            <div class="input-row">
                <label>Subject</label> <span id="subject-info"
                    class="info"></span><br /> <input type="text"
                    class="input-field" name="subject" id="subject" />
            </div>
            <div class="input-row">
                <label>Message</label> <span id="userMessage-info"
                    class="info"></span><br />
                <textarea name="userMessage" id="userMessage"
                    class="input-field" id="userMessage" cols="60"
                    rows="6"></textarea>
            </div>
            <div class="input-row">
                <div class="custom-field-name">
                    <input type="text" class="custom-field"
                        name="Fieldname[]" id="Fieldname"
                        placeholder="Fieldname" />
                </div>
                <div class="custom-field-value">
                    <input type="text" class="custom-field"
                        name="Fieldvalue[]" id="Fieldvalue"
                        placeholder="Fieldvalue" />

                </div>
                <div class="col">
                    <div class="custom-field-col">
                        <div onClick="addMore();"
                            class="plus-button"
                            title="Add More">
                            <img src="./images/icon-add.svg"
                                alt="Add More">
                        </div>
                        <div onClick="remove();"
                            class="minus-button"
                            title="Remove">
                            <img src="./images/icon-remove.svg"
                                alt="Remove">
                        </div>
                    </div>
                </div>
            </div>
            <div class="col">
                <input type="submit" name="send" id="send" class="btn-submit"
                    value="Send email" />
                <div class="col">
                <?php if(ENABLE_DATABASE == true){?>
                    <input type="submit" name="savetodatabase"
                        class=btn-submit id="savetodatabase"
                        value="Save database" />
                        <?php }?>
                </div>
                <div id="pageloader">
                    <img id="loading-image" src="./images/loader.gif" />
                </div>
            </div>
            <div id="statusMessage">
                        <?php
                        if (! empty($message)) {
                            ?>
                            <p class='<?php echo $type; ?>Message'><?php echo $message; ?></p>
                        <?php
                        }
                        ?>
               </div>
        </form>
    </div>
</body>
</html>
Contact form validation script using jQuery
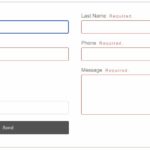
Form validation can be done either on the server-side or client-side. But, validation on the client-side with Javascript is very usual. And it is quite easy and seamless also.
So, I created a jQuery-based validation script to validate the HTML contact form. It requires all fields to be mandatory except the custom fields.
The contact form custom fields are optional. But, in PHP, it checks the custom field name and value not to be empty. This server-side validation will be done before preparing the contact-form action parameter.
Other JavaScript handlers
This contact.js file does not only include the validation handler. But also, defines handlers to add, delete custom field rows in the UI.
It allows anyone row of custom field inputs to be in the HTML contact form. It is coded in the showHideControls() function of the below file.
contact.js
function validate() {
	var valid = true;

	$(".info").html("");
	var userName = document.forms["mailForm"]["userName"].value;
	var subject = document.forms["mailForm"]["subject"].value;
	var userMessage = document.forms["mailForm"]["userMessage"].value;

	if (userName == "") {
		$("#userName-info").html("(required)");
		$("#userName").css('background-color', '#FFFFDF');
		valid = false;
	}
	if (subject == "") {
		$("#subject-info").html("(required)");
		$("#subject").css('background-color', '#FFFFDF');
		valid = false;
	}
	if (userMessage == "") {
		$("#userMessage-info").html("(required)");
		$("#userMessage").css('background-color', '#FFFFDF');
		valid = false;
	}

	handleLoader(valid);
	return valid;
}
function handleLoader(valid) {

	if (valid == true) {
		if ($("#savetodatabase")) {
			$("#savetodatabase").hide();// hide submit
		}
		$("#send").hide();
		$("#loading-image").show();// show loader
	}
}
function addMore() {
	$(".input-row:last").clone().insertAfter(".input-row:last");
	$(".input-row:last").find("input").val("");
	showHideControls();
}
function remove() {
	$(".input-row:last").remove(".input-row:last");
	$(".plus-button:last").show();
	$(".minus-button:last").hide();
	$(".input-row:last").find("input").val("");
}
function showHideControls() {
	$(".plus-button").hide();
	$(".minus-button").show();
	$(".minus-button:last").hide();
	$(".plus-button:last").show();
}
PHP contact form action to send email or store to Database
Generally, the contact form action will send an email with the body of posted form data. This example gives additional support to store the posted message and the details in the database.
This will be suitable when the HTML contact form is used to collect the following.
- Users’ feedback
- Support request
- Project inquiry
- Comments
This PHP code handles the form submission by checking the posted action index. It uses the PHP mail() function to send the HTML contact form email. If you want to send an email via SMTP using the PHPMailer library, the link has the code for it.
Refer PHP.net manual to know more about this mail() function.
If the user clicks the ‘Save to database’ button, it connects the Database via the DataSource class. It triggers insert action by sending the form data in the query parameters.
contact-form-action.php
<?php
namespace Phppot;
use Phppot\DataSource;
require_once __DIR__ . '/DataSource.php';
require_once __DIR__ . '/index.php';
if (! empty($_POST["savetodatabase"])) {
    $conn = new DataSource();
    $query = "INSERT INTO tbl_contact_mail(userName,subject,userMessage)VALUES(?,?,?)";
    $paramType = 'sss';
    $paramValue = array(
        $_POST["userName"],
        $_POST["subject"],
        $_POST["userMessage"]
    );
    $id = $conn->insert($query, $paramType, $paramValue);
    if (! empty($_POST["Fieldname"])) {
        $customFieldLength = count($_POST["Fieldname"]);
        for ($i = 0; $i < $customFieldLength; $i ++) {
            if (! empty($_POST["Fieldname"][$i]) && $_POST["Fieldvalue"][$i]) {
                $query = "INSERT INTO tbl_custom_field(fieldName,fieldValue,contact_id)VALUES(?,?,?)";
                $paramType = 'ssi';
                $paramValue = array(
                    $_POST["Fieldname"][$i],
                    $_POST["Fieldvalue"][$i],
                    $id
                );
                $conn->insert($query, $paramType, $paramValue);
            }
        }
    }
    if ($query==true) {
        $message = "Data Saved";
        $type = "success";
    } else {

        $message = "Problem in data";
        $type = "error";
    }
} elseif (! empty($_POST["send"])) {


    if (isset($_POST["userName"])) {
        $userName = $_POST["userName"];
    }
    if (isset($_POST["subject"])) {
        $subject = $_POST["subject"];
    }
    if (isset($_POST["userMessage"])) {
        $message = $_POST["userMessage"];
    }

    $htmlBody = '<div>' . $message . '</div>';
    $htmlBody .= '<br>';
    $htmlBody .= '<div style=font-weight:bold;>More details:' . '</div>';
    for ($i = 0; $i < count($_POST["Fieldname"]); $i ++) {
        if (isset($_POST["Fieldname"][$i]) && (isset($_POST["Fieldvalue"][$i]))) {
            $fieldname = $_POST["Fieldname"][$i];
            $fieldvalue = $_POST["Fieldvalue"][$i];
            $htmlBody .= '<div>' . $fieldname . '<div style=display:inline-block;margin-left:10px;>' . $fieldvalue . '</div>';
        }
    }
    $htmlBody .= '<br><br><br>';
    $htmlBody .= '<div>Thank You...!' . '</div>';
    // Run loop
$recipient="recipient@domain.com";

if (mail($recipient, $subject, $htmlBody)) {
        $message = "Mail sent successfully";
        $type = "success";
    } else {

        $message = "Problem in sending email";
        $type = "error";
    }
}

?>
Database script
This .sql file contains the create a statement and required indices of the tbl_contact table.
Import this SQL after setting up this example code in your PHP environment.
Note: This is only required if you need the “Store to database” option.
database.sql
-- --------------------------------------------------------

--
-- Table structure for table `tbl_contact`
--

CREATE TABLE `tbl_contact` (
  `id` int(11) NOT NULL,
  `userName` varchar(255) NOT NULL,
  `subject` varchar(255) NOT NULL,
  `userMessage` text NOT NULL
) ENGINE=InnoDB DEFAULT CHARSET=utf8mb4;

-- --------------------------------------------------------

--
-- Table structure for table `tbl_custom_field`
--

CREATE TABLE `tbl_custom_field` (
  `id` int(11) NOT NULL,
  `contact_id` int(11) NOT NULL,
  `fieldName` varchar(11) NOT NULL,
  `fieldValue` varchar(11) NOT NULL
) ENGINE=InnoDB DEFAULT CHARSET=utf8mb4;

--
-- Indexes for dumped tables
--

--
-- Indexes for table `tbl_contact`
--
ALTER TABLE `tbl_contact`
  ADD PRIMARY KEY (`id`);

--
-- Indexes for table `tbl_custom_field`
--
ALTER TABLE `tbl_custom_field`
  ADD PRIMARY KEY (`id`);

--
-- AUTO_INCREMENT for dumped tables
--

--
-- AUTO_INCREMENT for table `tbl_contact`
--
ALTER TABLE `tbl_contact`
  MODIFY `id` int(11) NOT NULL AUTO_INCREMENT;

--
-- AUTO_INCREMENT for table `tbl_custom_field`
--
ALTER TABLE `tbl_custom_field`
  MODIFY `id` int(11) NOT NULL AUTO_INCREMENT;
Conclusion
I hope this article gives you a useful contact form component for your website. It will be helpful to have a good idea to create a form like this on your own.
Custom field integration with contact forms a rare and tricky requirement. Share your thoughts in the comments section to continue posting useful codes.


Very useful and excellent for learning about contact form creating in website by php!!
Thanks
Thank you Asaf.