There are enormous amount of online applications and the login registration system must be the most common functionality among them all. The registration form is to let the user gain membership to acquire special privileges that varies by application.
The importance of the login registration system in an application is to make the visitor as the registered member of the application and let them log in to the system to check their authenticity. Based on the registered user’s authenticity, the web page access, utilities, privileges are provided to the application users.
Mostly, the login page will be the common landing page for the administrative web applications. For example, in WordPress admin, the login panel will be shown as the landing page. Implementing a simple login registration in an online application like eCommerce software, booking system is very simple.
Steps to Create a Login Registration System with Lightbox
In this article, we will see how to create an AJAX based Login Registration system in PHP. Also, we are going to integrate jQuery UI for displaying the login and the registration panel in the form of Lightbox.
So, we are going to learn several things by this example.
- How to integrate jQuery UI library to display lightbox.
- How to load Login Registration form HTML to the lightbox container.
- How to validate the form data and show the validation response in the lightbox.
- How to send the login registration requests to PHP endpoint via jQuery AJAX.
- How to process login authentication and user registration at the PHP code.
Flow of Control among jQuery Modals, AJAX Handlers and PHP
Showing the modal dialog or any other kind of pop-up window can be done easily by using jQuery UI. There are various feature-packed plugins to show a modal dialog.
In a previous tutorial, we have seen how to show the comment add edit form as a lightbox using Dialogify plugin.
jQuery UI dialog box is a very good choice of displaying a modal dialog in an application. The login and registration form HTML code is created inside a modal container.
By submitting the Login Registration form, the data will be posted to the PHP via AJAX after client-side validation. The login registration system with jQuery dialog and AJAX submit action will enrich your website with a modern outlook.
Landing HTML with Header Login Register Menu
In this section, we are going to see the HTML code that is used to show a landing page. In this page, a header bar will be shown with the login register menu links.
The menu options are displayed in the form of HTML buttons. With the reference of this button element object, the jQuery UI dialog window will be popped up to display login or registration form accordingly.
<?php
session_start();
?>
<!DOCTYPE html>
<html>
<head>

<script src="vendor/jquery/jquery-3.2.1.min.js"></script>

<link rel="stylesheet" href="style.css">

<link rel="stylesheet"
    href="//code.jquery.com/ui/1.11.4/themes/smoothness/jquery-ui.css">
<script src="https://code.jquery.com/ui/1.12.1/jquery-ui.js"></script>

</head>

<body>
    <div class="demo-container">
        <h2>AJAX based Login Registration System with jQuery Lightbox</h2>
        <div class="login-registration-menu">
            <input type="button" value="Login" id="btn-login"> <input
                type="button" value="Register" id="btn-register">
        </div>
        <div class="thank-you-registration">
        </div>
        <?php
            require_once "login-form.php";
            require_once "registration-form.php";
        ?>
    </div>
</body>
</html>
The login and registrations form HTML are saved in separate PHP files which are included into this landing HTML page. On page load, the jQuery UI dialog is instantiated by setting the options like modal window dimension, callback code for the window close event.
By clicking the login or the registration button, the corresponding dialog instance is used to open the dialog window.
<script>
    $(function () {
        var login_window = $("#login-dialog").dialog({autoOpen: false,
            height: 280,
            width: 520,
            modal: true,
            closeText: '',
            close: function () {
                register_window.dialog("close");
            }

        });

        $("#btn-login").button().on("click", function () {
            login_window.dialog("open");
        });

        var register_window = $("#register-dialog").dialog({autoOpen: false,
            height: 530,
            width: 520,
            modal: true,
            closeText: '',
            close: function () {
                register_window.dialog("close");
            }

        });

        $("#btn-register").button().on("click", function () {
            register_window.dialog("open");
        });
    });

</script>
<script src="login-registration.js"></script>
User Registration Flow
The user registration form will be the part of the modal container which is initially hidden. By clicking the register menu, the registration form dialog will be slide in to the browser.
This is the HTML code used for showing the registration form.
<div id="register-dialog" class="register-class"
    title="Registration Dialog Form" style="display: none;">
    <form id="register-form" action="" method="post" role="form">
        <div class="input-row">
            <span id="first-name-info"></span> <input type="text"
                name="first-name" id="first-name" class="input-field"
                placeholder="First Name" value="">
        </div>
        <div class="input-row">
            <span id="last-name-info"></span> <input type="text"
                name="last-name" id="last-name" class="input-field"
                placeholder="Last Name" value="">
        </div>
        <div class="input-row">
            <span id="register-email-info"></span> <input type="email"
                name="register-email-id" id="register-email-id"
                class="input-field" placeholder="Email ID" value="">
        </div>
        <div class="input-row">
            <span id="contact-no-info"></span> <input type="text"
                name="contact-number" id="contact-number" maxlength="10"
                class="input-field" placeholder="Contact Number">
        </div>
        <div class="input-row">
            <span id="register-passwd-info"></span> <input
                type="password" name="register-password"
                id="register-password" class="input-field"
                placeholder="Password">
        </div>
        <div class="input-row">
            <span id="confirm-passwd-info"></span> <input
                type="password" name="confirm-password"
                id="confirm-password" class="input-field"
                placeholder="Confirm Password">
        </div>
        <div class="submit-button">
            <input type="button" class="btn-submit" value="Register"
                onclick="ajaxRegistration()">
        </div>

    </form>

    <div class="success-message" id="register-success-message"
        style="display: none"></div>
    <div class="error-message" id="register-error-message"
        style="display: none"></div>

</div>
All the form fields are mandatory. By submitting the form, the fields are validated accordingly. The jQuery form validation script is imported and called on submitting the form.
In this validation script, I have used regex to test if the email, name and contact number fields are having a valid data format.
<script>
    $(".error").text("");
	$('#first-name-info').removeClass("error");
	$('#last-name-info').removeClass("error");
	$('#register-email-info').removeClass("error");
	$('#contact-no-info').removeClass("error");
	$('#register-passwd-info').removeClass("error");
	$('#confirm-passwd-info').removeClass("error");

	var firstName = $('#first-name').val();
	var lastName = $('#last-name').val();
	var emailId = $('#register-email-id').val();
	var contactNumber = $('#contact-number').val();
	var password = $('#register-password').val();
	var confirmPassword = $('#confirm-password').val();
	var actionString = 'registration';

	if (firstName == "") {
		$('#first-name-info').addClass("error");
		$(".error").text("required");
	} else if (!pregMatch(firstName)) {
		$('#first-name-info').addClass("error");
		$(".error").text('Alphabets and white space allowed');
	} else if (lastName == "") {
		$('#last-name-info').addClass("error");
		$(".error").text("required");

	} else if (!pregMatch(lastName)) {
		$('#last-name-info').addClass("error");
		$(".error").text('Alphabets and white space allowed');
	} else if (emailId == "") {
		$('#register-email-info').addClass("error");
		$(".error").text("required");
	} else if (!validateEmailId(emailId)) {
		$('#register-email-info').addClass("error");
		$(".error").text("Invalid");
	} else if (contactNumber == "") {
		$('#contact-no-info').addClass("error");
		$(".error").text("required");
	} else if (isNaN(contactNumber) || (contactNumber.indexOf(" ") != -1) || contactNumber.length > 10) {
		$('#contact-no-info').addClass("error");
		$(".error").text("Invalid");
	} else if (password == "") {
		$('#register-passwd-info').addClass("error");
		$(".error").text("required");
	} else if (confirmPassword == "") {
		$('#confirm-passwd-info').addClass("error");
		$(".error").text("required");
	} else if (password != confirmPassword) {
		$('#confirm-passwd-info').addClass("error");
		$(".error").text("Your confirm password does not match.");
	}
...
</script>
User Registration via AJAX
Once the validation is completed, the user registration form data will be serialized and sent to the server-side via AJAX. The following jQuery AJAX script shows how to send the AJAX request to PHP.
In this script, the ajax-login-registration.php file is called to process registration. During this process, the data posted via AJAX will be used to create the INSERT query to add the user into the database.
$('#loaderId').show();
$.ajax({
	url : 'ajax-login-registration.php',
	type : 'POST',
	data : {
		firstName : firstName,
		lastName : lastName,
		emailId : emailId,
		contactNumber : contactNumber,
		password : password,
		confirmPassword : confirmPassword,
		action : actionString
	},
	success : function(response) {
		if (response.trim() == 'error') {
			$('#register-success-message').hide();
			$('#ajaxloader').hide();
			$('#register-error-message').html(
					"Invalid Attempt. Try Again.");
			$('#register-error-message').show();
		} else {
			$(".thank-you-registration").show();
			$(".thank-you-registration").text(response);
			$("#register-dialog").dialog("close");
		}
	}

});
Registration Code in ajax-login-registration.php
This is a part of the code that is created in the ajax-login-registration.php to handle the registration process requested via AJAX. In this login registration system, the action parameter is posted via AJAX.
This is the single PHP endpoint where the login and registration processes are taking place based on the request.
In this PHP code, I have used MySQLi prepared statement for executing the database queries. The registration form parameters are bound with the query statement to add the user to the database.
As per the login registration system created for this example, the user email has to be unique. So, we need to check if there are any existing users with the same email before inserting the user into the database.
If the email Id exists, the error_message will be shown to the user saying the ‘Email ID already exists’
Storing the raw password into the database is not safe. I have encrypted the password by applying md5 in this example. You can apply any other encryption algorithm by replacing the one used in this example.
if (isset($_POST['action']) && $_POST['action'] == 'registration') {
    $first_name = validateData($_POST['firstName']);
    $last_name = validateData($_POST['lastName']);
    $email_id = validateData($_POST['emailId']);
    $contact_number = validateData($_POST['contactNumber']);
    $password = validateData($_POST['password']);
    $confirm_password = validateData($_POST['confirmPassword']);

    $error_message = '';
    $checkEmailQuery = $conn->prepare("select * from tbl_registration where email_id = ?");
    $checkEmailQuery->bind_param("s", $email_id);
    $checkEmailQuery->execute();

    $result = $checkEmailQuery->get_result();
    if ($result->num_rows > 0) {

        $error_message = "Email ID already exists !";
        echo $error_message;
    } else {
        $insertQuery = $conn->prepare("insert into tbl_registration(first_name,last_name,email_id,contact_number,password) values(?,?,?,?,?)");
        $password = md5($password);
        $insertQuery->bind_param("sssss", $first_name, $last_name, $email_id, $contact_number, $password);

        if ($insertQuery->execute()) {
            echo "Thankyou for registering with us. You can login now.";
            exit();
        } else {
            $error_message = "error";
        }
        $insertQuery->close();
        $conn->close();

        echo $error_message;
    }
}
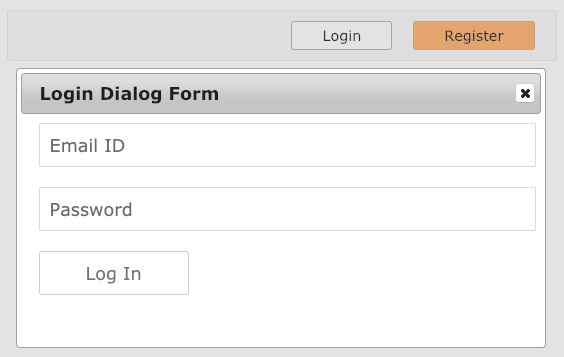
Login from jQuery Lightbox via AJAX
The login script flow is similar to that of registration. The user has to click login link to view the form in modal dialog. Email and Password fields are used to authenticate the registered users.
By submitting the login details via AJAX, the PHP code will process authentication. Once the user authenticated successfully, then the dashboard will be shown to the user.
If the login details are not correct, then the user will be notified with an error message.
login-form.php – modal container
<div id="login-dialog" title="Login Dialog Form" style="display: none;">
    <form id="login-form" action="" method="post" role="form">
        <div class="input-row">
            <span id="email-info"></span> <input type="email"
                name="login-email-id" id="login-email-id"
                class="input-field" placeholder="Email ID">
        </div>
        <div class="input-row">
            <span id="password-info"></span> <input type="password"
                name="login-password" id="login-password"
                class="input-field" placeholder="Password">
        </div>
        <input type="button" class="btn-submit" value="Log In"
            onclick="ajaxLogin()">
    </form>

    <div class="success-message" id="login-success-message"
        style="display: none"></div>
    <div class="error-message" id="login-error-message"
        style="display: none"></div>
    <div id="ajaxloader" style="display: none">
        <img src="LoaderIcon.gif" id="loaderId" />
    </div>
</div>
Request Login Via AJAX
This AJAX request passes three parameters the user email address, password and login registration system action parameter. These params are sent by using the POST request method.
function ajaxLogin() {
	$(".error").text("");
	$('#email-info').removeClass("error");
	$('#password-info').removeClass("error");

	var emailId = $('#login-email-id').val();
	var password = $('#login-password').val();
	var actionString = 'login';

	if (emailId == "") {
		$('#email-info').addClass("error");
		$(".error").text("required");
	} else if (!validateEmailId(emailId)) {
		$('#email-info').addClass("error");
		$('.error').text("Invalid");
	} else if (password == "") {
		$('#password-info').addClass("error");
		$(".error").text("required");
	} else {
		// show loader
		$('#loaderId').show();
		$.ajax({
			url : 'ajax-login-registration.php',
			type : 'POST',
			data : {
				emailId : emailId,
				password : password,
				action : actionString
			},
			success : function(response) {
				if (response.trim() == 'error') {
					$('#login-success-message').hide();
					$('#ajaxloader').hide();
					$('#login-error-message').html(
							"Invalid Attempt. Try Again.");
					$('#login-error-message').show();
				} else {
					$('.demo-container').html(response);
					//register_window.dialog("close");
					$("#login-dialog").dialog("close");
				}
			}
		});
		this.close();
	}// endif
}
Login Case in ajax-login-registration.php
By checking the action parameter and found it is the login request, then the entered email address and the password will be used to check the database.
Before binding the password to the login validation query, it has to be encrypted with the same method that was applied while inserting to the database.
Once the entered email and password are matched with the database, then the authentication will be succeeded. Otherwise, the user will be notified with the Invalid Attempt error message on the login modal dialog.
<?php
...
...

if (isset($_POST['action']) && $_POST['action'] == 'login') {
    $emailId = validateData($_POST['emailId']);
    $password = validateData($_POST['password']);
    $password = md5($password);
    $error_message = '';

    $selectQuery = $conn->prepare("select * from tbl_registration where email_id = ? and password = ?");
    $selectQuery->bind_param("ss", $emailId, $password);
    $selectQuery->execute();

    $result = $selectQuery->get_result();

    if ($result->num_rows > 0) {
        while ($row = $result->fetch_assoc()) {
            $_SESSION['username'] = $row['first_name'] . " " . $row['last_name'];
            require_once "dashboard.php";
            exit();
        } // endwhile
    } // endif
else {
        $error_message = "error";
    } // endElse
    $conn->close();

    echo $error_message;
}
?>
Showing Dashboard to the Logged-in Users
On successful login, the PHP code will return the HTML response to display the user dashboard to the browser. This HTML will be updated to the UI via AJAX without page refresh.
The AJAX success callback gets the response HTML from the PHP and process the UI update.
In the dashboard HTML, it contains a welcome text by addressing the logged-in user. Also, it will show an option to log out. The logout is simple a HTML link will call the logput.php.
In the loggout.php, the user session will be destroyed and the user will be redirected to the home page.
<div class="dashboard">
    <?php
    if (isset($_SESSION['username'])) {
        echo "Welcome  " . $_SESSION['username'];

        ?>
        <div style="height: 10px"></div>
    <div>
        <a href="logout.php"><input type="button" class="btn-logout"
            value="Logout"></a>

    </div>
        <?php
    }
    ?>
</div>
logout.php
<?php
session_start();
unset($_SESSION['username']);
session_destroy();
header("Location: index.php");
?>
Database Design
The following SQL script is used to create the tbl_registration table on the example database to run this example. The registered member data like first name, last name, email, contact number and password will be stored in this table.
When the user is attempting to log in with email and password, the entered data is validated by comparing the credentials with this table row data.
CREATE TABLE IF NOT EXISTS `tbl_registration` (
`id` int(11) NOT NULL,
`first_name` varchar(100) COLLATE utf8mb4_unicode_ci NOT NULL,
`last_name` varchar(100) COLLATE utf8mb4_unicode_ci NOT NULL,
`email_id` varchar(100) COLLATE utf8mb4_unicode_ci NOT NULL,
`contact_number` varchar(12) COLLATE utf8mb4_unicode_ci NOT NULL,
`password` varchar(100) COLLATE utf8mb4_unicode_ci NOT NULL,
`update_date` timestamp NOT NULL DEFAULT CURRENT_TIMESTAMP ON UPDATE CURRENT_TIMESTAMP
) ENGINE=InnoDB AUTO_INCREMENT=16 DEFAULT CHARSET=utf8mb4 COLLATE=utf8mb4_unicode_ci;
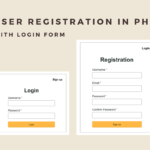
Login Registration with AJAX Output


I wish to add captcha and its validation in the registration page ..can you help me
Hi Siju, I provide freelance services for custom development. Contact me via email and we can work it out. thank you.
Great Example for Beginners
Thank you Bhavik.
Very nice thank you so much
Welcome Phildid.
Hello Bhavik.
Can you tell, please what is the best way to make a clean translation (for my case in french).
Thank’s very nice application very clean. Worked on my server (hostinger) at the first touch. It is so rare. As i see the file vendor. Is there any use with Laravel ?
getting error
Warning: mysqli::__construct(): (HY000/1045): Access denied for user ‘root’@’localhost’ (using password: YES) in C:\xampp\htdocs\hemant\LandingPage\ajaxlogin\db.php on line 2 Warning: mysqli::prepare(): Couldn’t fetch mysqli in C:\xampp\htdocs\hemant\LandingPage\ajaxlogin\ajax-login-registration.php on line 22 Fatal error: Uncaught Error: Call to a member function bind_param() on bool in C:\xampp\htdocs\hemant\LandingPage\ajaxlogin\ajax-login-registration.php:23 Stack trace: #0 {main} thrown in C:\xampp\htdocs\hemant\LandingPage\ajaxlogin\ajax-login-registration.php on line 23
Hi Hemant,
Check the database username/ password in db.php
And also, check if you imported tbl_registration.sql file into the databases used in db.php file.