My simple PHP shopping cart tutorial is one of the best as per my readers’ comments. So, I wanted to do the same with Laravel and write about how to create a Laravel-powered shopping cart.
This shopping cart example gives an elegant product gallery with an “Add to cart” option. A shopping cart page will show a table of cart items from the PHP session. It performs more cart actions by taking the Laravel routes defined.
The steps to create a simple Laravel shopping cart are as follows. It will be a perfect base for creating an eCommerce application.
- Create a database setup and configure it for the Laravel App.
- Create Controllers to capture cart action requests and respond accordingly.
- Build the Laravel blade templates with the UI controls for performing the cart actions.
- Map App URLs with the handlers by creating web routes.
- Prepare AJAX requests to call the server when the user interacts with the shopping cart controls.
How to create the database setup?
Preparing the database setup is the first step before coding the Laravel shopping cart example.
This section gives the commands and the Laravel classes to migrate the table structure and seed data.
After creating the database, it has to be configured by using the .env settings to let the Laravel App to get connected.
The Laravel .env file contains more App settings. When working with Laravel emails, we set the SMTP authentication credentials with this file.
Migrate the product table to a database
This command creates the migration class to create a product table to the target database.
When executing this command it generates a skeleton with the auto-generation and the audit field. These fields are to have the primary key and table row timestamp respectively.
Then, the other fields are added based on the product details planned for this example.
php artisan make:migration create_products_tablecreate_product_table.php
<?php

use Illuminate\Database\Migrations\Migration;
use Illuminate\Database\Schema\Blueprint;
use Illuminate\Support\Facades\Schema;

return new class extends Migration
{
    /**
     * Run the migrations.
     *
     * @return void
     */
    public function up()
    {
        Schema::create('products', function (Blueprint $table) {
            $table->id();
            $table->string('name', 255);
            $table->string('description', 255);
            $table->string('photo');
            $table->decimal('price', 10, 2);
            $table->timestamps();
        });
    }

    /**
     * Reverse the migrations.
     *
     * @return void
     */
    public function down()
    {
        Schema::dropIfExists('products');
    }
};
php artisan migrateCreate product database seeder to push initial data
The following command creates a PHP artisan seeder class for the Laravel project.
It invokes insert action for entering product row into the database. Each insert supplies product details based on the table structure created with the Laravel migration file.
The below seeder supplies name, description, photo, and price data. The photo field stores the physical full path of the product photos in the Laravel application’s storage path.
php artisan make:seeder ProductsTableSeederThe seeder class can have as much number of product insert calls as needed. It supplies the initial data to the shopping cart gallery.
The seeder is enough if the shopping cart application has limited products. There is no need for an admin control panel with product CRUD actions for the initial stages. The Laravel beginners tutorial has the code for the product CRUD.
Note: Replace the example.com with the development server or domain root where the Laravel project is.
ProductsTableSeeder.php
<?php

namespace Database\Seeders;

use Illuminate\Database\Seeder;
use Illuminate\Support\Facades\DB;

class ProductsTableSeeder extends Seeder
{
    public function run()
    {
        DB::table('products')->insert([
            'name' => 'Android smartphone with a 6.5',
            'description' => 'Android smartphone with a 6.5-inch display, octa-core processor, 4GB of RAM, 64GB storage (expandable), a triple rear camera setup (13MP main, 2MP depth, 2MP macro), an approximate 8MP front camera.',
            'photo' => 'http://example.com/storage/app/public/products/phone.jpeg',
            'price' => 698.88
        ]);

        DB::table('products')->insert([
            'name' => 'Digital Camera EOS',
            'description' => 'Canon cameras come in various models with diverse features, but generally, they offer high-quality imaging, a range of resolutions, interchangeable lenses, advanced autofocus systems.',
            'photo' => 'http://example.com/storage/app/public/products/canon.jpg',
            'price' => 983.00
        ]);

        DB::table('products')->insert([
            'name' => 'LOIS CARON Watch',
            'description' => 'The Lois Caron watch typically features a stainless steel case, quartz movement, analog display, synthetic leather or metal strap, and water resistance at varying depths.',
            'photo' => 'http://example.com/storage/app/public/products/watch.jpg',
            'price' => 675.00
        ]);

        DB::table('products')->insert([
            'name' => 'Elegante unisex adult square',
            'description' => 'Sunglasses come in a wide variety of styles, but they generally feature UV-protective lenses housed in plastic or metal frames.',
            'photo' => 'http://example.com/storage/app/public/products/sunclass.jpg',
            'price' => 159.99
        ]);

        DB::table('products')->insert([
            'name' => 'Large Capacity Folding Bag',
            'description' => 'A typical travel bag is designed with durable materials, multiple compartments, sturdy handles, and often includes wheels for easy maneuverability.',
            'photo' => 'http://example.com/storage/app/public/products/bag.jpg',
            'price' => 68.00
        ]);

        DB::table('products')->insert([
            'name' => 'Lenovo Smartchoice Ideapad 3',
            'description' => 'Lenovo laptops typically offer various configurations with features such as Intel or AMD processors.',
            'photo' => 'http://example.com/storage/app/public/products/laptop.jpg',
            'price' => 129.99
        ]);
    }
}
php artisan db:seed --class=ProductsTableSeederWhat are the basic shopping cart actions a lightweight App should have?
This code shows a ProductController created for this Laravel shopping cart project.
It handles the following shopping cart action requests and escalates them to the application’s logical control system.
showCartTable()reads the PHP session array and iterates it to display the dynamic cart table.addToCart()– An “Add to Cart” link in the product gallery triggers this action. It adds the selected product to the cart session.removeCartItem()– This function receives and passes the product ID to the endpoint to delete a particular item.clearCart()– This is about emptying the cart session in a single click. The layout header has the link to perform this action.
Each cart item row contains a “Remove” link to clear a particular item from the cart session.
The cart row has an input to enter the product quantity at checkout.
Adding/removing products with the cart changes the cart item count in the header and cart table total amount.
To create a persistent cart, keep the shopping cart products in a database instead of a PHP session.
ProductsController.php
<?php

namespace App\Http\Controllers;

use Illuminate\Http\Request;
use App\Models\Product;

class ProductsController extends Controller
{
    public function showCartTable()
    {
        $products = Product::all();

        return view('cart', compact('products'));
    }
    public function addToCart($id)
    {
        $product = Product::find($id);

        if (!$product) {

            abort(404);
        }

        $cart = session()->get('cart');

        if (!$cart) {

            $cart = [
                $id => [
                    "name" => $product->name,
                    "quantity" => 1,
                    "price" => $product->price,
                    "photo" => $product->photo
                ]
            ];

            session()->put('cart', $cart);

            return redirect()->back()->with('success', 'Product added to cart successfully!');
        }

        if (isset($cart[$id])) {

            $cart[$id]['quantity']++;

            session()->put('cart', $cart);

            return redirect()->back()->with('success', 'Product added to cart successfully!');
        }

        $cart[$id] = [
            "name" => $product->name,
            "quantity" => 1,
            "price" => $product->price,
            "photo" => $product->photo
        ];

        session()->put('cart', $cart);
        if (request()->wantsJson()) {
            return response()->json(['message' => 'Product added to cart successfully!']);
        }

        return redirect()->back()->with('success', 'Product added to cart successfully!');
    }

    public function removeCartItem(Request $request)
    {
        if ($request->id) {

            $cart = session()->get('cart');

            if (isset($cart[$request->id])) {

                unset($cart[$request->id]);

                session()->put('cart', $cart);
            }

            session()->flash('success', 'Product removed successfully');
        }
    }

    public function clearCart()
    {
        session()->forget('cart');
        return redirect()->back();
    }

    public function showProducts()
    {
        $products = Product::all();
        return view('welcome', compact('products'));
    }
}
App routes
The rules below show the URL mapping to the Laravel App HTTP controller’s handler.
The URLs call the mapped handler functions defined in the Product controller.
These handlers perform the shopping cart actions of adding/removing products to the PHP session array.
In the Laravel authentication tutorial, the auth routes are created to restrict the guest user from accessing private pages.
<?php

use Illuminate\Support\Facades\Route;
use App\Http\Controllers\ProductsController;

Route::get('/', function () {
    return view('welcome');
});
// In your routes/web.php
Route::get('/', [ProductsController::class, 'showProducts']);

Route::get('cart', [ProductsController::class, 'showCartTable']);
Route::get('add-to-cart/{id}', [ProductsController::class, 'addToCart']);

Route::delete('remove-from-cart', [ProductsController::class, 'removeCartItem']);
Route::get('clear-cart', [ProductsController::class, 'clearCart']);
?>
Template files to show the Laravel product gallery and Cart table
This section gives the Laravel blade template files for the product gallery and tabular cart view.
The product gallery is shown in two places in this example. One is on the welcome page on landing, and the other is on the cart page below the shopping cart table.
The product gallery below the cart table saves the user’s time navigating back to continue shopping.
Product gallery template
In a previous tutorial, we studied how the product gallery should be designed for an eCommerce application.
In this Laravel example, the shopping cart design is Bootstrap-powered. Also, a thin-line custom CSS is added wherever required to give an elegant output.
The gallery tiles show only vital data on products, names, photos, and prices. Each tile has an “Add to cart” button to place the product reference in the cart session array.
welcome.blade.php
@section('content')
<div class="container mt-5">
  <h2>Product Gallery</h2>
</div>

<div class="container products">
  <div class="row">
    @if(!empty($products)) @foreach($products as $product)
    <div class="col-xs-12 col-sm-6 col-md-4">
      <div class="card mb-4">
        <img
          src="{{ $product->photo }}"
          class="card-img-top img-size"
          alt="{{ $product->name }}"
        />
        <div class="card-body">
          <h5 class="card-title">{{ $product->name }}</h5>
          <p class="card-text">
            {{ \Illuminate\Support\Str::limit(strtolower($product->description),
            50) }}
          </p>
          <p class="card-text">
            <strong>Price: </strong> ${{ $product->price }}
          </p>
          <a
            href="javascript:void(0);"
            data-product-id="{{ $product->id }}"
            id="add-cart-btn-{{ $product->id }}"
            class="btn btn-warning btn-block text-center add-cart-btn add-to-cart-button"
            >Add to cart</a
          >
          <span
            id="adding-cart-{{ $product->id }}"
            class="btn btn-warning btn-block text-center added-msg"
            style="display: none"
            >Added.</span
          >
        </div>
      </div>
    </div>
    @endforeach @endif
  </div>
</div>
@endsection
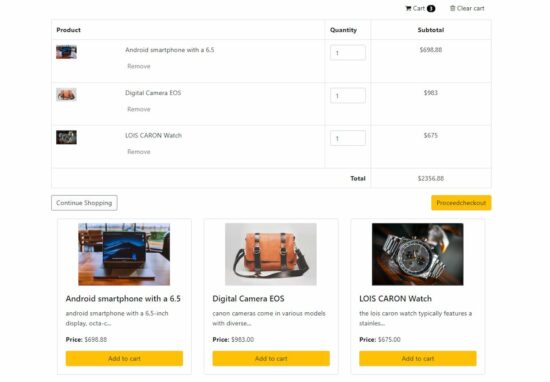
Shopping cart tabular form with edit and delete controls
This template shows a cart table with the product photo, name, quantity, price, and the subtotal amount on each row.
An individual or the complete cart item can be removed using the controls created for the cart template.
The quantity column of this table has the input box to edit the cart by changing the number of products to be ordered.
cart.blade.php
@section('content')
<table id="cart" class="table table-bordered table-hover table-condensed mt-3">
    <thead>
        <tr>
            <th style="width:50%">Product</th>
            <th style="width:8%">Quantity</th>
            <th style="width:22%" class="text-center">Subtotal</th>
        </tr>
    </thead>
    <tbody>

        <?php $total = 0 ?>

        @if(session('cart'))
        @foreach(session('cart') as $id => $details)

        <?php $total += $details['price'] * $details['quantity'] ?>

        <tr>
            <td data-th="Product">
                <div class="row">
                    <div class="col-sm-3 hidden-xs"><img src="{{ $details['photo'] }}" width="50" height="" class="img-responsive" />

                    </div>

                    <div class="col-sm-9">
                        <p class="nomargin">{{ $details['name'] }}</p>
                        <p class="remove-from-cart cart-delete" data-id="{{ $id }}" title="Delete">Remove</p>
                    </div>
                </div>
            </td>
            <td data-th="Quantity">
                <input type="number" value="{{ $details['quantity'] }}" class="form-control quantity" />
            </td>
            <td data-th="Subtotal" class="text-center">${{ $details['price'] * $details['quantity'] }}</td>
        </tr>

        @endforeach
        @endif

    </tbody>
    <tfoot>
        @if(!empty($details))
        <tr class="visible-xs">
            <td class="text-right" colspan="2"><strong>Total</strong></td>
            <td class="text-center"> ${{ $total }}</td>
        </tr>
        @else
        <tr>
            <td class="text-center" colspan="3">Your Cart is Empty.....</td>
        <tr>
            @endif
    </tfoot>

</table>
<a href="{{ url('http://127.0.0.1:8000/') }}" class="btn shopping-btn">Continue Shopping</a>
<a href="" class="btn btn-warning check-btn">Proceed Checkout</a>
<div class="container products">

    <div class="row">

        @foreach($products as $product)
        <div class="col-xs-12 col-sm-6 col-md-4">
            <div class="card mb-4">
                <img src="{{ $product->photo }}" class="card-img-top img-size" alt="{{ $product->name }}">
                <div class="card-body">
                    <h5 class="card-title">{{ $product->name }}</h5>
                    <p class="card-text">{{ \Illuminate\Support\Str::limit(strtolower($product->description), 50) }}
                    </p>
                    <p class="card-text"><strong>Price: </strong> ${{ $product->price }}</p>
                    <a href="{{ url('add-to-cart/'.$product->id) }}" class="btn btn-warning btn-block text-center" role="button">Add to cart</a>
                </div>
            </div>
        </div>
        @endforeach

    </div>

</div>

@endsection
Add / Remove cart items using the Laravel template controls
The template files include the following AJAX scripts to request the cart action to the server.
Clicking the “Add to Cart” button from the gallery triggers the following event listener and performs the AJAX processing.
The AJAX endpoint URL is mapped with the Laravel App routes.
$(document).ready(function () {
    $('.add-to-cart-button').on('click', function () {
        var productId = $(this).data('product-id');

        $.ajax({
            type: 'GET',
            url: '/add-to-cart/' + productId,
            success: function (data) {
                $("#adding-cart-" + productId).show();
                $("#add-cart-btn-" + productId).hide();
            },
            error: function (error) {
                console.error('Error adding to cart:', error);
            }
        });
    });
});
See the below AJAX code to remove a particular cart item from the PHP session.
It posts the remove request to the /remove-from-cart/ endpoint by sending the product ID.
The PHP endpoint captures this request in the ProductController and clears the appropriate session index.
$(".remove-from-cart").click(function(e) {
    e.preventDefault();

    var ele = $(this);

    if (confirm("Are you sure want to remove product from the cart.")) {
        $.ajax({
            url: '{{ url("remove-from-cart") }}',
            method: "DELETE",
            data: {
                _token: '{{ csrf_token() }}',
                id: ele.attr("data-id")
            },
            success: function(response) {
                window.location.reload();
            }
        });
    }
});


Thanks! Very helpful. Blessings in Christ Jesus
Thank you George.