A shopping cart application is for facilitating customers’ online shopping experiences. It is a vast domain, and there are leading online stores available. Creating our shop makes it challenging to cover all its functionalities and features. ECommerce libraries can help you build an online store in minutes.
In this tutorial, we will use one of the widely used packages to create a Laravel shopping cart. It simplifies cart management in Laravel and includes many features like wishlist management, discount appliances, and more.
Using a package is always an advantageous practice since the package takes care of modularity, code organizing, robustness, and more. If you want to create a simple PHP shopping cart, we have the code in the linked article without Laravel.
About the example
In this example, the welcome template displays the products and a lead to move them to the cart via an AJAX-driven interface. The other functionalities enabled for this example are updating item quantity, removing cart items, and clearing the entire cart.
This example uses darryldecode/LaravelShoppingcart package to enable online shopping in a few minutes.
Installation and integration
Download this package from Github or run the composer command to add and update your Laravel application dependency root.
For Laravel 5.1~
composer require "darryldecode/cart:~2.0"
For Laravel 5.5, 5.6, or 5.7~, 9
composer require "darryldecode/cart:~4.0" or composer require "darryldecode/cart"
Once the package is downloaded to the Laravel vendor directory, then update the config/app.php as below.
- Add the
Darryldecode\Cart\CartServiceProvider::classto the ‘providers’ array. - Add the
'Cart' => Darryldecode\Cart\Facades\CartFacade::classto the ‘aliases’ array
About the shopping cart package
The darryldecode/LaravelShoppingcart is a Laravel package simplifies shopping cart management within Laravel applications. It provides functionalities for managing shopping carts, adding products, updating quantities, removing items, and more.
Steps to create a Laravel shopping cart using package
After setting up the above package in the Laravel application folder, follow the below steps to use the package hooks from the application.
-
- Create product data sources by creating an exclusive application config.
- Read the products array from the config in the Laravel routing handler.
- Making routes for handling the ‘add to cart’, ‘update cart quantity‘, ‘remove cart item’ and clear cart actions.
- Laravel shopping cart web routes.
- Modifying the Laravel welcome template to display product showcase with cart
1. Create product data source by creating an exclusive application config
Create a shopping cart configuration file in the Laravel app configuration directory. Then, include the product data array below.
This array will list the shop products on a table view.
It is a multi-dimensional array indexing each element with the corresponding product ID. This will be helpful to fetch the product details by its ID when showing the order item details.
'product_details' => [
    '1' => [
        'id' => 1,
        'name' => 'LOIS CARON Watch',
        'price' => 500.00,
        'quantity' => 1,
        'attributes' => array()
    ],
    '2' => [
        'id' => 2,
        'name' => 'Digital Camera EOS',
        'price' => 600.00,
        'quantity' => 1,
        'attributes' => array()
    ],
    '3' => [
        'id' => 3,
        'name' => 'Lenovo Smartchoice Ideapad 3',
        'price' => 700.00,
        'quantity' => 1,
        'attributes' => array()
    ],
],
2. Read the products array from the config in the Laravel routing handler
This controller file reads the product array and stores it into a PHP variable $productDetailsArray from the config file. This array variable is used in the Laravel welcome template view to show all the products in a table.
app/Http/Controllers/ProductController.php
<?php

namespace App\Http\Controllers;

use Illuminate\Support\Facades\Config;
use Illuminate\Support\Facades\View;
use Illuminate\Http\Request;

class ProductController extends Controller
{
    public function showProductDetails()
    {
        $productDetailsArray = config('shopping_cart.product_details');
        return view('welcome')->with('productDetailsArray', $productDetailsArray);
    }
}
?>
3. Making routes for handling the cart actions
A CartController class created for this example takes care of the following actions using the Laravel package.
a) Add to cart
In this controller, the addToCart() function receives the product ID. This function is called when moving the product to the cart from the shop’s showcase.
The addToCart() function stores the product information (name, quantity, and price) in the cart session.
It uses the Darryldecode\Cart\Facades\Cart::add() function of the Laravel shopping cart package.
This add() function creates the user’s session and binds it as the cart index to add the product information.
The product information is fetched from the config array for the product received by the addToCart() function.
In this example, the user session ID is hardcoded. It can be replaced with a dynamic index generated by an authentication module if it exists in the Laravel application. In a previous tutorial, we have seen how to create a Laravel authentication system.
b) Remove the cart item
The removeCart() method handles the particular cate-item’s remove action. The package’s \Cart::session($userID)->remove() function needs the product ID to perform this action.
It checks if the product is in the cart in the library backend and removes it if a match is found.
c) Clear the complete cart
There is a direct one-line method provided by this Laravel package to clear the complete cart. The \Cart::session($userID)->clear() function empties the cart.
d) Update cart quantity
The updateCart() method receives the request object. This object contains two input properties product_id and quantity.
The quantity parameter is the new quantity entered by the customer. And the product_id is the reference for which the update has to be performed.
There is an input on each row of the shopping cart to enter a new quantity. The requested quantity has to be greater than one.
The package function \Cart::session($userID)->update() validates the received quantity to confirm if it is greater than zero.
app/Http/Controllers/CartController.php
<?php

namespace App\Http\Controllers;

use Illuminate\Http\Request;
use Darryldecode\Cart\Facades\Cart;

class CartController extends Controller
{
    public function addToCart(Request $request)
    {
        $productId = $request->input('product_id');

        $productDetails = null;
        foreach (config('shopping_cart.product_details') as $details) {
            if ($details['id'] == $productId) {
                $productDetails = $details;
                break;
            }
        }

        $userID = 2;

        // Add the product to the cart
        \Cart::session($userID)->add([
            'id' => $productId,
            'name' => $productDetails['name'],
            'price' => $productDetails['price'],
            'quantity' => $productDetails['quantity'],
            'attributes' => [],
            'associatedModel' => $productDetails,
        ]);
        return response()->json(['success' => true]);
    }

    public function updateCart(Request $request)
    {
        $productId = $request->input('product_id');
        $quantity = $request->input('quantity');

        $userID = 2;
        \Cart::session($userID)->update($productId, array(
            'quantity' => array(
                'relative' => false,
                'value' => $quantity
            ),
        ));
        return response()->json(['success' => true]);
    }

    public function showCart()
    {
        $productDetailsArray = config('shopping_cart.product_details', []);

        $userID = 2;
        $cartContent = \Cart::session($userID)->getContent();
        $total = \Cart::getTotal();

        return view('welcome')
            ->with('productDetailsArray', $productDetailsArray)
            ->with('cartContent', $cartContent)->with('total', $total);
    }

    public function removeCart(Request $request)
    {
        $productId = $request->input('product_id');

        $userID = 2;
        \Cart::session($userID)->remove($productId);
        return response()->json(['success' => true]);
    }

    public function clearCart(Request $request)
    {
        $userID = 2;
        \Cart::session($userID)->clear();

        return response()->json(['success' => true]);
    }
}
?>
4. Laravel shopping cart web routes
The URL rules below are created for this Laravel application, which uses a package for creating a shopping cart. So it contains rules to show the products and the cart items list with add, update, and remove control links.
Each rule maps the corresponding HTTP controllers and the handlers created to perform the online store operations.
routes/web.php
<?php

use Illuminate\Support\Facades\Route;
use App\Http\Controllers\ProductController;
use App\Http\Controllers\CartController;

Route::get('/', function () {
    return view('welcome');
});

Route::get('/', [ProductController::class, 'showProductDetails']);
Route::post('/add-to-cart', [CartController::class, 'addToCart'])->name('addToCart');
Route::post('/update-cart', [CartController::class, 'updateCart'])->name('updateCart');
Route::post('/remove-cart', [CartController::class, 'removeCart'])->name('removeCart');
Route::post('/clear-cart', [CartController::class, 'clearCart'])->name('clearCart');
Route::get('/', [CartController::class, 'showCart'])->name('cart.show');
?>
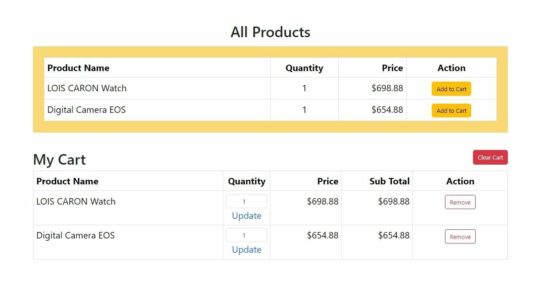
5. Modifying the Laravel welcome template to display product showcase with a cart
This HTML template integrates Bootstrap for styling and displays a list of products with their details, including name, quantity, and price. It provides functionality for adding products to a cart, updating quantities, removing items, and clearing the entire cart.
The design features a visually appealing layout with distinct sections for displaying products and managing the shopping cart.
resources/views/welcome.blade.php
<!DOCTYPE html>
<html lang="{{ str_replace('_', '-', app()->getLocale()) }}">

<head>
    <meta charset="utf-8">
    <meta name="viewport" content="width=device-width, initial-scale=1">

    <title>Laravel</title>
    <link rel="stylesheet" href="https://cdn.jsdelivr.net/npm/bootstrap@5.3.2/dist/css/bootstrap.min.css" integrity="sha384-T3c6CoIi6uLrA9TneNEoa7RxnatzjcDSCmG1MXxSR1GAsXEV/Dwwykc2MPK8M2HN" crossorigin="anonymous">
    <!-- Fonts -->
    <link rel="preconnect" href="https://fonts.bunny.net">
    <link href="https://fonts.bunny.net/css?family=figtree:400,600&display=swap" rel="stylesheet" />
    <style>
        .product-container {
            background-color: #fad875;
            padding: 30px 30px 15px 30px;
        }
    </style>
</head>

<body>
    <div class="container mt-5">
        <h1 class="text-center mb-3">All Products</h1>
        <div class="product-container">
            <table class="table table-bordered">
                <thead>
                    <tr>
                        <th scope="col" style="width: 50%;">Product Name</th>
                        <th scope="col" style="width: 15%;" class="text-center">Quantity</th>
                        <th scope="col" style="width: 15%;" class="text-end">Price</th>
                        <th scope="col" class="text-center">Action</th>
                    </tr>
                </thead>
                <tbody>

                    @foreach ($productDetailsArray as $k => $productDetails)
                    <tr>
                        <td>{{ $productDetails['name'] }}</td>
                        <td class="text-center">
                            {{ $productDetails['quantity'] }}
                        </td>
                        <td class="text-end">${{ number_format($productDetails['price'],2) }}</td>
                        <td class="text-center"><button type="button" class="btn btn-warning add-to-cart-btn cursor-pointer" data-product-id="{{ $productDetails['id'] }}"><span class="add-text">Add to Cart</span> <span class="d-none adding-text"> Adding</span> <span class="d-none added-text"> Added</span></button>

                        </td>
                    </tr>
                    @endforeach

                </tbody>

            </table>
        </div>
        <div class="mt-5">
            <div class="d-flex justify-content-between">
                <h2>My Cart</h2>
                <button type="button" class="btn btn-danger mb-3 clear-cart">Clear Cart</button>
            </div>
            <table class="table table-bordered">
                <thead>
                    <tr>
                        <th style="width: 40%;">Product Name</th>
                        <th class="text-center" style="width: 10%;">Quantity</th>
                        <th class="text-end" style="width: 15%;">Price</th>
                        <th class="text-end" style="width: 15%;">Sub Total</th>
                        <th class="text-center">Action</th>
                    </tr>
                </thead>
                <tbody>

                    @foreach($cartContent as $item)
                    <tr>
                        <td>{{ $item->name }}</td>
                        <td class="text-center">
                            <div class="input-group d-flex justify-content-center"><input type="number" min="1" class="form-control quantity-input text-center" value="{{ $item->quantity }}"></div>
                            <a href="javascript:;" class="update-btn cursor-pointer text-decoration-none" data-product-id="{{ $item->id }}"><span class="update-text">Update</span><span class="d-none updating-text"> Updating</span> <span class="d-none updated-text"> Update</span></a>
                        </td>
                        <td class="text-end">${{ number_format($item->price,2) }}</td>
                        <td class="text-end">${{ number_format($item->quantity * $item->price,2)}}</td>
                        <td class="text-center"><button type="button" class="btn btn-outline-danger romove-btn" data-product-id="{{ $item->id }}">Remove</button></td>
                    </tr>
                    @endforeach

                    <tr>
                        <th colspan="3" class="text-end">Total</th>
                        <td class="text-end">${{ number_format($total,2) }}</td>
                        <td></td>
                    <tr>

                </tbody>
            </table>
        </div>
    </div>
    <script src="https://code.jquery.com/jquery-3.6.0.min.js"></script>
</body>

</html>
jQuery scripts to prepare AJAX requests to the cart functional routes
The below code is from the welcome template file. This script portion can be found in the template.
These will bind the JavaScript listeners with the click event of the UI’s add, edit, and delete controls.
It prepares AJAX requests to the backend Laravel shopping cart package routes.
welcome.blade.php (Only the JavaScript from the welcome template)
$('.add-to-cart-btn').on('click', function() {
    var button = $(this);
    var productId = button.data('product-id');

    button.find('.add-text').addClass('d-none');
    button.find('.adding-text').removeClass('d-none');

    // Make an AJAX request to add the product to the cart
    $.ajax({
        type: 'POST',
        url: '{{ route('addToCart') }}',
        data: {
            product_id: productId,
            _token: '{{ csrf_token() }}',
        },
        success: function(response) {
            button.find('.adding-text').addClass('d-none');
            button.find('.added-text').removeClass('d-none');
            location.reload();
        },
        error: function(error) {
            console.error('Error adding product to cart:', error);
        }
    });
});

$('.update-btn').on('click', function() {
    var button = $(this);
    var productId = button.data('product-id');
    var quantity = button.closest('td').find('.quantity-input').val();

    button.find('.update-text').addClass('d-none');
    button.find('.updating-text').removeClass('d-none');

    // Make an AJAX request to update the product to the cart
    $.ajax({
        type: 'POST',
        url: '{{ route('updateCart') }}',
        data: {
            product_id: productId,
            quantity: quantity,
            _token: '{{ csrf_token() }}',
        },
        success: function(response) {
            button.find('.updating-text').addClass('d-none');
            button.find('.updated-text').removeClass('d-none');
            location.reload();
        },
        error: function(error) {
            console.error('Error updating product to cart:', error);
        }
    });
});

$('.romove-btn').on('click', function() {
    var productId = $(this).data('product-id');

    // Make an AJAX request to remove the product to the cart
    $.ajax({
        type: 'POST',
        url: '{{ route('removeCart') }}',
        data: {
            product_id: productId,
            _token: '{{ csrf_token() }}',
        },
        success: function(response) {
            location.reload();
        },
        error: function(error) {
            console.error('Error adding product to cart:', error);
        }
    });
});

$('.clear-cart').on('click', function() {

    if (confirm('Are you sure you want to clear the cart?')) {

         // Make an AJAX request to clear the product to the cart
        $.ajax({
            type: 'POST',
            url: '{{ route('clearCart') }}',
            data: {
                _token: '{{ csrf_token() }}',
            },
            success: function(response) {
                location.reload();
            },
            error: function(error) {
                console.error('Error adding product to cart:', error);
            }
        });
    }
});