In this Laravel tutorial, we are going to see how to integrate Stripe checkout in a Laravel application. It uses the Laravel Cashier package to achieve this. This code uses Stripe-hosted checkout.
This example makes you understand and recreate it in your Laravel environment easily. It describes the prerequisites and the step-by-step process of adding the Stripe checkout option.
Steps to integrate a Stripe checkout in Laravel
- Install the Laravel cashier package.
- Create a config with the product data array.
- Build products and thank-you templates.
- Create Laravel Stripe checkout routes.
- Make controllers to process Stripe checkout.
If you are looking for a Stripe Checkout code with PHP, the linked article has an example.
The Laravel Cashier package is for handling subscription billing. In this example, it uses this package for non-recurring, one-time product selling. This will be useful to enable payment options for shopping cart applications.
1. Install the Laravel cashier package
Laravel Cashier is for checkout payments requested by the App user. The payment requests are made with respect to the logged-in user() instance.
So it needs the Laravel authentication model to process Cashier payment requests.
The checkout feature is enabled by extending the Laravel Cashier Billable trait to the User model.

The below steps have the required commands and guidelines to create the setup.
i) Install Laravel authentication with the Breeze kit
Create a Laravel project
composer create-project --prefer-dist laravel/laravel laravel-stripe-checkout
Go to the created Project folder
cd laravel-stripe-checkout
Then, install Laravel Breeze to have an authentication module.
composer require laravel/breeze --dev
php artisan breeze:install
ii) Installing Laravel Cashier
Install Laravel Cashier and publish the package dependencies.
composer require laravel/cashier
php artisan vendor:publish --provider="Laravel\Cashier\CashierServiceProvider" --tag="cashier-migrations"
iii) Migrate user and payment database tables
The below command migrates the authentication and Stripe tables to the configured database. The database details are configured in the .env file. We have already seen this in the Laravel beginners’ tutorial.
php artisan migrate
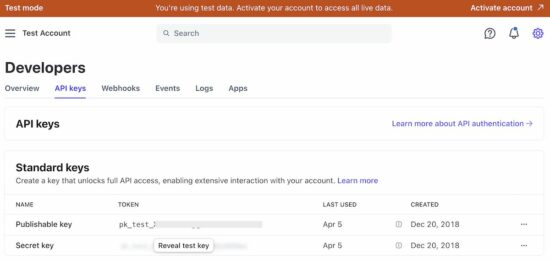
iv) Generate stripe API key
Add the below constants to the Laravel .env file. Replace the values with your Stripe keys and the product’s price ID. These configurations will be used at the time of sending the Stripe checkout request to the API.
STRIPE_SECRET=Your Stripe Secret Key
STRIPE_KEY=Your Stripe Publishable Key
STRIPE_PRICE_ID=Your Stripe Product Price ID
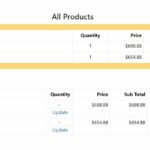
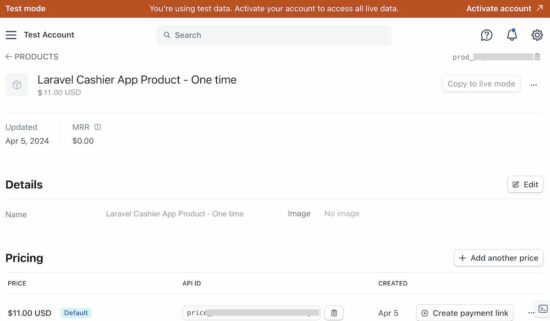
Navigate to Developers -> Product Catalog -> Add Product to create the Stripe product and price.
v) Include Billable in the User model to request Stripe checkout
The Laravel cashier checkout relies on authenticated users. The checkout() is the part of the Billable class. Add this class’s “use statement” to the User model.
use Laravel\Cashier\Billable;
class User extends Authenticatable
{
    use Billable;
}
Once the above steps are implemented, the Laravel project is capable of sending the checkout request.
2. Create a config with the product data array
This example uses product data from a config file. You can replace it with a database table.
config/product-details.php
<?php

return [
    'product' => [
        'name' => 'Mirrorless Digital Camera',
        'description' => 'Compact, versatile, and powerful, our mirrorless digital camera captures life"s moments with unmatched clarity and convenience.',
        'price' => 11,
        'image' => 'images/camera.jpg'
    ]
];
3. Build products and thank-you templates
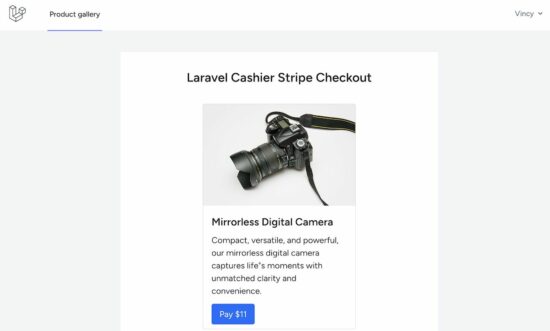
Once logged in, the dashboard template shows the product gallery tile with the pay button. In a previous tutorial, we have shown the “Add to cart” option to the product gallery tiles.
resources/views/dashboard.blade.php
<x-app-layout>
  <div class="dashboard-container">
    <h1 class="card-heading text-center">Laravel Cashier Stripe Checkout</h1>
    <div class="card-container">
      <div class="card">
        <img src="{{ $product['image'] }}" alt="...">
        <div class="card-body">
          <div class="card-title">{{ $product['name'] }}</div>
          <p class="card-text">{{ $product['description'] }}</p>
          <a href="{{ route('checkout')}}" class="btn btn-primary">Pay ${{ $product['price'] }}</a>
        </div>

      </div>
    </div>
  </div>
</x-app-layout>
The below templates display the acknowledgment to the browser. The Laravel web rules link URLs with these templates.
These URLs were sent with the Stripe checkout request. After processing the checkout, the Stripe redirects the user. The redirected page renders one of these templates based on the payment status between “success” and “cancelled”.
resources/views/success.blade.php
<!DOCTYPE html>
<html>

<head>
    <meta charset="utf-8">
    <meta name="viewport" content="width=device-width, initial-scale=1">
    <title>Laravel Stripe integration tutorial</title>
    <link href="{{ asset('css/custom-style.css') }}" rel="stylesheet">
</head>

<body>
    <div class="success-cancel-container">
        <img src="{{ asset('check-circle.svg') }}" class="tick-img">
        <h1 class="success-cancel-heading">Thank you for making payment</h1>
        <p class="success-cancel-text">{{ $successMessage }}</p>
        <div class="continue-btn">
            <a href="{{ route('dashboard') }}" class="btn bg-warning">Continue Shopping</a>
        </div>
    </div>
</body>

</html>

When the user clicks the “back arrow” from the Stripe-hosted checkout page, it shows the following cancel template.
resources/views/cancel.blade.php
<!DOCTYPE html>
<html>
<head>
<meta charset="utf-8">
<meta name="viewport" content="width=device-width, initial-scale=1">
<title>Laravel Stripe integration tutorial</title>
<link href="{{ asset('css/custom-style.css') }}" rel="stylesheet">
</head>
<body>
<div class="success-cancel-container">
<img src="{{ asset('cancel.svg') }}" class="tick-img">
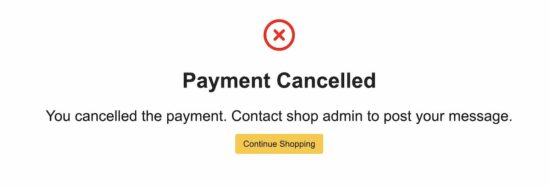
<h1 class="success-cancel-heading">Payment Cancelled</h1>
<p class="success-cancel-text">{{ $cancelMessage }}</p>
<a href="{{ route('dashboard') }}" class="btn bg-warning">Continue Shopping</a>
</div>
</body>
</html>
Create Laravel Stripe checkout routes
The below PHP file shows the Laravel web routes. Most of the URLs are created by setting up the authentication module.
The Stripe checkout-related URLs like /checkout/, /payment/success/ and /payment/cancel/ is created manually for this example.
routes/web.php
<?php

use App\Http\Controllers\ProfileController;
use Illuminate\Support\Facades\Route;
use App\Http\Controllers\StripeCheckoutController;
use App\Http\Controllers\DashboardController;

Route::get('/', function () {
    return view('welcome');
});

Route::get('/dashboard', [DashboardController::class, 'index'])->middleware(['auth', 'verified'])->name('dashboard');

Route::middleware('auth')->group(function () {
    Route::get('/profile', [ProfileController::class, 'edit'])->name('profile.edit');
    Route::patch('/profile', [ProfileController::class, 'update'])->name('profile.update');
    Route::delete('/profile', [ProfileController::class, 'destroy'])->name('profile.destroy');
});

Route::get('checkout/', [StripeCheckoutController::class, 'cashierStripeCheckout'])->name('checkout');

Route::get('/payment/success', [StripeCheckoutController::class, 'success'])->name('checkout-success');

Route::get('/payment/cancel', [StripeCheckoutController::class, 'cancel'])->name('checkout-cancel');

require __DIR__.'/auth.php';

?>
Make controllers to process Stripe checkout
First, the DashboardController is changed to load the product tile from the config.
This is created as part of the Laravel Breeze installation. By default, it shows the welcome message for the logged-in user.
app/Http/Controllers/DashboardController.php
<?php

namespace App\Http\Controllers;

use Illuminate\Support\Facades\Config;

class DashboardController extends Controller
{
    public function index()
    {
        // Get product array from Laravel config/product-details.php
        $product = Config::get('product-details.product');

        // Load product tile view to the browser
        return view('dashboard', compact('product'));
    }
}

?>
In this StripeCheckoutController, the checkout() request is sent with the following parameter.
- Stripe price id.
- Quantity which is set to 1.
- Stripe success callback URL.
- Cancel callback URL.
Once the request is processed in the Stripe server, it redirects to the corresponding callback URLs.
app/Http/Controllers/StripeCheckoutController.php
<?php

namespace App\Http\Controllers;

use Illuminate\Http\Request;

class StripeCheckoutController extends Controller
{
    public function cashierStripeCheckout(Request $request)
    {
        $stripePriceId = env('STRIPE_PRICE_ID');

        $quantity = 1;
        return $request->user()->checkout([$stripePriceId => $quantity], [
            'success_url' => route('checkout-success'),
            'cancel_url' => route('checkout-cancel'),
        ]);
    }
    public function success()
    {
        $successMessage = "We have received your payment request and will let you know shortly.";
        /* Show success template to display the acknowledgement
         of receiving the checkout request */
        return view('success', compact('successMessage'));
    }
    public function cancel()
    {
        $cancelMessage = "You have cancelled the payment. Contact shop admin to post your message.";
        return view('cancel', compact('cancelMessage'));
    }
}
?>
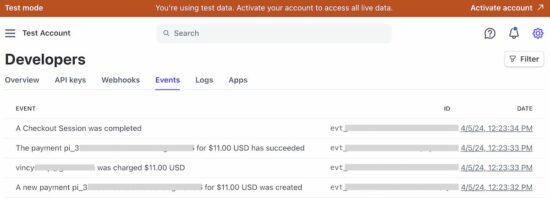
This screenshot shows the sequence of events that occurred during the Stripe checkout. This image displays the Stripe developers’ dashboard with the list of events.
Thus, we have created the Stripe checkout integration with Laravel/Cashier. If you are searching for a Laravel Stripe Integration with the Laravel/stripe package, the linked tutorial has a code.