This tutorial guides to integrate Stripe into a PHP Laravel application. It uses the basic PHP SDK provided by Stripe to access its API.
We have already seen an example of Stripe integration with simple PHP.
Following are the steps to enable Stripe payment gateway in a Laravel app.
- Install Stripe PHP SDK via composer.
- Login to the Stripe dashboard and get the API keys.
- Configure the keys into the Laravel Stripe app.
- Create the app config to return the stripe keys and the product details.
- Design Laravel templates for “payment” and “thank you” pages.
- Initiate the Stripe Checkout from the Laravel app controller.
This example will help to integrate payment features into your simple PHP shopping cart or any eCommerce web application.
1. Install Stripe PHP via composer
Run this composer command to install the stripe-php library into the Laravel App. This library is an intermediary to get use of the Stripe payment API services from the Laravel application.
composer require stripe/stripe-php
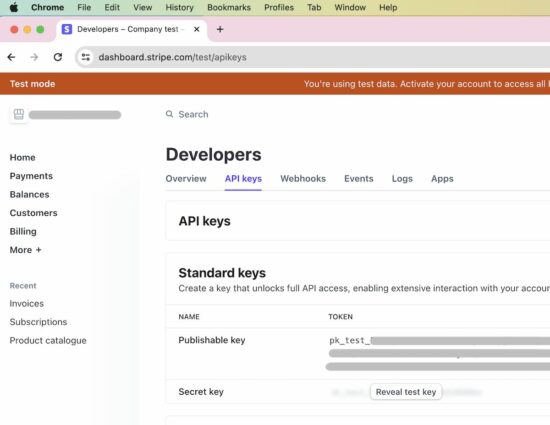
2. Login to the Stripe dashboard and get the API keys
It requires Stripe keys to be configured into the PHP Laravel .env file. Login to the Stripe dashboard and navigate to the “Developers” menu to get the API keys.
3. Configure the keys into the Laravel Stripe app
Then, configure the Stripe publishable key and secret_key in the Laravel .env file. We have seen this in a basic Laravel application created for beginners to implement a product CRUD system.
.env
STRIPE_SECRET_KEY = sk_test_51OIqw1JRNtX7K3SsxQvUoxqtkKZ6GGnhuThMWnbkVs8uYJHO5troMUZVqYVJEVW54tJGTYdtBHaXAh48rAathGno00QqnvZfK6
STRIPE_PUBLISHABLE_KEY = pk_test_51OIqw1JRNtX7K3Ss3PLgYcrIjglMSBBzIBb1vQU6FtNJZN5KPCkLNfxFNOyEGQBVkMcPImdlaRv9zN9bTKioXvnl00AuNE53Zf
These environment variables are used in the Stripe config created for this example.
4. Create the app config to return the stripe keys and the product details
The below PHP file is created in the Laravel app config directory that returns an array of payment provider keys and product for sale.
config/stripe.php
<?php

return [
    'stripe_publishable_key' => env('STRIPE_PUBLISHABLE_KEY'),
    'stripe_secret_key' => env('STRIPE_SECRET_KEY'),

    'product' =>[
        'name' => 'Classic Quartz Watch',
        'description' => 'Water resistant, Stop watch, Alarm features.',
        'price' => 1000,
    ]
];
?>
![]()
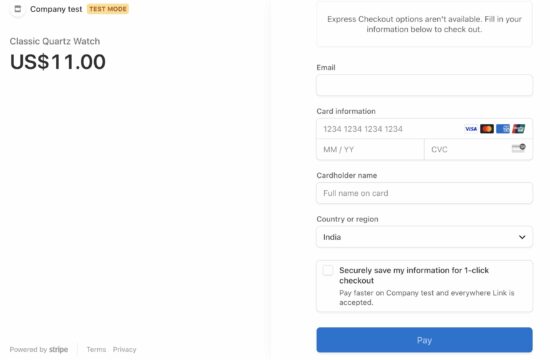
5. Design Laravel templates for “payment” and “thank you” pages
This example has two template files. One is for viewing a product page with a “Buy now” button. The other template is the HTML view for the Laravel Stripe payment’s “success” page.

The below template file, stripe.blade.php shows the product photo, title, and description for the front-end users. It also contains a “Buy now” button that triggers sending the payment request to Stripe.
The “Buy now” link refers to the stripe.checkout route defined in this example for processing the checkout request.
resources/views/stripe.blade.php
<!DOCTYPE html>
<html>
<head>
<meta charset="utf-8">
        <meta name="viewport" content="width=device-width, initial-scale=1">
    <title>Laravel Stripe integration tutorial</title>
    <link href="https://cdn.jsdelivr.net/npm/bootstrap@5.0.2/dist/css/bootstrap.min.css" rel="stylesheet" integrity="sha384-EVSTQN3/azprG1Anm3QDgpJLIm9Nao0Yz1ztcQTwFspd3yD65VohhpuuCOmLASjC" crossorigin="anonymous">
</head>
<body>

<div class="container">

    <h1 class="my-5 text-center">Laravel Stripe integration tutorial</h1>
    <div class="row justify-content-center">
        <div class="col-md-4">
            <div class="card" style="width: 18rem;">
              <img src="{{ asset('images/watch.jpg') }}" class="card-img-top" alt="...">
              <div class="card-body">
                <h5 class="card-title">{{ $product['name'] }}</h5>
                <p class="card-text">{{ $product['description'] }}</p>
                <a href="{{ route('stripe.checkout', ['price' => $product['price'] , 'product' => $product['name']]) }}" class="btn btn-primary">Pay ${{ $product['price'] }}</a>
              </div>
            </div>
        </div>

    </div>

</div>

</body>

</html>
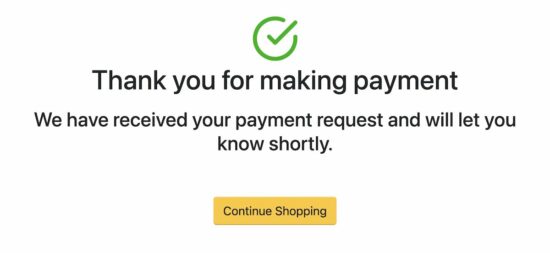
The other template file success.blade.php is created to show an acknowledgment to the customer after making the sale.
This Laravel view page shows a “thank you” message to let the customer know that the one-time payment request has been received.
resources/views/success.blade.php
<!DOCTYPE html>
<html>

<head>
    <meta charset="utf-8">
    <meta name="viewport" content="width=device-width, initial-scale=1">

    <title>Laravel Stripe integration tutorial</title>
    <link href="https://cdn.jsdelivr.net/npm/bootstrap@5.0.2/dist/css/bootstrap.min.css" rel="stylesheet" integrity="sha384-EVSTQN3/azprG1Anm3QDgpJLIm9Nao0Yz1ztcQTwFspd3yD65VohhpuuCOmLASjC" crossorigin="anonymous">
    <style>
        .bg {
            background-color: #ffc72c;
            border-color: #ffd98e #ffbe3d #de9300;
        }

        .bg:hover {
            background-color: #f7c027;
        }
    </style>
</head>

<body>
    <div class="container text-center mt-5 pt-5">
        <img src="{{ asset('check-circle.svg') }}" class="tick-img">
        <h1 class="text-center">Thank you for making payment</h1>
        <h3 class="text-center mt-3">{{ $successMessage }}</h3>

        <a href="{{ route('stripe.index') }}" class="btn mt-5 bg">Continue Shopping</a>
    </div>
</body>

</html>
6. Initiate the Stripe Checkout from the Laravel app controller
This PHP Laravel controller file StripePaymentController.php prepares Stripe payment requests. It sets the line items of the sale, payment method, and success URL with the payment request.
It sets the Stripe secret key with the API instance before using this to call the API service. After receiving the payment request, the API will redirect the user to the success_url with the CHECKOUT_SESSION_ID in its query string.
This CHECKOUT_SESSION_ID is used to get the payment entity status and more details via the Stripe API.
app/Http/Controllers/StripePaymentController.php
<?php

namespace App\Http\Controllers;

use Illuminate\Http\Request;
use Illuminate\Support\Facades\Config;

class StripePaymentController extends Controller
{

    public function stripe()
    {
        $product = Config::get('stripe.product');
        return view('stripe', compact('product'));
    }

    public function stripeCheckout(Request $request)
    {
        $stripe = new \Stripe\StripeClient(Config::get('stripe.stripe_secret_key'));

        $redirectUrl = route('stripe.checkout.success') . '?session_id={CHECKOUT_SESSION_ID}';
        $response =  $stripe->checkout->sessions->create([
            'success_url' => $redirectUrl,
            'payment_method_types' => ['link', 'card'],
            'line_items' => [
                [
                    'price_data'  => [
                        'product_data' => [
                            'name' => $request->product,
                        ],
                        'unit_amount'  => 100 * $request->price,
                        'currency'     => 'USD',
                    ],
                    'quantity'    => 1
                ],
            ],
            'mode' => 'payment',
            'allow_promotion_codes' => false
        ]);

        return redirect($response['url']);
    }

    public function stripeCheckoutSuccess(Request $request)
    {
        $stripe = new \Stripe\StripeClient(Config::get('stripe.stripe_secret_key'));

        $session = $stripe->checkout->sessions->retrieve($request->session_id);
        info($session);

        $successMessage = "We have received your payment request and will let you know shortly.";

        return view('success', compact('successMessage'));
    }
}
?>
Laravel stripe payments web routes
These Laravel web routes are for landing the payment initiating page and thank-you page on the browser. The stripe/checkout URL sends the user request to the handler that initiates creating a Stripe Checkout Session via API.
routes/web.php
Route::get('/', [StripePaymentController::class, 'stripe'])->name('stripe.index');
Route::get('stripe/checkout', [StripePaymentController::class, 'stripeCheckout'])->name('stripe.checkout');
Route::get('stripe/checkout/success', [StripePaymentController::class, 'stripeCheckoutSuccess'])->name('stripe.checkout.success');


Thanks for your dedication.
It’s very useful for junior developer.
Hope you have a great day!
Very good tutorial. Thanks for sharing your knowledge!