Creating a PHP image slideshow can be done in different ways. We need a set of images that are to be used in the slideshow. The image data source can be a file or database from which they are grabbed before running the slideshow.
In this PHP example, let us upload multiple images via a HTML form. Then the uploaded images’ path are used in the slider script to display image slideshow.
There are numerous popular jQuery JavaScript plugins for image slideshow. The slideshow features varies from plugin to plugin. In a previous tutorial, we have seen about how to create a responsive slideshow using ResponsiveSlides.js plugin.
In this example, I am using jQuery Slider library to run the slideshow. The slideshow overlay markup will be specified on the landing page. This markup will be used as the target to run the PHP image slideshow with the stacked images.

What is inside?
- Uses of image slideshow
- Popular jQuery-based libraries for image slider
- About PHP image slideshow example
- File structure
- HTML form with multiple image upload option
- JavaScript validation for the file input object
- PHP code to upload multiple image files
- Server-side image validation
- JQuery script for image slider
- Custom jQuery code for displaying image gallery
- PHP image slideshow output
Uses of image slideshow
In a web or mobile application the Image slideshow is used in various places. For example,
- Slideshow will help to highlight image preview for a gallery images.
- In a eCommerce software, the image slideshow is used to showcase product images.
- Site banner uses image slideshow to showcase portfolio.
- Image slideshow will be useful for the product presentation.
Popular jQuery-based libraries for image slider
There are more popular jQuery-based plugins for implementing image slideshow. For example,
- Colorbox – a lightweight customizable lightbox plugin for jQuery.
- Coin Slider – an image slider with unique effects.
I will be writing articles soon on how to use these libraries to create an image slideshow as part of the current series.
Both of these plugins are available under MIT licence. They have many features and also easy to integrate with your application. Check it out!
About PHP image slideshow example
In this tutorial, I have created the code for displaying PHP image slideshow which is sleek and simple. It uses jQuery lightbox to popup the current slide among the slider images. Slideshow navigation is configured to be done by explicit click of the navigation links.
The slide images are initialised from the $_FILES global array. The file input data submitted via a HTML form is posted to the PHP. The posted file data is read from the PHP $_FILES array with the reference file input object index.
In this example, the file input option is set with the multiple property. Hence, the user could choose more than image file while browsing the file explorer.
Instead of using the HTML multiple property, I prefer to use add more feature to dynamically append more file input field to the form. Comparatively, it will be more comfortable than the default bulk selection method.
On submitting the selected files via the form, the PHP code will store them to a target location. Then, a gallery view stored images will be shown to the user with Start Slideshow control.
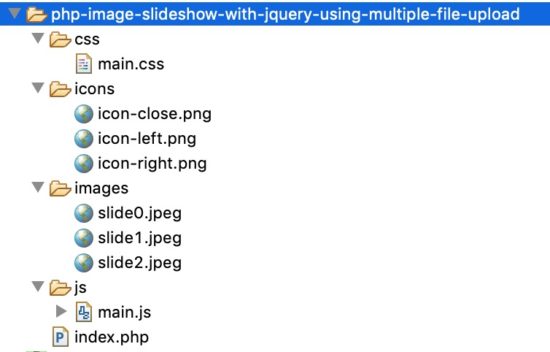
File structure
The following screenshot shows the simple file structure of this example created in PHP with a jQuery based plugin. The images folder is the target to store the uploaded images. Then, this folder files are extracted by using PHP glob() to display the PHP image slideshow.
HTML form with multiple image upload option
This form contains file input to allow the user to choose multiple image files to upload. The attribute “multiple” allows the user to select more than one file at a time. We can upload multiple files.
The multiple files will be available in the form of an array. We can loop through each file and access the image file. On submitting this form, the image file will sent to PHP to upload it into the target directory. The enctype value “multipart/form-data” are required for uploading files in form.
<!doctype html>
<html lang="en">
<head>
<meta charset="utf-8">
<meta name="viewport" content="initial-scale=1">
<!-- Main CSS -->
<link rel="stylesheet" href="css/main.css">

<title>PHP Image Slideshow</title>
</head>
<style>
body {
    max-width: 960px;
    margin: 0 auto;
    font-family: arial;
}

.gallery {
    padding: 40px 0px;
}

.galleryItem {
    width: 300px;
    display: inline-block;
    padding-right: 15px;
}

.galleryItem img {
    width: 100%;
}
</style>
<body>
    <div class="container py-4">
        <h1>PHP Image Slideshow</h1>
        <body>
            <form action="index.php" id="image" name='image'
                method="POST" enctype="multipart/form-data"
                onsubmit="return validate();">
                <div class="form-row">
                    <input type="file" id="file-input" name="file-input[]"
                        multiple="multiple">
                </div>
                <div class="button-row">
                    <input type="submit" id="submit" name="submit"
                        value="Post to Slideshow"><span id="validation_error"></span>
                </div>
            </form>
        </body>
        <div>

        </div>
        <div class="galleryShadow"></div>
        <div class="galleryModal">
            <i class="galleryIcon gIquit close"></i> <i
                class="galleryIcon gIleft nav-left"></i> <i
                class="galleryIcon gIright nav-right"></i>
            <div class="galleryContainer">
                <img src="">
            </div>
        </div>
    </div>
    <script src="https://code.jquery.com/jquery-3.3.1.min.js"></script>
    <!-- Main JS -->
    <script src="js/main.js"></script>
</body>
</html>
JavaScript validation for the file input object
The following script shows the basic JavaScript validation to check if the files count is greater than 0.
This script will be executed on the form submit event. This validation script is to check if the user select atleast 1 image before posting the form data to the PHP. If no file is choosen, this validation script will return FALSE and display the error message on the browser.
<script src="https://code.jquery.com/jquery-3.3.1.min.js"></script>
<script>
function validate() {
	    if($("#file-input").val() == "") {
        $("#validation_error").html("Please select image files");
        return false;
    }
    return true;
}
</script>
PHP code to upload image files
We have already seen several image upload examples in PHP. For example, single or multiple image upload, AJAX file upload, Handling uploads with libraries like FineUploader, ImageParser and more.
In this example, the uploaded files are moved to the specified target. The $_FILES array is iterated with respect to the corresponding index. As we have selected multiple images by using the form’s file input, the $_FILES array will be multi dimensional as shown below.
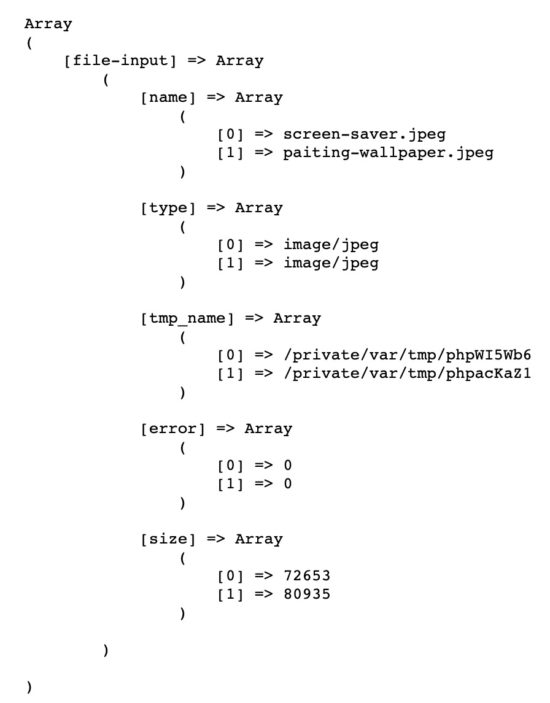
The files are stored in the images folder as specified as the target while invoking the move_upload_files().
<?php
    if(isset($_POST['submit'])){
        if(count($_FILES['file-input']['name']) > 0){
                    for($i=0; $i<count($_FILES['file-input']['name']); $i++) {
                        $File_dir = $_FILES['file-input']['tmp_name'][$i];
                        $save = "images/".$_FILES['file-input']['name'][$i];
                        move_uploaded_file($File_dir, $save) ;
                    }
                $dir = "images/";
                $photo = glob($dir."*.jpeg");
                foreach($photo as $photos){?>
                    <div class="galleryItem">
                        <img src="<?php print_r($photos) ?>">
                    </div>
                  <?php
                }?>
                <div class="button-row1">
                <input type='submit' id='slideshow' name='slideshow'  value='Start to Slideshow'>
                </div>
      <?php }}?>
PHP File Upload Functions
While uploading files using PHP, the is_uploaded_file() and move_upload_file() are used. The is_uploaded_file() function is used to check if the files is uploaded via the HTTP POST.
Once the validation is completed the move_upload_file() is used to transfer the files from $_FILES[‘file-input’][‘tmp_name’] to the /images/ target.
PHP glob() Function
The PHP glob() function is used to get the images path that matches the specified pattern. In this example, I specify the pattern “images/*.jpeg” to get the uploaded images from the target folder.
This function will return the matched file paths in an array format. The resultant array can be iterated to process with the file path on each iteration.
In this PHP image slideshow example, the glob() function’s output is processed with a foreach() statement. On each iteration the image tile markup is created with the dynamic path. This is to show the gallery view after form submit.
Server-side image validation
In the server-side PHP script, the $_FILES array length is checked if it is greater than 0. If so, then the file upload process will be proceeded forward.
Since it is multi-file upload, the PHP file upload function is called on each loop iteration of the $_FILES global array.
If the $_FILES array is empty and returns 0 while calculating the elements count, then the file upload script will not be executed.
JQuery script for image slider
In the main.js file the Start Slideshow button click events are handled to begin the dynamic image slideshow. The slideshow will be shown with the overlay body with slider navigation and Quit action controls.
On clicking the Start Slideshow, quit, prev, next action controls, the slideshow state will be changed. On loading and quitting the image slideshow, the jquery fade-in and fade-out effects are created for the slide overlay.
In the image slideshow the previous and next action controls are used to move the slider images back and forth. The galleryNavigate() function is used to move the image slides. This script is used to invoke the function to shift to the previous or next image slides.
$(function () {
    $('.gIquit').click(function () {
        $('.galleryModal').css({ 'transform': 'scale(0)' })
        $('.galleryShadow').fadeOut()
    })
    $('#slideshow').click(function (){
        galleryNavigate($('.galleryItem'), 'opened')
        $('.galleryModal').css({ 'transform': 'scale(1)' })
        $('.galleryShadow').fadeIn()
    })

    let galleryNav
    let galleryNew
    let galleryNewImg
    let galleryNewText
    $('.gIleft').click(function () {
        galleryNew = $(galleryNav).prev()
        galleryNavigate(galleryNew, 'last')
    })
    $('.gIright').click(function () {
        galleryNew = $(galleryNav).next()
        galleryNavigate(galleryNew, 'first')
    })


    function galleryNavigate(gData, direction) {
        galleryNewImg = gData.children('img').attr('src')
        if (typeof galleryNewImg !== "undefined") {
            galleryNav = gData
            $('.galleryModal img').attr('src', galleryNewImg)
        }
        else {
            gData = $('.galleryItem:' + direction)
            galleryNav = gData
            galleryNewImg = gData.children('img').attr('src')
            $('.galleryModal img').attr('src', galleryNewImg)
        }
        galleryNewText = gData.children('img').attr('data-text')
        if (typeof galleryNewText !== "undefined") {
            $('.galleryModal .galleryContainer .galleryText').remove()
            $('.galleryModal .galleryContainer').append('<div class="galleryText">' + galleryNewText + '</div>')
        }
        else {
            $('.galleryModal .galleryContainer .galleryText').remove()
        }
    }
})
Custom jQuery code for displaying image gallery
In a previous tutorial, we have seen custom code for creating image slideshow with jQuery library without using exclusive slideshow plugin.
Creating custom code is always good by having its advantages. It will have more flexibility to add features or to make any changes. Also, it will be good for easy maintenance.
The following code shows the jQuery script for creating image slideshow. This slideshow will run automatically without previous next navigation links.
If you are not ready to use slideshow plugins, then this script will be helpful for you to create slideshow.
<div id="image-slide">
	<img class="slide" src="slides/beach1.jpg"/>
	<img class="slide" src="slides/beach2.jpg"/>
	<img class="slide" src="slides/beach3.jpg"/>
	<img class="slide" src="slides/beach4.jpg"/>
	<img class="slide" src="slides/beach5.jpg"/>
</div>
<script>
$(document).ready(function() {
    $(".slide:first").show();
    setInterval(function(){ Next($('.slide:visible'))}, 2400);

});
function Next(slide) {
    slide.fadeOut();
    if(typeof slide.next().attr('src') !== 'undefined') {
        slide.next().fadeIn();
    } else {
        $('.slide:first').fadeIn();
    }
}
</script>
In the above code, I have used static images for the slideshow. Replace this image slider source with the dynamic images read from the database or file source.
PHP image slideshow output
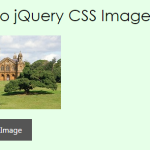
The below screenshot shows the output of multi-file upload option and gallery view of the uploaded images. Also, the second screenshot shows the image slideshow with jQuery lightbox effect.
Screenshot for the Image upload option with Gallery
In this screenshot the Post to Slideshow button is the form submit button. On successful submit the uploaded images are displayed in a gallery view below the form as shown in this screenshot.
The gallery display contains a button control to start the image slideshow for the gallery images.

Conclusion
Some users look at the slideshow as a design factor for adding gimmick. It is not true, but adds more value if we put the slideshow in a right place for right scenario. In your eCommerce store, if you want to showcase your product with various perceptional views then the slideshow will be a best suit.
By identifying best and simple slideshow plugin, its a matter of few minutes to implement a slideshow for your application.
Since adding more libraries will increase the load and thereby slow down the application, choosing correct plugin is important if it is required and unavoidable. Creating own code for implementing simple things are my strong recommendation.
Hope, this PHP image slideshow example and the custom script guides you enough to build a cool image slideshow.


Thanks you so much.
Welcome Oholiab.
This is a very good PHP tutorial content. I learned a lot about it.Many Thanks Vincy!
Thank you Oski.
Very good tuto , thanks @ Vince
Welcome Sanic.