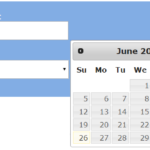
Datepicker is a wonderful option provided with the user interface to facilitate users to select a date in the correct format. In this article, we are going to add a date picker to a web page, using the jQuery plugin.
jQuery Datepicker plugin is provided with various options and methods, that are used to customize the date picker user interface and the calendar widget.
Let us have an example, to see how to add this plugin to provide the date picker user interface to a web page. With this example, first, we are going to display the calendar in a default manner without using any customization with the help of the options and methods provided.
For adding a jQuery date picker, we need to go with the following steps.
- Add require javascript library files as usual as we have done with another jQuery event handler, like, Drag/Drop, Show/Hide and etc., to access jQuery methods and options required./li>
- Link web page with external CSS that contains styles for calendar theme.
- Invoke date picker event handlers to show the calendar widget to be the popup.
<html>
<head>
<title>JQuery DatePicker</title>
<link rel="stylesheet"
	href="http://code.jquery.com/ui/1.10.3/themes/smoothness/jquery-ui.css" />
<script src="http://code.jquery.com/jquery-1.9.1.js"></script>
<script src="http://code.jquery.com/ui/1.10.3/jquery-ui.js"></script>
<script>
$(function() {
$( "#txtDate" ).datepicker();
});
</script>
</head>
<body>
	<div>
		Select Date: <input type="text" id="txtDate" />
	</div>
</body>
</html>
In the above code, we have added the required Javascript libraries as the source of accessing jQuery built-in functions. For that, we can refer to these libraries either by using a direct URL that requires the internet or we can make a local copy of these files by downloading the latest version from jQuery’s official website.
After that, the date picker() is invoked with the reference of the HTML input element id. So, by default, the input element is the target, where the selected date will be displayed, and also, used to trigger event to popup calendar widget.
If we want to have two elements separately, for triggering the date picker event and for populating the response, we need to go with the available jQuery date picker plugin options and methods.
Datepicker Options Methods in jQuery
There are several options and methods provided by the jQuery Datepicker plugin. For example, the following list contains some of the jQuery plugin options that are used to customize date picker settings.

Options
- buttonImage – This option contains the path or name of an image to be shown, on clicking what the calendar widget will be the popup.
- buttonImageOnly – This date picker option is to show only the image without any button effect around it.
- buttonText – This option is like the alt attribute of an HTML <img> tag, which is used to show alternate text given if there is any problem on showing an image to the browser.
- showOn – It can contain values like focus, button and both to popup calendar widget with respective event occurrences, like, on focusing target input field, on clicking a button.
- dateFormat – As we can guess easily what this option is used, it is for giving the required format of the selected date.
- minDate, maxDate – It will show a minimum and a maximum number of dates that are able to select, respectively.
All options including those that are not specified in the above list, are used to apply changes with respect to a specific selector.
Let us have an example to work with date picker some of the options from the above list.
<html>
<head>
<title>JQuery DatePicker</title>
<link rel="stylesheet"
	href="http://code.jquery.com/ui/1.10.3/themes/smoothness/jquery-ui.css" />
<script src="http://code.jquery.com/jquery-1.9.1.js"></script>
<script src="http://code.jquery.com/ui/1.10.3/jquery-ui.js"></script>
<script>
$( "#txtDate" ).datepicker({
showOn: "button",
buttonImage: "datepicker_icon.png",
buttonText: "Date Picker",
buttonImageOnly: true});
});
</script>
</head>
<body>
	<div>
		Select Date: <input type="text" id="txtDate" />
	</div>
</body>
</html>
If you don’t have such an image as specified in the above script, then, the value of the buttonText option will be shown to the browser.
Methods
Datepicker methods are used to perform various functions including some familiar date functions, such as date getters and setters. Some of these functions are,
- getDate – To get the current date.
- setDate – To set a specified date that should be in the current date format.
- hide – To clear the recently opened calendar display.
- option – This function will be used as a date picker option getter or setter based on the argument received. For example, if there is no argument while invoking this method then, it will return all available selector options as key and value pairs. If we pass the option name and value for it, then, the value will be set for the option name given.
Apart from the above list of a function, this plugin also includes some utility functions for performing operations like clearing default date picker settings, formatting dates and so on.
For example, setDefaults() function is used to clear the default setting by specifying required options and values. And the code is,
<html>
<head>
<title>JQuery DatePicker</title>
<link rel="stylesheet"
	href="http://code.jquery.com/ui/1.10.3/themes/smoothness/jquery-ui.css" />
<script src="http://code.jquery.com/jquery-1.9.1.js"></script>
<script src="http://code.jquery.com/ui/1.10.3/jquery-ui.js"></script>
<script>
$.datepicker.setDefaults({
showOn: "button",
buttonImage: "datepicker_icon.png",
buttonText: "Date Picker",
buttonImageOnly: true
});
$(function() {
$( "#txtFromDate" ).datepicker();
});
</script>
</head>
<body>
	<div>
		From Date: <input type="text" id="txtFromDate" />
	</div>
	</div>
</body>
</html>
Using this setDeafults() function, we can apply options once for all date picker instances available on our website.


Thanks for this jquery datepicker tutorial. Really simple and helpful.