EmailJS is a cloud service that supports to enable the frontend to send email without any backend. All we need is to create an EmailJS account and configure it to the frontend application.
This tutorial shows the step-by-step procedure to learn how to enable email sending in a React application using EmialJS.
Steps to allow EmailJS to send mail
1. Signup with EmailJS service
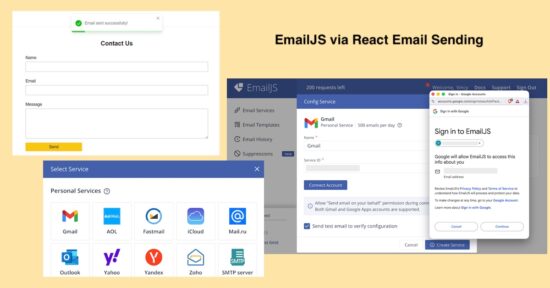
First signup and login with EmailJS dashboard. It’s a free and enables mail sending via various services supported.
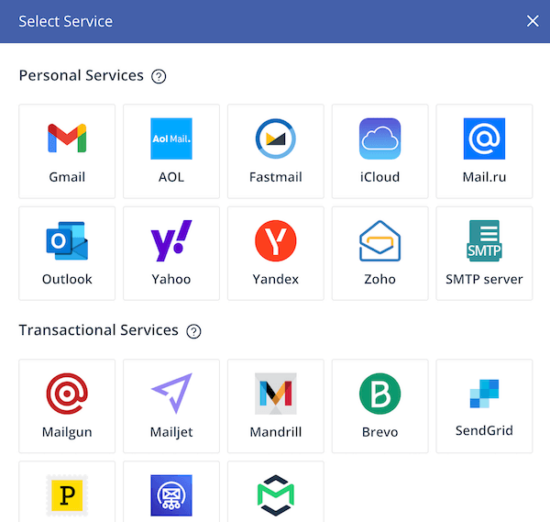
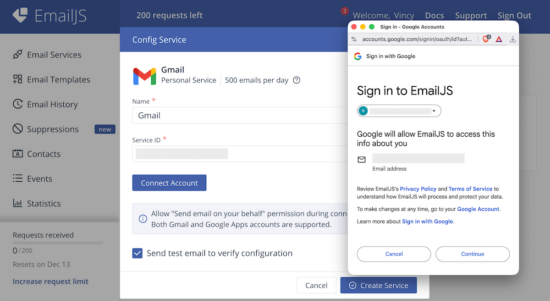
2. Choose service provider via Add New Service -> Select Service
It supports various services like Gmail, Yahoo and etc. It also have settings to configure custom SMTP server with this online solution.
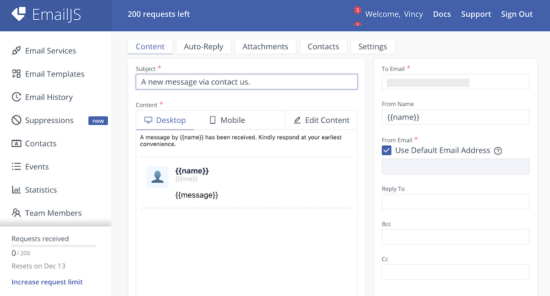
3. Design mail template by Email Templates -> Create New Template -> Select Template
There are various built-in templates in the EmailJS dashboard. I selected the “Contact Us” template for this example.
Template edit interface has the option to change the design and the content. It allows to add dynamic variables as part of the mail content.
When calling the EmailJS service, the request will have values to replace this variables. This feature will help to send a personalized email content.
Copy the Template ID once created an email template.
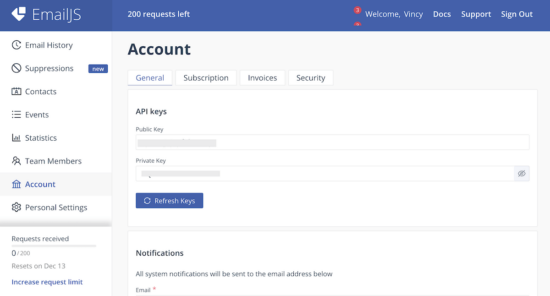
4. Get EmailJS API Public Key
Added Service ID, Template ID the EmailJS Public Key is also need to initiate the library class from the frontend React App.
Navigate via Account using the left menu to open the API keys section. Copy Public Key from the EmailJS dashboard.
Initiate EmailJS library to React App
Create a React app and install the EmailJS library to it using this command.
npm install emailjs-com
This example code contains this library installed. So, just run npm install to bring the dependancies into your node_modules.
Then, import the emailjs-com to the React JSX and initiate the EmailJS service as shown below. This script shows how the emailjs instance is used in the form handle submit.
import emailjs from "emailjs-com";
   const handleSubmit = (e) => {
    e.preventDefault();
    const SERVICE_ID = "Your Serivce ID";
    const TEMPLATE_ID = "Your Template ID";
    const PUBLIC_KEY = "EmailJS API Public key here";
    emailjs
      .send(SERVICE_ID, TEMPLATE_ID, formData, PUBLIC_KEY)
      .then(() => {
        toast.success("Email sent successfully!", { position: "top-center" });
        setFormData({ name: "", email: "", message: "" });
      })
      .catch(() => {
        toast.error("Failed to send email. Please try again.", {
          position: "top-center",
        });
      });
  };
Example React form to send email
This example provides component for the email sending form fields. The fields UI code is moved to a separate file and made as a component. It is imported into the parent container in the EmailForm component.
It renders Name, Email and Message fields. Each fields is validated with a handleChange hook.
src/components/EmailFormFields.jsx
const EmailFormFields = ({ formData, handleChange }) => {
return (
  <>
    <div className="form-group">
      <label className="form-label">Name</label>
      <input type="text" name="name"
        value={formData.name}
        onChange={handleChange}
        className="form-input"
        required
      />
    </div>
    <div className="form-group">
      <label className="form-label">Email</label>
      <input type="email" name="email"
        value={formData.email}
        onChange={handleChange}
        className="form-input"
        required
      />
    </div>
    <div className="form-group">
      <label className="form-label">Message</label>
      <textarea name="message"
        value={formData.message}
        onChange={handleChange}
        className="form-input"
        rows="6"
        required
      ></textarea>
    </div>
  </>
);
};
export default EmailFormFields;
React JSX to load EmailJS and EmailFormFields Component
This JSX defines the handleChange and handleSubmit hooks for validation and mail sending respectively.
The form container includes the <EmailFormFields />, Submit button and a <ToastContainer />.
After sending email via emailjs, the handleSubmit action resets the form and make it ready for the next submit.
When submitting the form, the handleSubmit function sends the formData with the API keys and IDs. Configure your EmailJS keys and IDs to this React script to make this example to send email.
src/components/EmailForm.jsx
import { useState } from "react";
import emailjs from "emailjs-com";
import { ToastContainer, toast } from "react-toastify";
import "react-toastify/dist/ReactToastify.css";
import "../../public/assets/css/phppot-style.css";
import EmailFormFields from "./EmailFormFields";

const EmailForm = () => {
  const [formData, setFormData] = useState({
    name: "",
    email: "",
    message: "",
  });
  const handleChange = (e) => {
    const { name, value } = e.target;
    setFormData((prev) => ({ ...prev, [name]: value }));
  };
  const handleSubmit = (e) => {
    e.preventDefault();
    const SERVICE_ID = "Your Serivce ID";
    const TEMPLATE_ID = "Your Template ID";
    const PUBLIC_KEY = "EmailJS API Public key here";
    emailjs
      .send(SERVICE_ID, TEMPLATE_ID, formData, PUBLIC_KEY)
      .then(() => {
        toast.success("Email sent successfully!", { position: "top-center" });
        setFormData({ name: "", email: "", message: "" });
      })
      .catch(() => {
        toast.error("Failed to send email. Please try again.", {
          position: "top-center",
        });
      });
  };
  return (
    <div className="form-wrapper">
      <h2 className="form-title">Contact Us</h2>
      <form onSubmit={handleSubmit} className="payment-form">
        <EmailFormFields formData={formData} handleChange={handleChange} />
        <button type="submit" className="submit-btn">
          Send
        </button>
      </form>
      <ToastContainer />
    </div>
  );
};
export default EmailForm;
Note: Form data is in an associate array format, where the array keys matches the email template variables. For example, if the email template body in the EmailJS dashboard contains Hi {{name}}, then the form data will have the key-value as name: submitted-name to replace the variable.
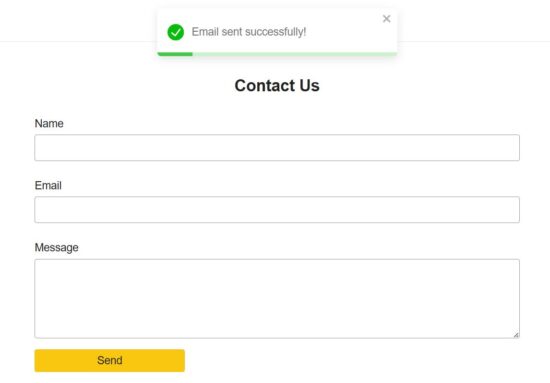
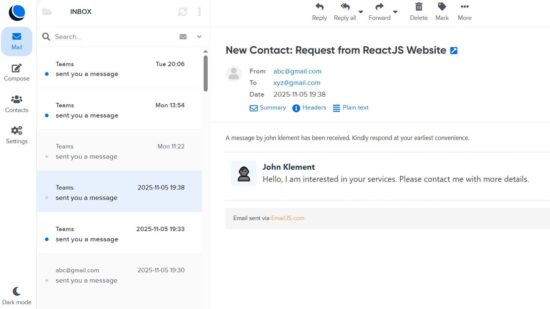
The receive email signature and the mail body design will be as configured in the EmailJS dashboard. The following diagram shows the received email output.
Conclusion
Thus, we have created a frontend in React for sending email without any backend set up. I hope, you find EmailJS very simple to integrate into an application. And its registration process is very simple. And, the features to customize the email body is very useful to have a thematic email template for different applications.