Stripe provides more options for integrating payments into an application. I choose the low-code Stripe checkout option by redirecting to a hosted pre-built payment form. It’s a very easy way of integrating payment with minimal steps. Previously, we saw the Stripe implementation procedure for a core PHP application.
If you are looking for a Stripe checkout integration code for your React app, this tutorial will show you how. This React example contains a shopping cart with a checkout button. The cart management is with basic features like adding and removing the cart item.
When clicking the checkout button, it calls the Stripe PHP API service created for this application. This service is launched at the backend to handle Stripe checkout. It starts the checkout session lifecycle through the PHP Stripe SDK.
The below sections provides guidance with a step-by-step process of Stripe payment integration for a React shopping cart. It explains payment configurations, library integration needed to enable the payment feature.
React project setup
1. Download and extract the React project bundle from this tutorial
Download the React project zip from this article and extract into your environment.
2. Create node_modules to import elements for cart and checkout React components
Execute npm install to get the dependencies as specified in the package.json.
This example using the mdb-react-ui-kit frontend library to get a ready-to-use and responsive shopping cart checkout interface.
Part of ReactStripeIntegration.jsx
import {
  MDBBtn,
  MDBCard,
  MDBCardBody,
  MDBCardHeader,
  MDBCol,
  MDBContainer,
  MDBIcon,
  MDBInput,
  MDBListGroup,
  MDBListGroupItem,
  MDBRipple,
  MDBRow,
  MDBTooltip,
  MDBTypography,
} from "mdb-react-ui-kit";
3. Include Stripe JavaScript library
The Stripe JavaScript library is included into the page that contains the React shopping cart root container. It helps to get the reference of the Stripe object to initiate Stripe checkout.
<script src="https://js.stripe.com/clover/stripe.js"></script>
4. Copy the server-side endpoint to the PHP root and specify path in React hook
This example code will contain an api endpoint in /api/react-stripe-action.zip. Unzip this into your PHP environment.
Change the endpoint root in the React script. Spot the following code to change target of the Stripe API service created in PHP.
const response = await fetch('http://localhost/react-stripe-action/ajax/create-checkout-session.php', {
PHP backend configuration
1. Generate Stripe API keys.
I assume that you know how to get the Stripe API keys. If not, you can check the link to know how to get the API client id and secret key from the Stripe developers dashboard.
Generate API keys using the Stripe dashboard. Login to the Stripe developers account and get the keys from https://dashboard.stripe.com/account/apikeys.
2. Configure the keys in the PHP service config created for this example
react-stripe-action/config.php
<?php
namespace Phppot;

class Config
{

    const WORK_ROOT = 'YOUR_FULL_DOMAIN/react-stripe-action/';

    /* Stripe API test keys */
    const STRIPE_PUBLISHIABLE_KEY = "";

    const STRIPE_SECRET_KEY = "";

    const CURRENCY = 'USD';
}
Set the Stripe secret key in the service class constructor. It will be used for requesting a Stripe checkout session creation later.
react-stripe-action/lib/StripeService.php
<?php
namespace Phppot;

use Slim\Http\Request;
use Slim\Http\Response;
use Stripe\Stripe;


require_once __DIR__ . '/../config.php';

class StripeService
{
    function __construct()
    {
        require_once __DIR__ . "/../vendor/autoload.php";
        \Stripe\Stripe::setApiKey(Config::STRIPE_SECRET_KEY);
    }
}
?>
3. Install Stripe PHP SDK via composer
Run this command and include the vendor/autoload.php file in StripeService class as shown in the above code.
composer require stripe/stripe-php
Frontend Checkout Implementation
There are three components in the React frontend.
- Shopping cart table view.
- Product gallery to add more items to the cart.
- Checkout interface.
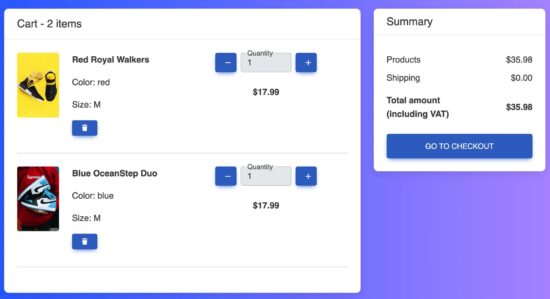
1. Shopping cart table view
The table rows are shown by iterating the cart array stored in the JS localStorage variable. Each row contains cart-edit controls to increment or decrement the cart item quantity and to delete a particular row.
The below code shows the Material Design Bootstrap element to display the shopping cart row and columns.
Part of ReactStripeIntegration.jsx
<MDBRow>
<MDBCol lg="3" md="12" className="mb-4 mb-lg-0" style={{ width: '16%' }}>
<MDBRipple rippleTag="div" rippleColor="light" className="bg-image rounded hover-zoom hover-overlay">
<img src={item.img} className="w-100" alt={item.name} style={{ width: '120px' , height: '120px' ,
objectFit: 'cover' }} />
<a href="">
<div className="mask" style={{ backgroundColor: "rgba(251, 251, 251, 0.2)" , }}></div>
</a>
</MDBRipple>
</MDBCol>
<MDBCol lg="5" md="6" className=" mb-4 mb-lg-0">
<p>
<strong>{item.name}</strong>
</p>
<p>Color: {item.color}</p>
<p>Size: {item.size}</p>
<MDBTooltip wrapperProps={{ size: "sm" }} wrapperClass="me-1 mb-2" title="Remove item">
<MDBIcon fas icon="trash" style={{ cursor: "pointer" }} onClick={()=> removeItem(item.id)}
/>
</MDBTooltip>
{}
</MDBCol>
<MDBCol lg="4" md="6" className="mb-4 mb-lg-0">
<div className="d-flex mb-4" style={{ maxWidth: "300px" }}>
<MDBBtn className="px-3 me-2" onClick={()=> decrementQty(item.id)}
disabled={item.qty === 0}
>
<MDBIcon fas icon="minus" />
</MDBBtn>
<MDBInput value={item.qty} min={0} type="number" label="Quantity" readOnly />
<MDBBtn className="px-3 ms-2" onClick={()=> incrementQty(item.id)}
>
<MDBIcon fas icon="plus" />
</MDBBtn>
</div>
<p className="text-start text-md-center">
<strong>${(item.price * item.qty).toFixed(2)}</strong>
</p>
</MDBCol>
</MDBRow>
2. Product gallery
A collection of MDBCard elements builds the product gallery. The product card in the gallery contains an option to add that item to the shopping cart. The “Add-to-cart” click event behaviour is controlled based on if the item already exists in the cart.
If exists it increments the quantity. Otherwise, it adds a new entry to the localStorage.
Part of ReactStripeIntegration.jsx
<MDBCard className="mb-4">
   <MDBCardHeader>
      <MDBTypography tag="h5" className="mb-0">
         Add Products
      </MDBTypography>
   </MDBCardHeader>
   <MDBCardBody>
      <MDBRow>
         {initialCart.map((item) => (
         <MDBCol key={item.id} md="3" className="mb-4">
            <MDBCard>
               <MDBRipple rippleTag="div" rippleColor="light" className="bg-image rounded hover-zoom hover-overlay"
                  style={{ display: "flex" , justifyContent: "center" , alignItems: "center" , height: "120px" }}>
                  <img src={item.img} alt={item.name} style={{ width: "120px" , height: "120px" , objectFit: "cover"
                     }} />
               </MDBRipple>
               <MDBCardBody className="text-center">
                  <p>{item.name}</p>
                  <MDBBtn size="sm" onClick={()=> {
                     setCart((prev) => {
                     // If item exists, increment qty, otherwise add it
                     const exists = prev.find((i) => i.id === item.id);
                     if (exists) {
                     return prev.map((i) =>
                     i.id === item.id ? { ...i, qty: i.qty + 1 } : i
                     );
                     } else {
                     return [...prev, { ...item, qty: 1 }];
                     }
                     });
                     }}
                     >
                     Add to Cart
                  </MDBBtn>
               </MDBCardBody>
            </MDBCard>
         </MDBCol>
         ))}
      </MDBRow>
   </MDBCardBody>
</MDBCard>
3. Checkout interface
The above shopping cart components are already seen in the previous tutorial. This checkout session is new component that connects the React hook to handle a Stripe checkout.
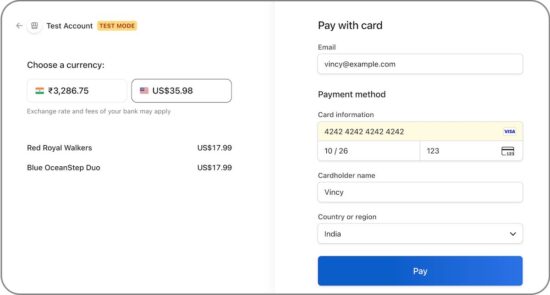
This component displays the cart total with shipping amount (0 here) with a “Go to checkout” button. On clicking this button, the custom hook in the name handleCheckout is called. It calls the PHP API to create Stripe checkout session.
This function receives the prebuilt-hosted-checkout URL from the API.
Part of ReactStripeIntegration.jsx
<MDBCard className="mb-4">
   <MDBCardHeader>
      <MDBTypography tag="h5" className="mb-0">
         Summary
      </MDBTypography>
   </MDBCardHeader>
   <MDBCardBody>
      <MDBListGroup flush="true">
         <MDBListGroupItem className="d-flex justify-content-between align-items-center border-0 px-0 pb-0">
            Products
            <span>${total.toFixed(2)}</span>
         </MDBListGroupItem>
         <MDBListGroupItem className="d-flex justify-content-between align-items-center px-0 border-0">
            Shipping
            <span>$0.00</span>
         </MDBListGroupItem>
         <MDBListGroupItem className="d-flex justify-content-between align-items-center border-0 px-0 mb-3">
            <div>
               <strong>Total amount</strong>
               <strong>
                  <p className="mb-0">(including VAT)</p>
               </strong>
            </div>
            <span>
               <strong>${total.toFixed(2)}</strong>
            </span>
         </MDBListGroupItem>
      </MDBListGroup>


      <MDBBtn block size="lg" onClick={handleCheckout}>
         Go to checkout
      </MDBBtn>
   </MDBCardBody>
</MDBCard>
Managing Cart and Handling Stripe Checkout
The below JavaScript code is part of the ReactStripeIntegration component. It defines the cart status with the React useState and manages by using custom hooks that add/edit/delete cart items.
For demonstration purpose, it initiate cart variable to have two products. When the handleCheckout function receives the API response, it parse the Stripe checkout URL and redirect the user to that.
Part of ReactStripeIntegration.jsx
import React, { useState, useEffect } from "react";

import "mdb-react-ui-kit/dist/css/mdb.min.css";
import "@fortawesome/fontawesome-free/css/all.min.css";

export default function PaymentMethods() {
  const initialCart = [
    {
      id: 1,
      name: "Blue OceanStep Duo",
      color: "blue",
      size: "M",
      price: 17.99,
      qty: 0,
      img: "images/blue.jpg",
    },
    {
      id: 2,
      name: "Red Royal Walkers",
      color: "red",
      size: "M",
      price: 17.99,
      qty: 0,
      img: "images/yellow.png",
    },
  ];

  // Store cart items in a localStorage
  const [cart, setCart] = useState(() => {
    const storedCart = localStorage.getItem("cart");
    return storedCart ? JSON.parse(storedCart) : initialCart;
  });

  useEffect(() => {
    localStorage.setItem("cart", JSON.stringify(cart));
  }, [cart]);


  const incrementQty = (id) => {
    setCart((prev) =>
      prev.map((item) =>
        item.id === id ? { ...item, qty: item.qty + 1 } : item
      )
    );
  };

  const decrementQty = (id) => {
    setCart((prev) =>
      prev.map((item) =>
        item.id === id && item.qty > 0 ? { ...item, qty: item.qty - 1 } : item
      )
    );
  };

  const removeItem = (id) => {
    setCart((prev) => prev.filter((item) => item.id !== id));
  };

  const total = cart.reduce((acc, item) => acc + item.price * item.qty, 0);

  // Go to checkout button handler
  const handleCheckout = async () => {
      try {
        const response = await fetch('http://localhost/react-stripe-action/ajax/create-checkout-session.php', {
          method: 'POST',
          headers: { 'Content-Type': 'application/json' },
          body: JSON.stringify({ unitPrice: total, cartItems: cart })
        });
        const session = await response.json();
        var responseObj = JSON.parse(session);
        console.log('Checkout session:', responseObj.checkout_url);

        if (responseObj.checkout_url != "") {
         window.location.href = responseObj.checkout_url;
        }

      } catch (error) {
        console.error('Error:', error);
      }
  };
}
Payment response handling
In the PHP endpoint, the Stripe checkout session object is built with the success and cancel URL. Those are to redirect the user after payment is completed.
The below JSX files have the static content to show the success and failure responses.
StripePaymentSuccess.jsx
import React from "react";

import "mdb-react-ui-kit/dist/css/mdb.min.css";
import "@fortawesome/fontawesome-free/css/all.min.css";

export default function PaymentMethods() {

  return (
    <section className="h-100 gradient-custom">
   <div className="container-fluid w-100">
      <div className="row justify-content-center py-4">
         <div className="col-md-4">
            <div className="card mb-4">
               <div className="card-header py-3">
                  <h5 className="mb-0">Payment Response</h5>
               </div>
               <div className="card-body">
                  <div className="row">
                     <h3>Thank you for shopping with us!</h3>
                  </div>
               </div>
            </div>
         </div>
      </div>
   </div>
</section>
  );
}
StripePaymentCancel.jsx
<div className="col-md-4">
   <div className="card mb-4">
      <div className="card-header py-3">
         <h5 className="mb-0">Payment Cancelled</h5>
      </div>
      <div className="card-body">
         <div className="row">
            <p>You have cancelled the payment. Contact admin if you have any question in completing the payment process!
            </p>
         </div>
      </div>
   </div>
</div>
The React app has the route definition for these pages. We can make these pages have dynamic data like the Stripe payment indent id.
Part of App.jsx
...
import StripePaymentSuccess from './components/StripePaymentSuccess';
import StripePaymentCancel from './components/StripePaymentCancel';
...
...
<Route path="/success" element={<StripePaymentSuccess />} />
<Route path="/cancel" element={<StripePaymentCancel />} />
...
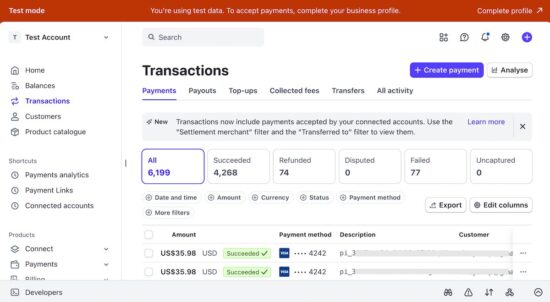
Testing Stripe integration
After completing the Stripe checkout session life cycle, the sequence of events that occurred during the process can be seen in the Stripe dashboard.
Login to the Stripe developer dashboard and navigate to “Transactions” to see the test payment made through the above React+Stripe integration example code flow.
Conclusion
We have integrated Stripe’s easiest method of integrating a payment gateway to a React application. The shopping cart has the an unavoidable need to have a payment option mostly. So, we have seen one of the most wanted software requirements in an eCommerce platform.
Stripe is the best choice to accomplish this mission perfectly and easily. I created lots of Stripe payment gateway integration example and shared them in this blog. For example, we have seen Stripe subscription payment, Stripe Apple pay integration and more.
References: